Tag Archives: how to

Let’s Ask: You’re in a Curling League?

Liz: So, tell me about curling. What is it? Why does it involve—

Anastasia: —the brooms?

Liz: Yeah, brooms.

Anastasia: Do you not know anything about curling?

Liz: I think there’s a Norwegian team that has weird pants? That’s what I know. And it shows up on the Olympic schedule. Actually I did see a good analogy for it the other day. Someone said something on Facebook about how curling is like bocce with brooms on ice. And I was like, “I wonder if that’s actually an accurate statement because that’s such an easy way to explain it.” So is it like bocce with brooms on ice?

Anastasia: Do you feel like you understand bocce ball better than you understand curling?

Liz: Yeah, I do.

Anastasia: (Laughs) Um, it is actually kind of like bocce ball on ice, I’m not gonna lie. The whole idea is that you have these giant rocks, that are called “stones”, and you—very similar to bocce ball—are trying to roll them down a large sheet of ice, as opposed to a lane of shells. And you’re trying to have your rocks be the closest to the center of the thingy at the end, which is it called—oh I’m the worst person to do an interview on this—um, fuck what is it called…the button. The middle is called “the button.” The rest of it is called something else, um, it’s like the…target. It’s not the target, but it looks like a target! You’re aiming for that space at the end. So each four person team throws eight stones, two stones per player, and at the end of those sixteen stones, whatever team has the closest rock to this little red thing in the middle, the button, that is the team that gets the points for that “end.” And an end is like one round.

Liz: How many points do you get?

Anastasia: You get as many points as you have stones in the house—the house! That’s what it’s called, the end thingy is called “the house.” The number of stones you have in the house until broken by the other team. [Editor’s Note: Here’s a link because this makes no sense.]

Liz: So why–what are the brooms for? Do you like use them to speed up and speed down? I don’t understand the brooms.

Anastasia: Okay, the brooms. So when you throw a stone, it’s super heavy. Like, I can barely pick up one and carry it. So they are like these super heavy rocks with handles, and you have this thing called “the hack,” which is at the end of your lane of ice, and you basically put one foot in the hack, put a “slider” on your other foot (to make it slippery so you can slide on it), and launch you and your rock down the ice.

Liz: Mhm.

Anastasia: So you launch yourself off the hack and then release the stone turned a little bit to the left or right—that’s called an “in turn” or an “out turn”—and that’s what adds the “curl.” I don’t fully understand the physics, but this controls the direction the rock spins, which affects the way your rock will curl down the ice. And so what the sweeping does is that it can increase the speed that the rock is going or it can help keep the line straight. If you have really good sweepers, the friction that the brooms make warms up the ice, making it slicker, so the rock moves faster. A lot of times, you might release a light stone with the intention of “sweeping it in,” which means that you are going to have your sweepers sweep it really hard to get the most distance out of it. This gives you better control over placement because you can call your sweepers on and off. That’s why you hear all that yelling: the “skip” is telling his/her sweepers to sweep.

Liz: Mhm. Who’s the skip?

Anastasia: So there are four people on each team. The skip is basically the captain. He/she is the last person who throws, usually, and they’re also the person at the end of the lane calling the shots. The skip will tell you which way to turn your rock (so which way to curl—in or out), how much weight to put on your rock (aka how hard to throw it), and tell you where to aim. And then they yell at the sweepers and tell them whether to sweep or not. That’s why they’re yelling things like “hard”—hard means sweep faster, sweep harder—or “off”—off means stop. Stuff like that. When you’re skipping, you have to judge the speed and the “line”—the direction—of the rock to gauge what it’s doing and if that’s what you want it to be doing.

Liz: Um, awesome. Okay, uh-

Anastasia: Does any of that make sense

Liz: Yes. I also read a Wikipedia article as you were saying it and discovered it was like shuffleboard. And then I was like, “Oh!”

Anastasia: Why would you cheat and read a Wikipedia article!?

Liz: Well you were talking about the brooms and I was like, “I don’t… I’m confused.” So I looked it up and then I was like, “Oh! I get it. It’s like shuffleboard with brooms.” And then the brooms made sense.

Anastasia: I like how bocce ball and shuffleboard make more sense to you. I barely understand bocce ball and I’ve never played shuffleboard.

Liz: So where do you go to play? Do you play like at a rink somewhere?

Anastasia: So I play in California. When I started playing, I was playing in northern California, now I play in southern, but before I started, I didn’t even realize that there was any curling out here because it’s a big Canadian and northern sport–and by “nothern” I mean places where it’s actually cold.

Liz: It’s a sport that requires ice and snow.

Anastasia: It does require ice. So you have to play on an ice rink. But I discovered that a lot of ice rinks, at least in northern and southern California, have curling. But it’s not “dedicated ice,” meaning that we curl on the same ice you skate on and that hockey players play on, which is why they call it “arena curling.”

Liz: Is there a difference?

Anastasia: Well, the biggest challenge is dealing with the quality of the ice because you’re sharing it with all these other people. So we’re always kind of dealing with these dips and slopes and drops in the ice, which can really affect the way you throw things. I’ve seen rocks start curling one way and then completely switch directions by the time they get to the house, or make giant s-curves, or hit a bump and lose steam or just stop altogether, it can be really interesting to strategize through.

Liz: So you turn an ice rink into a curling rink?

Anastasia: We take an ice rink, first it gets zambonied, and then we go through and we use this thing—the best way I can describe it is to imagine a swinging Catholic incense urn—that we use to pebble the ice with water droplets. You shake water droplets all over the ice and then run a scraper over them, to clip off the top, which creates this sort of gritty surface. You can walk on it with sneakers and you won’t slip. I mean, it’s still ice, you can slip, and I’ve fallen a couple times while playing, but you can walk on it with your shoes with much less chance of falling. I know a lot of people are intimidated by the ice and say “Oh I’m gonna have to wear skates or I’m gonna fall over,” but I always tell them: all you have to do is wear sneakers and warm clothes. And you don’t have to bundle up cause you’re moving the whole time, so you get hot.

Liz: So who is the best curling team in the world? Like who’s gonna win the Olympics, in your opinion? Or do you not even know? You just like playing?

Anastasia: You know, someone asked me the other day if the Norwegian team was gonna win purely based on their pants–

Liz: (Laughs) I mean, it’s distracting.

Anastasia: I think the Canadians are the best curlers, but I don’t actually know. You know, there’s a lot of people in my league who are really invested in it and in all the tournaments and things. We do these things called Bonspiels, which is like a big curling tournament, and a lot of leagues—um I don’t want to call it leagues, they are actually called clubs, “curling clubs”, I’m in a curling club—they will have Bonspiels. Like we have two in southern California and there’s at least one up in northern California. And so, there is this competitive circuit that goes on and there are curlers who are very invested in it and will travel to different competitions and things, but I haven’t really gotten there. I enjoy watching a good curling match but I’m not—I like playing the sport much more than I like to watch it. So I watch highlights, or the Youtube video of a really epic shot rather than sit and watch a full game or really keep up with who is curling. But I did spend a couple hours educating myself on the Canadian trials and I do think the Canadians are gonna be in medal contention this year.

Liz: Ooh medal contention… Okay, well I guess you already talked about how you ended up playing, but if I—I don’t want to start playing, I’m just gonna let you know—but if I did want to play…

Anastasia: Why not?

Liz: I mean, not to be rude, but is it like, physically hard? Is that a weird question to ask?

Anastasia: (Laughs)

Liz: We were talking about bocce ball and shuffleboard and people kind of consider those retirement, like on the beach, type sports. But clearly curlers are athletes, it’s not a game. But watching it, I’m like, this seems like a game, I don’t understand. And you said the stone’s are really heavy, but what makes it–

Anastasia: It doesn’t seem that physical?

Liz: What makes it physical? Or what does it require physically? Or like, is it something I can pick it up later?

Anastasia: Yeah. I mean, people can curl at all ages. There is an agility factor with the whole sliding thing but there’s actually this hand pole that people can use to release the stone if they can’t, or don’t want to, get down on their knees to slide.  But the thing that makes the sport really “athletic” is actually the sweeping. It’s very intense—you’re like running down a sheet of ice and sweeping with as much force as you possibly can while doing it. I mean, it’s not the same physical endurance as say basketball or whatever else. But I would say that it’s probably on par with like softball. I think it’s actually a really good intro sport if you’re kind of out of shape and you’re looking for a fun way to start exercising, because I do think it’s a good workout, but I like it more for the fun of the game than the exercise.

Liz: Yeah.

Anastasia: You, for example, would not be able to replace your running routine with curling.

Liz: Okay. That’s what I wanted to know.

Anastasia: But in terms of starting, you can go online and find out if there is a curling club at your local ice rink. I started with a club in northern California, Wine Country Curling, which I had to drive 90 minutes to get too. Now, in LA, I’m in the Hollywood Curling Club but I’ve also gone down and curled with the O.C. club. Most of these clubs, especially right now during Olympic rush, do tons of “Learn to Curls” and drop ins. That’s how I started, by going to a “Learn to Curl.” It’s very low commitment and it’ll probably cost you $15 to $25. But you’re there for a couple hours and they will teach you all the basics. You will throw stones, you will sweep, you will definitely be able to tell if you like it. I enjoyed it so much I decided to sign up for a league after that. But a lot of clubs will also do “drop in” nights where you can just come and play a game or you can “sub” for a league team, which means you come and fill in for someone who is out that week. And curlers are so, so, so nice. They really want people to learn and everyone is more than happy to teach or answer questions from new curlers. Curling is supposed to be this fun, social activity. So while we do take it seriously, but we have a lot of fun too.

Liz: So, what’s your favorite part of the game? And like, what was the part that took you a long time to understand? Was there something you really struggled with?

Anastasia: The best part of curling is, in my opinion, throwing. Because there’s this moment, when you kick off from the hack, where you’re just kind of floating along on the ice. I love that. You’ve done all this preparation: getting into the hack, making sure you’ve got your slider on, that you’ve got your rock, that you’ve figured out what turn your skip wants you to do, you know where to aim,  you know how you need to be positioned to aim there, you know how hard you need to kick off to give the stone the right weight—because the kick off is actually where the force comes from, you don’t launch the rock with your hand, that force comes from your legs—and then, in that moment when you kick off, it’s all done. So it’s this kind of this quiet, calm moment where you are just watching yourself execute. And I think that’s really cool. I don’t really like sweeping, probably because it requires the most physical activity. (Laughs) I also really like skipping. But that was a hard thing for me to grasp–the strategy of it all and really understanding the different ways the rocks turn and where they go and how the curl actually works and the physics of where you want to aim a stone. It took me a whole season before I really started to grasp it, but once I did, it made the game so much more fun.

Liz: Cool.

Anastasia: Now I’m gonna get you to go to a learn to curl.

Liz: No.

Anastasia: I can’t convince you?

Liz: (Laughs) Probably not.

Anastasia Heuer is the founder and Editor-in-Chief of the UNDERenlightened. When she’s not writing, you can find her on the road in search of the world’s best hot chocolate, trying not to burn down her kitchen, or in a park somewhere with a good book.  

Liz Bohinc is a Staff Writer for the UNDERenlightened. She’s also a Compassionate Human Being. Runner. Reader. Science Fact and Science Fiction Enthusiast. Softball Addict. Animation Connoisseur. Twitter: @littlelyme.

How to Mediate a Conflict

Aren’t conflicts just the most fun? Every group of friends, coworkers, or any gathering of people will probably have some sort of drama every now and then.

Be it roommates who aren’t talking because of dishes left in the sink or people who are frustrated about scratch paper being left in the communal copier, it’s good to have a conflict mediation system up your sleeve to help folks work things out. Here are some basic steps:

Assess your Involvement. Are you the best person to be helping these people? Make sure you are actually a neutral party. If you’re not, get the eff out of there: you’ll really only make things worse and get yourself stuck in the middle. Is this a work issue? Make sure you feel comfortable enough with office politics to play this role. As a mediator, your job is not to figure out who is right, but instead to help the aggravated parties create an equitable solution together. Make sure you are coming from the right place.

Set your discussion up. Choose a comfortable, quiet, private place to chat. Start by setting some ground rules for the discussion. These are here to make sure the discussion stays on track and that people are less likely to be hurt by others’ words (because we all know that “sticks and stones” is a huge lie). Good ground rules include:

  • ‘I statements’: Participants only talk about their experience of the situation. This doesn’t include what they think others might feel, or why they think others have done something.

Pro tip: “I think you’re a bitch” is not an ‘I statement.’

  • Be kind: no yelling, no insults, no storming out.
  • If anyone in the group has to leave at a certain time, talk about that now so everyone is aware.

Tell everyone the structure of the discussion, so people know what to expect. Here is a typical structure:

  • Each person explains their side of the story and gets heard by everyone else.
  • Together, you all explore solutions.
  • After exploring, you’ll agree on a solution to start with.

Now it’s time to jump in!

Figure out what actually happened. Start by having each person explain where they are coming from. Flip a coin or draw numbers to see who starts first. In instances with large groups of people, it’s important to repeat this process with each individual, and not set up camps. Each person will have a unique experience of the conflict, and people ganging up on another person will defeat the purpose.

Here is an example, using our imaginary friends Oscar and Martha:

  • Martha won the coin toss, so she starts by telling her side of the story and why she is upset.
  • Oscar repeats what he heard Martha say without interpretation or explanation.

This is super critical. The goal of this piece of the process is to make sure that each person’s feelings are put out in the open, and each person can confirm that the other person understands. The summary should be something like “Martha says that it she feels frustrated when she comes home to a sink full of dirty dishes.” An example of a bad summary would be “I leave my dishes in the sink, and it doesn’t matter to me, because I have more important things to do than dishes.” As a mediator, it’s really important to keep people from digging in their heels and not trying the process out.

If you are mediating a conflict between a large group of people, have each person say something. They don’t have to tell the whole story back, but it’s critical that person who shared feels like every person understood.

  • Martha confirms whether or not Oscar understood her story correctly. I usually ask people “Is that how you feel?” or “Is that what happened?”
  • Repeat, but with Oscar’s side of the story.
  • If you are in a group, repeat until each individual has had an opportunity to tell their experience.

Take a deep breath. Well done! At this point in the mediation, things should already be looking up. Feeling heard is really powerful, and getting everything out on the table is usually more than half the battle. But, we still have to press on…

As mediator, identify key words and issues. Is someone looking for respect? Cleanliness? Remuneration? What were some needs that were identified as not being fulfilled? Choose the issues that need to be resolved, and get ready to start looking for solutions. Make sure to check first with the people who are upset—it would make things way worse to assume you know exactly what the biggest issues are.

  • A great way to ask this is, “It sounds like it really bothers you, Martha, when you come home and find dishes in the sink, is this true? Can I list this as one of the main issues to focus on?”
  • There is no right number of issues to focus on—it totally depends on the conflict and how much time you have. If you are pressed for time, make sure to ask the people you are helping what the most important things to focus on are.

Start Looking for Solutions. With the person who lost the coin toss starting first (Oscar in our case) or the last person to speak if in a large group, start asking your conflicted parties to suggest solutions to each issue. Each person should suggest a solution, and then there should be time to think before swapping to the other person. Go issue-by-issue and write the suggestions down until you have a good brainstorm of solutions.

Photo by Anastasia Heuer

Photo by Anastasia Heuer

Check In. Take a beat. Check in with those involved. Are they feeling good? Hopeful? Frustrated? If they are not feeling so great, go back and explore more about what is really going wrong. You may be focusing on something totally incorrect!

Make a Plan. Once you have a list of solutions and everyone’s feeling good, make an action plan, and make it SMART. That is, Specific, Measurable, Attainable, Relevant and Time-bound. A bad solution would be “Oscar will wash the dishes,” but a SMART solution is “Oscar will wash dirty dishes within 24 hours of using them.” The latter solution can be checked in a way that the former can’t, and that makes it really easy to identify when Oscar hasn’t followed up.

Check Back. Make a time to check in with the involved parties to see how they are doing. Make plans for coffee a week or two later to see how they are feeling and reassess then.

Want to read more about conflict resolution? My favorite resource is The Center for Nonviolent Communication

The UE Review: Cooking Chicken Breasts

When we started UE, one of our missions was to test our how-tos (or ones we found around the web) and publish follow-ups from the UE perspective. Today we are not going to test one of our own articles but a recipe we found on one of the websites we follow, The Kitchn.

A little background on my experience with chicken: My mother is still so frightened of “pink” (undercooked) chicken that she dices her chicken breasts up into quarter-inch squares that she then cooks to death. (Mom, I love you.) I fondly called this “cubed chicken” and mocked it all the way up until college when I realized—having only learned the one way—that I too would cook my chicken like this. (Mom, I still love you.) This inexperience, and my already lazy cooking habits, led me to eventually quit cooking the bird—or any meat really—altogether. I have since faced my fears of meat but not my cutting habits, only graduating to slightly larger “chunks.”

But today is the end of all that because today I learn how to cook chicken breasts without cutting them at all.

THE RECIPE: ”How to Cook Moist Tender Chicken Breasts Every Time”

INGREDIENTS:

I started by collecting the following:

  • 1 to 4 boneless skinless chicken breasts

I was cooking for four (no pressure) so I used two boneless skinless chicken breasts. These breasts were about an inch and a half thick and frozen.

  • Salt and freshly ground black pepper

If you don’t have “freshly ground” black pepper lying around, pre-ground pepper should be fine. I, for one, used to hand mash peppercorns between two paper towels with the butt of a knife because I was too lazy to buy ground pepper or a pepper grinder (don’t ask me why I had whole peppercorns) …but I don’t think many people will have this problem. (Just in case: tips for finding a the right pepper mill and the different kinds of peppercorns.)

  • 1/4 cup flour

Check.

  • 
1 teaspoon freshly chopped herbs (optional)

Meh. It said optional and I was too lazy to go to the store. I considered some dry herbs from my cupboard, like an “Italian Spice Medley,” but decided to just skip it altogether.

  • Olive oil

I recently learned to cook with oil, instead of water, and it changed my life. (A great breakdown of the different types of kitchen oils.)

  • 
1/2 tablespoon butter

I’ve been convinced in the past year that butter really is that much better than margarine. (If you don’t trust me, at least read what best-selling author Michael Pollan has to say about it.)

Next step, proper kitchen utensils:

EQUIPMENT:

  • 10-inch sauté pan with lid

In this case, the lid is essential. As for the 10-inches, just make sure your chicken fits comfortably in the pan. If you don’t have a sauté pan, these tips might help you find the perfect one. Considering that most of my cookware came from Ikea, I may not be the best source for recommendations, but Amazon, Marshall’s, Costco, or thrift stores, can all be excellent sources for quality pots and pans (and other kitchen items).

Clearly a pan is not the only thing you are going to need. So I’m going to add:

  • Sharp knife capable of cutting chicken

I reiterate the above locations for those in need of a knife set.

  • Spatula

Having burned myself on many a metal spoon, I cannot recommend a good wooden spoon / spatula enough—they don’t transfer heat!

  • Cutting Board

Your choice between wooden or plastic. If you’re really lazy, you can just use a plate. If you can’t stick your board in the dishwasher, make sure you follow these steps to keep it clean.

  • Three Medium-Sized Plates

I really can’t justify putting in a link here, I hope you own plates.

INSTRUCTIONS:

Defrosting frozen chicken: An intelligent, pre-planning person might have remembered to set their frozen chicken breasts out in the morning to ensure that they were properly defrosted by the evening. I, however, was not that person. So, my chicken, having been set out a mere three hours before, was still half frozen by the time I went to cook it. I tried to rectify this by massaging it under hot water from the faucet. (Apparently, according to the USDA, both of these methods are unsafe and one should only defrost their chicken in the refrigerator, cold water, or the microwave. Oops. Still alive.) I moved on to the microwave. I basically just started hitting buttons (like “Defrost” and “Chicken” and “Yes”) until it started working. But, if your microwave doesn’t have a defrost setting, two minute increments on 50% power would probably be an okay choice—then again, remember how many times I’ve cooked chicken in my life and take my advice at your own risk.

Start with your chicken on your cutting board…

  1. Pound the chicken breasts to an even thickness with the handle or flat of a knife.

Okay, I forgot to do this but, to ensure even cooking, this would probably be a good thing to do. If there is any excess fat (the white stuff) on your chicken breasts, feel free to trim it off.

  1. Lightly salt and pepper the chicken breasts.

Don’t be like me and touch your salt and pepper shakers with your raw chicken covered hands—attempting to wash them is not as fun as it sounds.

  1. Mix about a half teaspoon of salt in with the flour along with a little pepper. Chop the herbs finely, if using, and mix in as well.

Mix this flour mixture on one of your three plates. The other two are for your chicken—one for raw, one for cooked. I didn’t measure but be careful not to pour too much flour, anything you don’t use will be thrown out. Having just salted and peppered my chicken, I didn’t bother to mix in any salt and pepper (and my chicken still passed a taste test) but to each their own. As I stated above, I skipped the herbs.

  1. Quickly dredge the chicken breasts in the flour, so that they are just lightly dusted with flour.

I don’t know why this has to be done “quickly.” I took my time. Take your breasts and dunk each side in the flour. I scooped even more flour on top and gave it a good pat to make sure they were really covered.

  1. Heat the sauté pan over medium-high heat. When it is quite hot, add the olive oil and butter. Let them melt, and swirl the pan.

  1. Turn the heat to medium. Add the chicken breasts. Cook for just about 1 minute to help them get a little golden on one side (you are not actually searing or browning them). Then flip each chicken breast over.

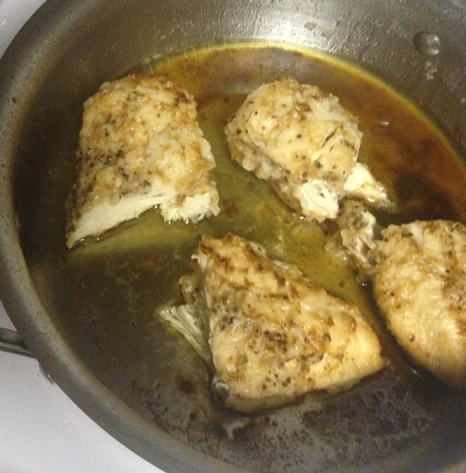
“Turn the heat to medium.” Oops. So, being unable to read, I kept my heat on high and was assaulted by crackling oil. But my chicken still turned out fine. (I can’t say the same for my blackened pan.) Being paranoid of salmonella, I didn’t follow the one minute rule. Instead, I waited until each side was golden brown (more golden than brown).

  1. Turn the heat to low. Put the lid on the pan. Set a timer for 10 minutes, and walk away. Do not lift the lid. Do not peek.

My feelings on this: “Whaaaa? No peeking??? Like none—zero? But, what if I want to make sure it’s working? Ugh.”

  1. After 10 minutes have elapsed, turn off the heat. Reset the timer for 10 minutes and leave the chicken breasts in the pan. Again, do not lift the lid. Do not peek.

“STILL!? Sigh, fine.” When it comes to cooking, trust is not something I do well.

  1. After the 10 minutes are up, take the lid off, and tada! Soft, tender, juicy chicken breasts that aren’t dried out in the least. Doublecheck them to make sure there is no pink in the middle. Slice and eat.

“OMFG IT ACTUALLY WORKED!” Tender, soft, juicy, NOT PINK, tasty chicken breasts. I sliced each breast in half and served.

Pro Cleaning Tip (From someone more Pro than me):

If you’re like me and burned the shit out of your pan, try out the following technique I recently learned from a friend:

  1. Make sure you drain any excess oil and then put the pan back on the burner, on high heat, and wait a minute until it gets hot (or just do this right after you are done cooking).

  2. Put the pot under running water, angling the pot AWAY FROM YOU, and scrub with a long-handed scrubby brush (not a sponge). Don’t be alarmed if the oils in the pan crackle and steam when they hit the water.

  3. Scrub, scrub, scrub.

  4. All clean!

This is part of The UE Review series.

ChickenSquare

Photo by Anastasia Heuer

How to Make a GIF

In 1987, a new type of image format, known as 87A, was released by CompuServe. This type of format allowed for a broad range of colors and the ability to loop. It would eventually become what we know today as an animated GIF, or Graphic Interchange Format. Today the GIF is still used in a variety of online settings, such as moving graphics for a site or part of a meme or a piece of art in itself. But what do you have to do to make a GIF?

To make a GIF, you’re going to need a few things:

1. A collection of images you wish to animate or a video

2. A copy of Adobe Photoshop

Once you have these, it’s time to get to work!

carrey

conantypes

The first thing to do is prepare your source material. Depending on the kind of GIF, your images will come from different places.

Slideshow/Looping GIFs

Some GIFs are just loops of still images without a lot of real animation. This is probably the most basic type of GIF to make. The first thing you want to do is gather all of your images in one folder, preferably in the order you want them to appear in your GIF. It is important that they are all sized as big as you want your GIF to be, otherwise you will have to do this manually in Photoshop.

Next, open Photoshop and create a new file (set the image size to whatever the size of your GIF will be).

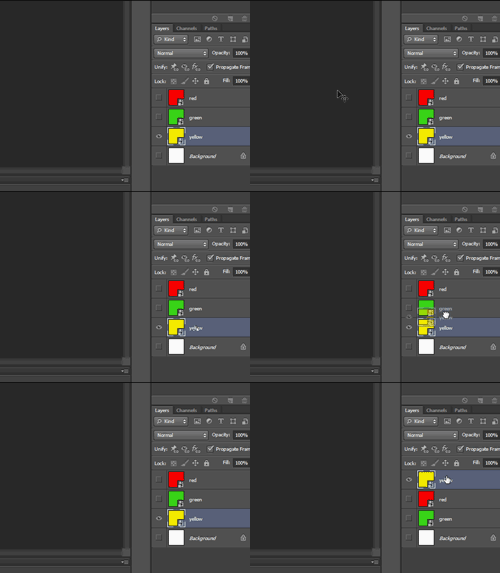
Place your images into new Layers by using File > Place. You will see your images appear as individual layers on the right. Make sure they are in the correct order if they aren’t already. The bottom layer will be first in the animation, but you can adjust it however you wish.

A

If you are using CS6, click on a tab at the bottom called Timeline. If you are on an older version of Photoshop, you must go to Window > Animation to see this.

B

Select Make Frame Animation in order to get to the right mode. It should create a frame of your topmost image.

C

Next, pull the Animation drop-down menu and select Make Frames from Layers. This will make a new frame from each layer. This includes the background layer, so delete this if you don’t want in your animation.

“But my animation looks all choppy!” You might be saying.

carreychews

Refining Your GIF

At this point, you have several options. You can save it at this point, but you may need to refine the timing. The main tools you will use at this point are the delay and tweening. For this example, you should only need to set the delay. It is normally defaulted to a 0 second delay, and set to repeat only once. Change this to repeat forever if you want it to loop. Beneath each frame, you will see a triangle. By clicking this, you can set how long each frame should last. If you select all of your frames, you can adjust them all at once as well.

Tweening is used in GIFs to smooth the transition between two or more frames. It creates a more fluid transition between your images if they are not already optimized for animation.

D

To tween an image, select two frames that are side by side and click the Tween button by holding Shift. The menu that pops up will ask how many frames to create between your frames.

Using too many can make your images appear ghostly, but not enough might not do anything at all.

NoTweening

No Tweening

Tweening

Some Tweening

TweeningBad

Too Little Tweening

TweeningTooMuchToo Much Tweening

You will notice subtle differences between the above images, and depending on what effect you are trying to achieve, there are different solutions possible. Remember, if you tween your frames, you will probably have to adjust your delays as well.

Video Clip GIFs

But the real reason you’re here is to learn how to make all those funny meme GIFs from various films and TV shows!

wonka

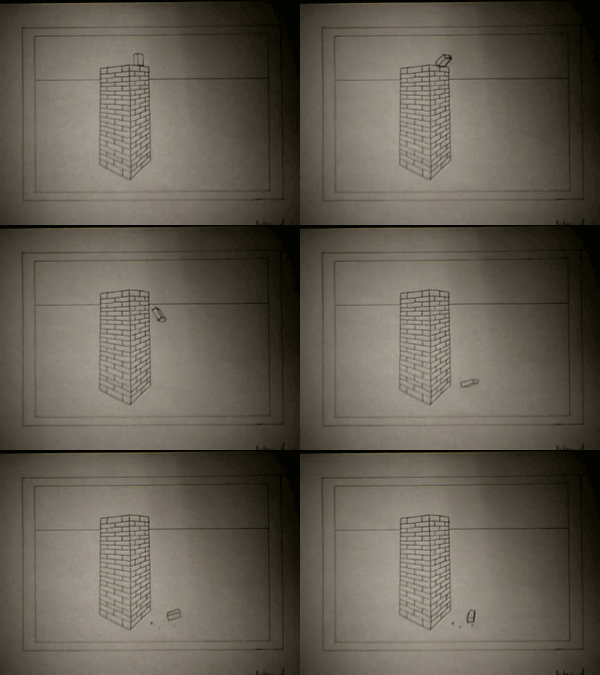
Another method of making a GIF is to convert a video file to frames. This is probably one of the most common types of GIFs, and is very popular in meme culture. It is also very easy to make once you have access to the video you want.

cumberbatch

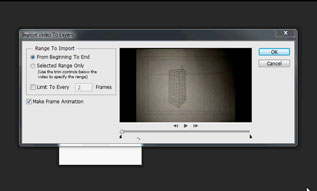
The only difference in the process is how you obtain the images. Instead of placing images, you must import a video clip into Photoshop. (It is important not to use a very long video, or it will take a long time to load: under 10 seconds is usually a safe bet).

[File > Import > Video Frames to Layers... GIF]

A pop-up menu will allow you to trim the specific portion of your clip you want to use. This will automatically convert your clip to frames, and then you can edit the delay and tweening if you wish.

IMAGE_E

Saving Your GIF

Lastly, you will have to save your file to the proper format. Instead of using the normal Save feature, use Save for Web or Save for Web and Devices.

[File > Save for Web... GIF]

This menu gives you options to select the proper format, plus different sizing and optimization functions. This tool is designed to allow you to keep your full Photoshop project saved at the highest quality so you can then save multiple versions of your work in various formats. To make sure your GIF remains animated, select GIF from the formats and click Save below. The file size will be much larger than a normal JPEG.

IMAGE_F

That is all you have to do to create your GIF! Note that the speed of your GIF may be different than what you viewed in Photoshop, so you may have to play around with different settings to get precisely what you want.

videogif

Another interesting feature (new to CS6) is the ability to make transparent GIFs. These function in the same manner and are created the same way, however, they utilize the transparent background that can be used in other Photoshop projects. By using these in your GIF, you can make an animation that can be layered onto a website and you can still see the background through it.

transparent

Animated GIFs are seen by some as an emerging art form in itself. With this knowledge, you can easily play around with them and see for yourself, or just give a cat some laser beams!

laserhipstercat

And that is all there is to it!

rickman