Tag Archives: Series

No Dryer? No Problem.

I don’t know about you, but I am constantly plagued with wet or damp clothing that I never have enough time to deal with. I always seem to be out of time with a dryer that is nonexistent, broken, taken, or—like in my last apartment—seemingly incapable of drying clothing.

So, in the absence of self-drying clothing, I present you with the following five dryer alternatives for your dryer emergencies:

1. Direct Sunlight

The old school method: lay/drape/hang your clothes out in the sun and watch the magic happen! And by watch I mean go do anything else for six hours because—depending on the amount of sunshine, humidity levels, and temperature—this approach can be painfully slow. Keep an eye on the sun (remember it moves) and make sure to rotate (and/or flip over) your clothes at least once.

If you want to get fancy, use a clothesline. You might be able to find one in your backyard if you live in an older house/apartment building, but if not you can always jerry-rig one out of chairs/trees/fences/poles and some string/shoelaces/ribbons/computer cords. Then drape or clip your wet apparel on the line and let Mother Nature do her work. No super cheap clothespins lying around?  Binder clips, chip clips, and hair claws make for great alternatives.

2. Fan

While the outdoors is always best for maximum wind/sun exposure, if you’re without a yard, balcony, or trustworthy neighbors, you can also take advantage of the sunshine within your home and speed up the process with your favorite fan(s). Personally, I like to use hangers and a metal clothesline (aka my shower rod) or an awesome drying rack. But if that doesn’t cut it just hang your clothes on, or tucked into, other ledges around your home (i.e. dresser drawers, door handles, moldings). NEVER drape wet clothing over lamps. (Let’s just say, I’ve tried it… Two words: burn marks.)

The advantage of this method is that it does not require the sun (making it your best overnight option) and it is entirely environment controlled. Unfortunately, if you’re drying a lot of clothes, this method can take quite a bit of time. If I need dry clothes within an hour or two, I take a more direct approach: draping the clothes straight on to my fan. (This is probably definitely a fire hazard so I’m not recommending it.) Instead, try hanging what you need on the back of a chair, and pointing your fan directly at it to produce the same results.

3. Blow Dryer

You’ll need to own a blow dryer to embrace this option—so guys, you may be out of luck. This is my go to option under pressure—fast, efficient, and effective. It is, however, more labor intensive than any of the other methods. But it can also be a great approach for dealing with any unfortunate liquid mishaps. This will work with your clothes on or off, but for very damp clothing, off is better. I usually stick my blower right into an arm or leg, hold the other end closed, and let it fill up with air, rotating between sections every 10-15 seconds to make sure nothing burns. But again: fire hazard. So instead, let’s both try hanging our clothes in the shower and following the tips recommended by Wardrobe Advice.

4. Heater

This works better in the winter months because let’s be honest, no matter how badly you need that shirt, who wants to turn on the heat in July? (Plus, if it’s summer, umm sun?) I find the heater has a significant set it and forget it advantage over the blow dryer because, as long as you position your clothes just right (or weigh them down) to keep them from blowing off, you can enjoy your cereal from across the room. (Keeping an eye on them for rotation and safety of course.) This method is also especially effective for larger, or heavier articles of clothing (i.e. jeans).

5. Car Heater

Does it really get better than your own personal, traveling dryer? If you own a car, and are absolutely desperate, this may be your best option under extreme time pressure.

First, check and see if your car has a heater vent in the center console (the vent for the back seat). If so, drape your article of clothing in front of the vent (rotating every few minutes for maximum coverage) and voila! Your very own on-the-go dryer.

But, if you’re like me, and don’t have a handy back seat vent, you’re stuck with the dashboard vents. MAKE SURE you take the appropriate precautions for your personal safety and the safety of others before trying this—i.e. don’t be stupid and hold the shirt on your heater while you are driving.

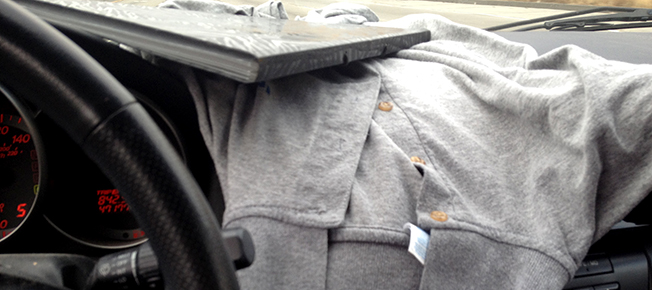
In the above photo, I used a handy expanding file folder (while driving in a straight line) to keep my desperately needed shirt in place. This is clearly not the safest option. Think about using clothespins (or any of the above clothespins alternatives) to keep your clothing attached instead. There is a rotation factor here, so please PULL OVER (or make sure you are stopped) when you rotate your clothing. No dryer emergency is worth a car accident.

Bonus Tip: Need to get wrinkles out?  Hang up your shirt up as close to the shower as you can without getting it wet. Turn the water on to the hottest setting, close the bathroom door, and let the steam give you a wrinkle free shirt in about ten minutes.

dryerhero

Photo by Anastasia Heuer

Disclaimer: This article is meant for your entertainment. You can read the UNDERenlightened’s full disclaimer in our User Agreement.

Reusing that Jar: Making Whipped Cream

Okay, let me get this out of the way right now: I’m kind of a hippie. Ok, I am a hippie. I live without a microwave, a working dishwasher, or a hand mixer. I also love to cook. Being a poor grad student, and a little low-tech, but still wanting to try out the latest recipe for mint-lemon crème brûlée (or whatever Martha Stewart is up to these days) means I have to get a little creative in the kitchen.

Whipped cream is one of those delicious accents of sweetness that makes nearly any dessert go from good to mind-blowing. If you’ve ever had homemade whipped cream, then you know it tastes way better than whatever you can squirt out of a can. So, how on earth did Mom, or Aunt Josie, or Grandpa Steve, ever get cream to fluff like the clouds baby angels live on? They probably used an electric mixer. But I’ll tell you a secret: You can use a mason jar instead. (Extra bonus: buffed arms!)

Yes. That’s right. A mason jar. You know, like a jam jar, one of those things that all the hipster kids (including me) are using as drinking glasses and vases right now? They totally make great travel mugs, flower vases, containers for leftovers, and pencil holders… but that’s another article. Or five.

Back to whipped cream—let’s talk about how this works:

What you need:

  • One (clean!) mason jar (or an old tomato sauce jar, applesauce jar, or really any glass jar with a tightly sealing lid)
  • A freezer
  • Heavy whipping cream (often sold in pints, like the mini milk cartons you used to get in elementary school)
  • Powdered sugar (totally optional, often labeled “confectioner’s sugar”)
  • Vanilla extract (also totally optional)

What to do:

1. Put your clean glass jar in the freezer—with the lid off—for 15 to 20 minutes before you need to make the whipped cream. (This step isn’t entirely necessary, but it’ll help your cream get fluffier faster.)

2. Take the jar out of the freezer and fill it no more than halfway full with cream. If you fill it more than halfway, the cream won’t have enough room to expand and won’t reach its optimum fluffiness.

3. Here’s where you can add the powdered sugar and vanilla if you’d like. A tablespoon of powdered sugar should be plenty, but it depends on how sweet you want it to be. (No measuring spoons? A tablespoon comes out to be about as much as a rounded average spoonful.) A teaspoon of vanilla extract is enough (about 1/4 of an average spoonful).

4. Now the exercise comes in! (Who said dessert can’t be healthy?) Screw the lid tightly onto the jar, and shake shake shake, shake shake shake, shake that… jar. Vigorously. (Make sure the lid is securely screwed on, otherwise you could end up in the whipped cream version of the Marine World splash zone.) You can even take turns with friends—passing around a jar of cream and making Shake Weight jokes is an excellent way to wait for those brownies to finish baking.

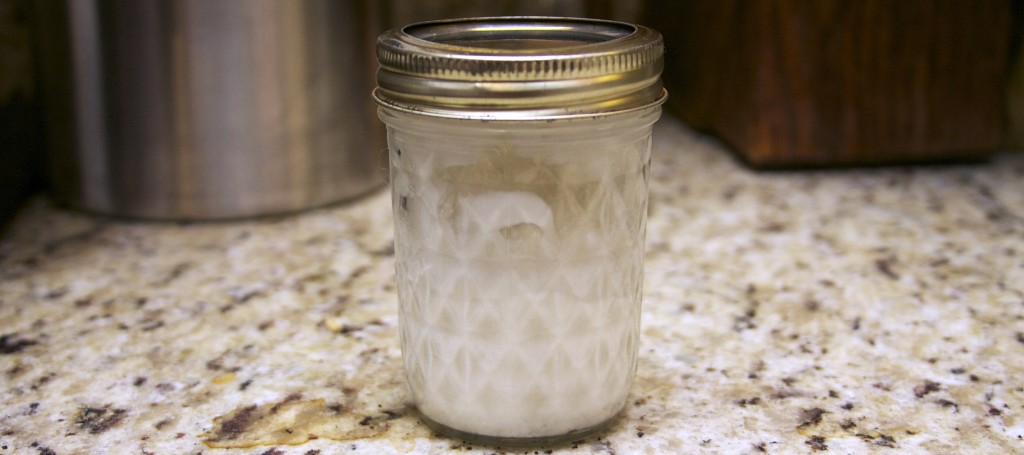
5. The time it takes for your cream to become fluffy goodness depends on how hard you shake that thang and the size of your jar. You’ll know it’s getting close when the cream coats the sides of the jar and makes it hard to tell how full it is.

6. Check after 5 minutes or so of quality shaking, and every few minutes after that. A larger jar—like a quart jar or an applesauce jar—can take a little longer. It’s whipped cream when it’s so fluffy that it doesn’t pour or drip out of a spoon easily. (Sometimes I’m impatient, and I only wait till it’s fluffy but still pourable—a great option if you’re serving it over fruit, ice cream, or pudding, etc.)

Editor’s Note: In an effort to fulfill our goal of road testing some of our articles (and because whipped cream in a jar is ridiculously delicious), Elise and I attempted to follow Heather’s instructions. We discovered that over shaking can lead to undesirable (and inedible) curdling. (Not to be confused with curling—a winter sport popular in Canada.) This can happen quite suddenly. Be careful to check your cream every 15 seconds or so after it starts to coat the sides of your jar. (Seriously, don’t over shake. When you think it’s done—STOP! We can tell you, bickering over the appropriate fluffiness level does not end well.)

7. If you need more whipped cream, spoon and scrape what you’ve got out of the jar into a bowl, wash the jar, and repeat until you have enough for everyone.

8. Enjoy!

What-ifs:

  • If you have leftover whipped cream: store it in the jar or another airtight Tupperware-style container in the fridge. It’ll keep for a few days, but will be iffy after more than a week. Besides, who can let whipped cream sit for that long without devouring it?
  • If you don’t use your heavy whipping cream before the “use by” date: you’re outta luck. I tried freezing my heavy whipping cream once… it was in a glass bottle, and I opened the freezer to find the bottle cracked and frozen to the cream. Then I tried defrosting the cream, even straining out the shards of glass, in an effort to salvage the situation. (I would not recommend this.) It ended up being something in between butter and milk and not all whippable.
  • If you want to get fancy with your whipped cream: go ahead! Experiment with adding a dash of cinnamon or nutmeg when you add the sugar and/or vanilla. (A dash is one shake of the spice jar, if it has a lid with little holes, OR a mound—a little smaller than the size of a dime—in your palm.)
whippedcream

Photo by Meaghan Morrison

Thinking About Your Money

Once you reach your twenties, you’re expected to know a lot of things. You’ve gotten to a point where you are expected to know how to work, feed, and clothe yourself—but having an actual plan for your paychecks may not be something you’ve figured out yet. We all have a sense of the lifestyle we want to live—whether that’s buying a house, starting a business, or traveling the world—but often we don’t spend enough time on the road map that will actually get us there.

Financial planning is a subject that young people are often uncomfortable with. There are so many technical terms you’re magically supposed to understand—but what if no one ever told you which ones really matter? I get it. I went to school for design, and no one was teaching me how to make the most from my money.

Luckily, my parents understood that this is confusing for those of us just starting out and were able to answer most of my questions. So, the advice I lay out here comes to you from someone who was a novice but has learned a lot recently by making small but important changes to the way I think about my money. This stuff is scary—you’re making decisions about large amounts of money. But it would be scarier to turn 30—or worse, 40—and realize you really have no plan in place to make sure you can buy a house, help your kids through college, take a year to travel the world, or retire before you’re 80.

This is the first of five articles about the basics of dealing with your finances in your twenties. To start, you should be thinking about your money in categories—four categories to be exact. Four categories that are used to buy different things at different times in your life. And because they’re used at different times, for different reasons, they all live in different places. Right now we are going to go over these categories so you can keep the big picture in mind. Each of the next four articles will go in depth with one of the categories so you feel comfortable going out and making informed decisions with your money.

So let’s get into it. Oh! But before we do, if you want to make this as painless as possible, you might want to save (or maybe even print) the following chart.

All right, here we go. The first category you should think about your money in is Immediate Spending. This is the one you probably already have down pat. This is what’s in your checking account, the money that you will need within a year. This is what you use to pay your rent, bills and buy food from as well as those concert tickets you want and the new glasses you’ll need after you break your glasses at the concert. My post will focus on budgeting and my favorite way to keep track of my money painlessly.

The second category is Short-Term Spending. This is money for 1-5 years away. If you have a savings account, you already have a start on this one. But… you might not really use it for savings. It’s just… you know, that other account. While a savings account works here, I’m going to suggest thinking about a Money Market Account (which is practically the same) and/or CDs (certificate of deposit). Both simply give you higher APY (annual percentage yield, or interest rate), meaning you make more money by simply putting your money in the right place. This money is spent if you need to put a deposit down on an apartment or a new car, want to travel for a few months or in case you get unexpectedly laid off from work.

The third category is Long-Term Spending. This is the money you use to buy a house and start a family, start your own business, or to go back to school. You want to feel confident that you will not need to touch this money until 5 to 40 years from now. You want to invest this money in the stock market and/or in bonds. For all our sanity, when we talk about the stock market, we’re going to keep it to investing in mutual funds and individual stocks. Yes, the stock market can definitely seem scary, but I promise to make it as simple as I can.

The last category is Retirement. Please don’t neglect this one, guys. It’s such an easy one, and starting early has an enormous impact on how much money you retire with. This is the money for all expenses you will have post-retirement. It goes into a 401k, an IRA (individual retirement account), a Roth IRA—or some combination of these.

Okay, those are the basics. Four categories of money for four different types of spending. We will go in-depth with each category in each of the next four articles. Hopefully, by the end of this series, you’ll have a better understanding of how to start plotting your financial road map. I promise, no matter how little you have to save it isn’t as hard as it seems. Once you plot your road map, you’ll be well on your way.

money

Photo by Meaghan Morrison