Tag Archives: kitchen

So You Want to Throw a Dinner Party

My friends and I are entering the period of our lives where we have spaces with significant others, few to no roommates, and the horrible decision of owning a dining table for more than three people and a pile of books. Dinner for two or four isn’t such a big hassle, but when everyone wants to come over, eat, drink, and play games it can start to get out of hand.

The Guests

How many of your friends can you comfortably seat? Whether it’s around your dining table or apartment, it’s better to be able to provide a chair so that everyone can eat at the same time. Are these people who will get along? Will they hover in the kitchen? Consider who makes a great guest for eating—they’re not always the same people you want to have over for drinks or dancing. Keep the number of guests reasonable for noise too. It can be hard to yell over people, and too many people can make that a challenge. Start small!

The Table

Put all your leaves in. Adding the extra space in later for plates, napkins, glasses, platters of food, finished plates, and assorted elbows will be a godsend when you’re in the middle of cooking and entertaining. My boyfriend and I like placemats, as they’re easy to clean (throw them in the wash with your clothes), and they give a visual space for where everyone should sit and put all their eating crap. Set out dishes in advance too, along with flatware and glasses. It’s nice to not have to scramble for everything at the last second, or have to direct guests where to get their utensils and plates while you’re finishing up the meal. I like to not assign seats, because two of your guests might be having a great conversation that you would’ve never considered, and now they want to talk all night about it (but no one else does).

The Food

What’s easy for you to make? Can you do a lot of it? Sometimes I get into the trap of thinking that Dish A would go really well with Dish B, with a side of Dish C. But all of these plates are hard work or require recipes I’ve never really done before—and when everyone is waiting for their food, scrambling to make sure that your food is edible (and hopefully tasty) is probably the worst thing to worry about. So, keep it small and easy! I’m guilty of generally not following this on a day-to-day basis: I like to look up recipes that sound delicious, try to make it for a few people, and fail miserably. When I’m going to entertain, I definitely try to keep it simple.

Start with an appetizer that takes a very little preparation, maybe something you can do in the morning or the night before. Salads are an easy choice: throw some mixed greens with a relatively neutral dressing or even serve the dressing on the side. Add tomatoes, fresh fruit slices, or nuts to add texture to the salad. Alternatively, soups are easy to make earlier in the day or the night before. Just bring it up to simmer and serve hot with some fresh bread. If either of these is too much work, you can always settle with a cheese platter—put some bricks of cheese on a wooden cutting board with some knives and crackers, maybe a few slices of cured meats. Personally, I like crostini types of snacks. Get a nice baguette and slice it into thin rounds. Brush with olive oil or butter and toast in your oven until crispy. Top with a bit of cheese, or meat, or a spread of your choice. A bit of smoked salmon, herb cream cheese, and a sprinkle of chives makes it perfect for me.

As for the entree, what’s good for everyone? Ignoring dietary restrictions, fish and chicken are pretty easy to just throw in the oven, pull it out, and serve when it’s time. I like to go with a recipe that’s pretty heavy on the aromatics, but it’s not for everyone! To me, lots of garlic, onions, and herbs help to make a kitchen feel homey, and there’s nothing quite like opening the oven door and hearing everyone groan with anticipation. For a bit more of an active cooking experience, you can always grill or pan-fry your main course—this is more along the lines of what I generally do. Sear some steaks in a pan or a grill and top it with butter, or work to build a more nuanced dish like chicken marsala (a personal favorite). Either way, I’d aim to do about one large serving per person, with extras for the folks you know who like to have extras (mostly me), and you’re set!

But wait! Side dishes? Make them in advance if you can. Or have them be as very little maintenance if possible. Salads if you didn’t have one for an appetizer are great here, as are various potato preparations: mashed, baked, and gratin are fantastic ways to serve a side starch. If your entree is pretty heavy, keep your side relatively light! And vice versa. You want everyone to have room for dessert, of course.

After everyone’s done with their main course and has been settled for a bit, I like to bring out dessert. Unless you’re into baking and pastries, I’d definitely grab a cake or a few pastries from your favorite bakery. It’s a lot of work to make your own desserts, and the precision can be taxing when you consider that you’ve made so many other things for this party (even if you didn’t do it all yourself). Something easy to cut like a pie or a cake works well for dessert, especially if it highlights seasonal fruit. Ice cream and coffee are also fantastic and absurdly simple. Carve out a couple scoops and serve with a small cup of joe.

The Drinks

While we’re talking about beverages, what do you serve for the rest of the dinner? It really depends on your crowd and your personal tastes. We have a stocked wine rack and a decent amount of hard liquor, so it’s easy for our guests to have whatever they’re feeling like imbibing.

I’m a bit of a wine snob (I’m sorry), and it’s nice to have a general progression of lighter wines to bolder ones as the meal goes on. A rosé is a good halfway point for avid white and red wine drinkers, and generally fits nicely for an appetizer into a main course. Aiming for bold reds through the entrée typically works best, unless you’re serving white-fleshed fish or lighter chicken preparations.

This being said, serve whatever wine you think tastes best! It’s the expectation that you serve white wine with fish and chicken, but no one is stopping you from having lovely glass of gewürztraminer with a steak or a fantastic glass of pinot noir with halibut.

If your guests are into cocktails or straight liquor, it’s nice to have some glasses available and some ice on hand for said drinks. I urge guests to keep it simple. We’re not in a bar, and I won’t have slices of lemon, lime, or orange, or mint or basil leaves on hand just because you want a specific cocktail. I generally assume that if someone is drinking a specific boozy drink, they’ll be drinking it all night. I treat beer the same way: have a small selection of beers you know people like, and if they’re drinking it, odds are that they’ll drink it all night.

It’s also great to have some non-alcoholic, non-water drinks on hand for designated drivers, guests with allergies, or generally otherwise opposed to liquor. Sparkling juices and seltzers can be nice alternatives to soft drinks, and they’re tasty too. Water should also be readily available, for cleansing the palate and sating thirst (I keep a Brita in the fridge for this purpose).

Whatever Comes After…

Is whatever you want! Some dinner parties end with the end of dessert, and others go on to play games, watch TV or movies, and whatever else you and your friends do. It’s probably better to avoid any strenuous activities right after all that food, though. I personally insist on cleaning up after myself—my guests are just that, guests. But if they’re insistent and you’re tired, might as well take advantage of the free labor!

Don’t stress out (unless you like it), and try to have fun! Your guests will have a good time if you are, and it’s not worth it to go crazy over a night of cooking (and drinking). You can always clean up tomorrow, eat the leftovers and relax after everyone’s gone. Good luck!
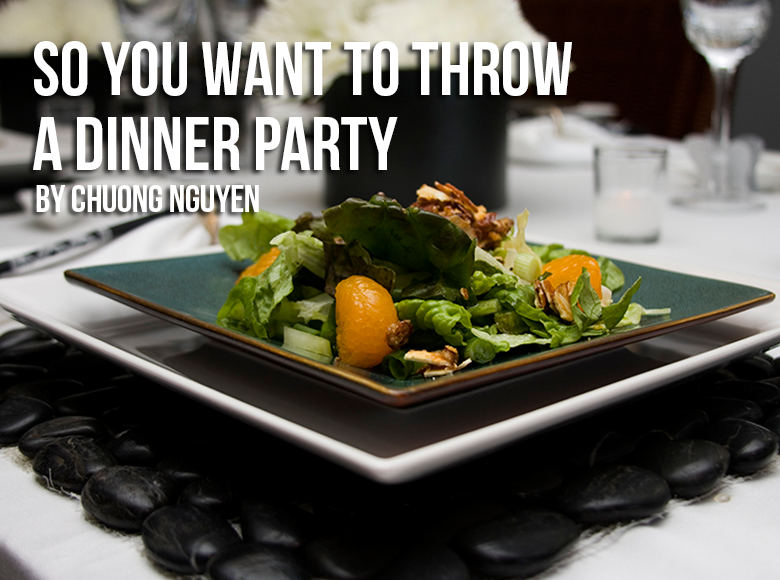
Photo by Meaghan Morrison
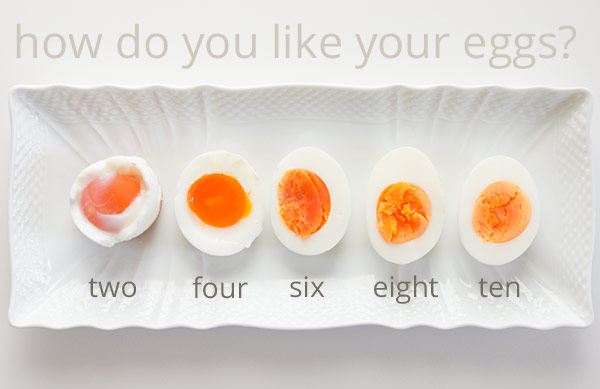
Photo by Meaghan Morrison

Saucepan Recipes That Are Easier Than You Think

Cooking, for whatever reason, can be intimidating. Maybe it is the fire and knives? Maybe it is the possibility of poisoning yourself or your loved ones? Or maybe it’s just because being a chef seems like a glamorous career for geniuses. The thing is, though, it’s not as hard as it seems. Like any other skill, it just takes some learned skills, practice, and the willingness to make a few mistakes.

I consider myself a chef, though I am not “in the industry,” which was my response when a waiter at an upscale brunch place asked me where I worked after seeing my culinary-inspired tattoo. And, you know what? That’s okay! People are quick with an apologetic, “Oh, I’m a terrible cook!” when it’s time for the staff meeting potluck. Instead, I challenge you to appreciate the effort you put in to feeding yourself! Let me start you off with three intimidating foods that are easier than they sound, and all of which can be cooked in a saucepan. Which is a pot, by the way. A small pot, that in restaurants might be used for sauces, but in many 20somethings’ kitchens is mostly used for 1-2 servings of Annie’s mac and cheese.

1. Boiled Egg

Why Make It?

Have you ever sliced a hard-boiled egg with fresh ground pepper for a mid-morning snack? Piped some tasty egg yolk and mayo mixture into delicious deviled eggs? Slurped a warm soft-boiled beauty with your miso-filled ramen bowl? They are well worth the effort.  Though this first dish might be like skating through easy-town for some readers, I do give some tips and tricks (one I just learned last week!) to make things easier, so check it out.

The Technique

You will need a saucepan, a medium sized bowl, and eggs for this.

Place the eggs in your saucepan and fill it with enough water to cover the eggs about an inch. Don’t go running for a ruler; I usually just approximate with the first joint of my index finger.

Cover the saucepan and bring it to a boil. It is important to boil the water with the eggs already inside because 1) the cook time accounts for the cooking they’ll do as the water boils and 2) if you drop them into already boiling water, they will crack and not be beautiful and perfect.

When the water is boiling, turn off the heat and move the saucepan to a cool burner, leaving the lid on to keep the heat in. Set the timer for your desired egg done-ness using the following useful chart from No Recipes (this site has an extensive egg boiling article—definitely worth a read!):

Saucepan Recipes That Are Easier Than You Think

Photo via No Recipes

2 minutes – The white isn’t fully set, and the yolk is totally raw

4 minutes – The white is fully set, but the yolk is thick and runny

6 minutes – The white is fully set, and the yolk is mostly set but still a little runny in the middle

8 minutes – The white is fully set, and the yolk is set but tender

10 minutes – The white is fully set, and the yolk is fully set

As you wait, prepare your ice bath: fill the medium-sized bowl with cold water and ice cubes. I usually leave it in the sink so I can do a quick dump. I hold the lid partially on to keep the eggs in the saucepan while I dump out the water, then I move the lid out of the way to dump the eggs right into their ice bath. This is because I am lazy about dish-washing; a colander would suit just fine.

After a minute or two in the ice bath, they will be cool enough to touch. I pick them up, bang them on all sides with the back of a spoon to make cracks all over the shell, and put them back in the water. If I want one right away, I might pull it out and peel it then and there, but ideally they should sit for a bit so the water can get under the shell and loosen it to make peeling easier. And you’re done!

Tips and Tricks

By far the biggest issue for egg boiling is the peeling. If you’ve ever found yourself attempting to peel and egg and instead removing chunks of tasty white (that’s food in there!), you know what I mean. This is especially annoying if you want to serve these to people and want them to look smooth and flawless.

My mom always told me to just use older eggs (as in, near their expiration date). This does work for science reasons that I don’t understand just yet. But if you can’t wait that long (and who can?), there is another trick. Before cooking your egg, take something with a small but rounded edge (I used the butt of my rolling pin handle). Take your raw egg in one hand and hold the rolling pin steady with the other. Whisper a short prayer to your deity of choice, and then tap the wide butt end of the raw egg gently against the tip of the rolling pin handle. You want to hear a tiny crack that breaks a bit of the shell but not the membrane of the egg. I was sure this would end in a mess and tears, but it totally worked and made peeling at the end a lot easier.

2. Jam

Why Make It?

When most people picture jam-making, they picture a kitchen full of Laura Ingalls Wilders, out in the middle of nowhere, all wearing kerchiefs over their hair and wiping sweat from their brows with their forearms as they use both hands to stir an enormous, thick vat of goo that will last the winter. But that is not at all an accurate depiction of the time and effort involved! Jam is actually fairly quick and easy to make, especially if you are only making a couple jars and do not plan on proofing (sealing the lids so they can sit out at room temperature for ages). And with the delightful ability to mix flavors to your own personal preference and look like a gourmet BAMF, there is no reason not to.

The Technique

First, supplies: To make jam, you’ll need some sterile* mason or Ball jars (with the flat lids and twist rings), fruit, sugar, lemon juice, and pectin (available at most larger grocery stores, in the baking aisle, by the Jello). Choose the No Sugar Needed Pectin—it works the best even if you do use sugar (which you will, I imagine).

You’ll also want a pot and probably a funnel, to ease more jam into the jar.

* To sterilize them, boil the jars, lids, and rings in a big pot before you put the finished jam inside. This kills all bacteria. Washing the in dishwasher will do the trick too.

Now, recipes: Different jam recipes have different ratios, so I’ll start with a specific favorite of mine: strawberry lavender. For lots of recipes, proofing times, and just generally great advice, check out PickYourOwn.org, a website with terrible design but a lot of knowledge. It walked me through my first canning experience.

Strawberry Lavender Jam

Buy/pick some strawberries! You’ll need about twice as many cups of whole strawberries as you want cups of complete jam. So if you want 6 cups of jam, you’ll need 12 cups of whole berries.

Wash them, hull them (cut the leaves and white part out with a small knife), and cut them into pieces. The smaller you cut them, the faster they will break down in the jam.

Prepare your sugar by blending 4 cups of sugar in a food processor with 4 tablespoons of edible lavender buds (available at specialty spice stores). I do this one cup at a time ‘cause my food processor is small. You could also probably get away with chopping up the lavender very finely as well.

In your saucepan, mix ¼ cup of your lavender sugar with 1 ½ packages of pectin (SureJell or another brand, doesn’t matter). Feel free to play with this amount as you cook. As you make more jam, you’ll find the perfect ratio for you.

Cook this mixture over medium high heat for about 5-10 minutes, until the mixture is at a full boil (remains boiling even when you stir).

Add the rest of the sugar and allow it to come to a boil again. Don’t raise the heat too high, though, as that creates more foam. Keep at a full boil for 1 minute. Speaking of foam, feel free to scoop that off and toss it in the sink. It’s just bits of jam with too much air.

Remove from heat and test for thickness. Do this by keeping a teaspoon in a glass of cold water. When you take the saucepan off the heat, dip the spoon to get a bit of jam and let it cool to room temperature. If it looks thick enough, hooray! If not, add a little more pectin and cook a bit longer.

When the jam is cooked to perfection, use a funnel to move it into the jars. If you plan to use and eat or give away the jars to people who will use or eat them right away, you don’t need to proof them. If you want to save them, then…

Proofing!

If you want to make more than a jar or two, you’ll likely want to proof (or seal) your jars to get rid of all bacteria and allow them to sit safely on the shelf without going bad.

To proof them, fill with jam, screw on the lid and ring, and place them into a big pot of boiling water. There should be a few inches of water over the top of the lid. Depending on the jam, they will need to proof for different amounts of time—check online. When the time’s up, remove them from the pot and let them sit out and cool overnight at least. Within 30 minutes, you should hear a “pop” to tell you the can has properly sealed—if not, keep it in the fridge and eat it soon. Aside from a big pot, you’ll probably want something to lift them out of the boiling water (I used big tongs once, but then I went to Target and got an actual jar lifter and it was fantastic).

Tricks and Tips

Jam-making includes a lot of equipment and, for that reason, it’s super helpful to have everything lined up and ready to go. Make sure you have your sugar and pectin measured out and lots of oven mitts and hot-thing-holders on hand. Your jars, lids, and twist rings should be clean and ready, too.

You also want to be aware of temperature. Pouring hot jam into a cold jar could cause the glass to break, so you will want to sterilize your jars while prepping your jam. I usually do this by allowing the jars to boil away for about 10 minutes in a big pot on the stove while I’m cutting up the fruit. If I’m just making a few jars worth and not planning on proofing, I wash the jars in hot water to warm up the glass while the jam thickens.

Depending on the fruit you are using, your jam will be different consistencies at different temperatures. I found, for example, that blackberries thicken up nicely in the saucepan and stay at a similar consistency in the fridge. Strawberries and prickly pears (the fruit of cacti), however, don’t seem to thicken much in the saucepan, causing you to bite your nails and continue adding pectin, which all comes together strongly when the jar is cooled, making your jam a bit stiffer than desirable. So don’t worry if it doesn’t thicken like you think it should—it could just be the type of fruit. Do more research online.

Finally, note that pectin will lose its magical thickening abilities if you up the recipe too much, so work in small batches. The recipe I provide above is about as much as you want to do at one time in one pot. But there is no reason not to have two pots going at once!

3. Pastry Cream

Why Make It?

Pastry cream, though super delicious, probably seems like something that Julia Child or Martha Stewart would make, not you. What do you do with it anyway? Well, if you’re like me, you use it to impress your friends and neighbors! Obviously pastry cream is integral for tasty pastry creation, if you’re working on fruit tarts or Danishes or donuts. But it is also an integral ingredient in a very simple, very fun, very beautiful dish know as a trifle. This dish is meant to be made ahead and then refrigerated, making it easy to bring to potlucks and get-togethers, impressive and convenient to serve at a dinner party, and fun to assemble and eat with groups for a bridal or baby shower or a birthday party.

Pastry Cream Recipe

You’ll need:

  • 2 cups of milk/cream (I usually combine 1 cup of whipping cream and 1 cup of milk; half and half works too)
  • ½ cup sugar
  • Pinch of salt
  • 5 large egg yolks (save the whites – you can make an omelet later!)
  • 3 tablespoons cornstarch (flour is fine too)
  • 4 tablespoons of butter (1/2 a stick)
  • 1½ teaspoons vanilla extract


Before you start cooking, prepare an ice bath to quickly cool your pastry cream. Get two large bowls, one slightly (but not much) bigger than the other. Fill the bigger one with cold water and ice and float the small inside the larger. Finally top it off with a mesh strainer balanced on the top. Put this ice bath to the side for the end of your recipe.

Heat the cream/milk in a saucepan until simmering. Watch out! Milk comes to an overflowing boil within seconds of starting to simmer. Keep an eye on it.

Whisk the sugar, pinch of salt, and 5 egg yolks together in a large bowl. You want to whisk for a good long time, until the mixture turns more of a paler yellow than the brighter yellow it started out as. Add in the cornstarch/flour.

If the milk has started to simmer by now, please, feel free to remove if from the burner and turn off the stove.

Now it’s time to combine the two mixtures. Be careful—doing this too fast will cook the eggs. You are going to do a process called tempering, in which you add a little bit of the hot milk/cream to the egg, sugar, flour mix to slowly warm it up. Drizzle about a tablespoon of hot liquid into your bowl and immediately whisk it to spread the heat evenly and avoid cooking one small spot. Repeat this a few times—you should be whisking for as much of this time as possible. I usually add about 1/3 of my cream this way.

When the mixture seems to be fairly warm, use a spatula to scrape the mixture back into the saucepan with the rest of the hot milk/cream. Return it to medium heat. Using a whisk or silicon spatula or wooden spoon, stir constantly while the mixture cooks. You are heating up the cornstarch/flour so it thickens the mixture, plus kills any bacteria in your eggs.

Continue whisking, even though you are super bored, for about 5 minutes. It could take longer or shorter, depending on the temperature of your ingredients. If you let it sit, you will scorch the bottom of the pastry cream. You’ll know it’s time when you see these cool-looking, thick bubbles of pastry cream in the saucepan. When you see that, continue for 30 seconds to a minute longer, then remove saucepan from the burner.

Off the stove, add in your butter and vanilla, and stir to combine.

Now, turn to your ice bath. Use a spatula to scrape the custard into mesh strainer, to get rid of any lumpy bits. It won’t fall through on its own, so you’ll need to hold the strainer and use the spatula to push it through.

Allow it to sit 10-15 minutes and cool a bit, then take plastic wrap and cover the bowl. Make sure the plastic wrap comes down inside the bowl, pressing against the top layer of pastry cream and coming up the inside sides of the bowl. Sounds weird, but this keeps the pastry cream from developing a skin. Allow it to set for at least 3 hours in the refrigerator.

Tips and Tricks

Believe it or not, this is one of the easiest fancy things to make. As long as you don’t add your hot milk to your cold eggs too fast or cook the final product without stirring, your pastry cream will be delicious.

To play with other flavors, consider soaking herbs in the milk/cream while it heats. Mint is delicious, but basil and even rosemary create a really unique and tasty final product. Make sure you remove the leaves before combine the milk with the eggs and sugar.

You can also add chocolate chips at the end with the butter and vanilla for a tasty chocolate-y flavor!

And that’s it! Hopefully you will be breaking out your saucepan for more exciting things this weekend!

Taming Your Garbage Disposal

Exciting news! You have recently acquired a fabulous kitchen device called the garbage disposal. Amazing in that if you cook something, you just throw the scraps in there, hit a button and BAM—it’s gone! You save space in your trash can, the landfill, and get to take out some latent aggression on your produce.

But there are things you should never put in the garbage disposal. Save yourself the pain of throwing down money for a plumber with the following tips:

The DO-NOTs – Things you should NOT put down your garbage disposal:

  • Your Hand. In my opinion there were two awesome scenes from Season 1 of Heroes: When Claire (who can heal herself for those of you who haven’t seen it) walks out of the burning house charred from the nuclear explosion and when she sticks her hand down the garbage disposal to fetch a ring only to pull it up all mangled and bloody—showcasing EXACTLY why YOU should NOT stick your hand down a garbage disposal. It is a motorized rotating blade. Even if it is off—DO NOT RISK IT. One accidental flip of the wrong switch and…
  • Grease / Oil may be a liquid but it never should be poured down any drain. Why? Because as it cools, grease coagulates, and can clog your pipes
  • Starchy Veggies such as potatoes, broccoli, and other fiberful family members can also draw water and their long, tough, stringy fibers can tangle and jam the blades.
  • Bones & Fruit Pits will not meet defeat in the garbage disposal. These kitchen leftovers are simply too strong to be processed and can break the disposal’s blade. Be sure to dispose of them in a careful manner, keeping them out of reach of children and pets that could choke on them.
  • Shot Glasses, Plastics, Glass and Paper go in the recycling and not in the garbage disposal. This one should be obvious, despite what the UE Editor-in-Chief may think (Editor’s Note: I claim no knowledge of this, nor have I ever done this…if this had occurred, however, it was by pure and total accident, and ended very badly for everyone, particularly the garbage disposal.) Shot glasses and other broken household objects should never go in your garbage disposal because they will BREAK it.

The jury is still out…

  • Coffee Grounds are tough—there are two schools of thought: Some sources say that the grounds are greats for cleaning out your drain and freshening up odors. Others say they can stick and clog up the drains. I think it’s probably best to avoid putting these babies down the disposal and looking into some of these alternative re-uses for coffee grounds.

The DOs – Things you should put down your garbage disposal:

  • Lemon, Lime and other Citrus peels throw a couple of these peels down the drain and you’ll have a cleaner, better smelling garbage disposal in no time. One of the reason you find citrus fruits in so many household-cleaning products is that they are cleansing and non-corrosive. Citrus juice can even strip dirt from under your fingernails without much effort at all. (Think about that next time you order water with lemon.)
  • Ice, Ice, Baby. (Sorry, couldn’t stop myself.) Crunching large amounts of ice, and a bit of vinegar, in your garbage disposal will help sharpen and clean its blades.

Pro Tip: Is it hot and sticky in the summer? Is your home prone to fruit flies and other winged visitors? If you’re having trouble getting rid of them it’s probably because they are living in your sink drains. Kill them and prevent them from coming back by pouring large amounts of ice over your drain. This makes it too cold for them to lay eggs and survive.

Now that you’re an expert garbage disposal user—feel free to grind away!

Photo by Meaghan Morrison