Tag Archives: green

That Time of the Month: Dealing with Your Period

It’s a plague brought unto us at the most awkward of times and lasts throughout most of our adult lives (or at least the arguably attractive portion). For many women, they just started bleeding one day and have continued to do so every month since. So, let’s clear up some confusion about what is happening, why, and how to best deal with it.

Most of us learned about our baby-making machines in adolescent schooling, but here’s just a quick refresher: Every 28 days or so (every woman is different) your uterus will shed the lining (called “endometrium“) that was meant to create a hospitable environment for a fertilized egg. Since the guest of honor didn’t show, it doesn’t need all those party decorations. Your body will go back to homeostasis, and in doing so your hormones will get all out of whack, leading to the oh-so-pleasant changes in water retention (bloating) and mood (PMS). The cramping that you might feel is your uterus contracting in order to expel the endometrium. This whole process can last anywhere from 2 to 7 days, although for most women it’s about 3 to 5.

To prepare yourself beforehand, the most important thing you can to increase your comfort is hydrate, hydrate, hydrate! Before and during. A healthy amount of water in your blood works to promote viscous blood flow and hydrates your muscles helping to cut down on breakouts, painful cramps, fatigue, headaches, bloating, and loose bowel movements. Easier and cheaper than any over-the-counter medicine, right?

And, if you’re the type to get mood swings, exercise and a change of scenery will do wonders for your mood. Sadly, milk chocolate won’t help, but dark chocolate might! It contains small amounts of anandamides, which will give you a natural mood enhancement.

In actually dealing with the bloody mess, we have some options:

Pads

The easiest option. They’re easy to insert: just peel and attach. By simply having it down there, you know it’s doing its job. You don’t need to question when it’s time to change, your eyes will tell you all you need to know. There’s also that peace of mind that comes with knowing that there’s nothing foreign in your lady-crevices.

But they definitely come with their share of problems. While you can feel pretty secure with one on, it may lead to itchiness or, if left on too long, a certain smell that might alert others to the state of your vagina. Their comfort factor is reliant on bathroom accessibility, which kind of sucks. And, unless you’re catatonic, these pillows of cotton tend to shift, which can lead to a bit of a mess if you’re not careful. In addition to all that, they’re may not be the best at secrecy: not only does it feel like you’re wearing a diaper, you may look like it too.

If throwing away three pads a day is economically alarming, there’s an eco-friendly option to pads as well! You can either purchase or make your own re-usable cloth pads. I haven’t personally tried this, but I think it sounds like a fantastic option. It’s basically the same idea as reusable diapers, but with menstrual blood instead of feces. That’s about a hundred times less gross! Or about two times less gross—my gross tolerance may be a bit higher than most.

Tampons

My old go-to. They have many benefits over pads: they’re discreet, don’t show through your pants, and when inserted correctly, you can’t feel them. Plus, you can go swimming without fear of leaving a red trail and you can enjoy an active lifestyle without getting a rash! When dealing with your period, they’re the first road to freedom.

We have two options for tampon usage, those with applicators and those without. They’re both very simple, and easy to get the hang of. Insert the fatter end of the applicator into your vagina, grip the neck with your thumb and middle finger, and then press down on the skinny end with your index finger to push the tampon in and then remove the applicator.  Without a pre-packaged applicator, your fingers will act as the applicator. Same idea, except you grip the body of the tampon, and push directly on the string side of it. A little messier, but it has the benefit of more control over how it sits in your body. If you are able to feel the tampon inside of you, then it needs to be pushed deeper. Once you feel comfortable with the position, lightly tug on the string to ensure that it stays in place. If it doesn’t move, congratsyou’re good to go!

However, there are a few downsides: Tampons definitely have a time limit. Depending on your body, or the day of your cycle, this can range from one to eight hours. If you leave it in for too long, you can run the risk of overflow, unpleasant odor, and the most serious of all risks—Toxic Shock Syndrome (cue ominous music). Toxic Shock Syndrome (TSS) can result in death if it’s not caught early enough, and I think we’d all choose shedding uterine lining over death any day, amiright?

I once read a story about a women who forgot that she had a tampon in, then later had sex. The tampon didn’t come out for a few days. That might be something to keep in mind. Sorry for the nightmares.

Menstrual cups

I am in love with menstrual cups. These silicone vesicles of perfection have changed my life. Not only are the health benefits enormous, but they’re good for the environment too! They cost about $40 and one will last you up to ten years, so you’re no longer spending 10 dollars every month to protect your underthings and your dignity. They have the benefits of freedom that tampons provide, but with a menstrual cup you don’t have the risk of TSS. That’s because you’re not inserting cotton, which can harbor bacteria. The best thing about cups is that you’ll never leak with them and you can safely sleep all night in them! You probably shouldn’t keep them in longer than 16 hours on heavy days before you empty them, though, because that’s a pretty heavy load of blood to be keeping inside your vagina.

However, there’s a learning curve to them. First, make sure it’s right side up. The whole point is that it’s a cup to “catch” your blood. There are two ways to insert it depending on which is more comfortable for you. You can either pinch one side in so that the opening now forms a “C,” or you can punch down one side into the cup itself. Once inside your vagina, let go of the bowl of the cup to let it unfold, and then twist the base of the cup in a full rotation to form a seal of suction. If you hear a kind of popping noise as you twist, you know you’ve done it right. I usually like to pull down on it slightly and check if there’s any resistance. After this, wash your hands and you’re good to go! If you’re like me though, the first few times you use it, you might check yourself every ten minutes out of paranoia.

As for removing it, place your fingers around the bottom of the cup, and gently squeeze while twisting to loosen the suction. If you don’t loosen the suction, it’ll feel weird and you’ll know to stop, I promise. Hold it upright and then dump the contents into the toilet (or if you’re taking a shower, you can dump it down the drain). Rinse the menstrual cup (or wipe it down with toilet paper) before reinserting it to ensure a clean suction. It’s not actually that messy unless you purposefully fling it around or if you’re a complete klutz.

When you’re done with your week of menstruation, wash the cup and then soak it in boiling water for a few minutes. That will sterilize it, and you can then store it until your next period. Warning—you probably should not use if you have an IUD. Upon removal, the suction might pull your IUD strings out and—yikes—that would hurt.

So if you’ve been curious, or your period has been making your life hell, I hope I’ve helped shed some light on some solutions. Happy flowing!
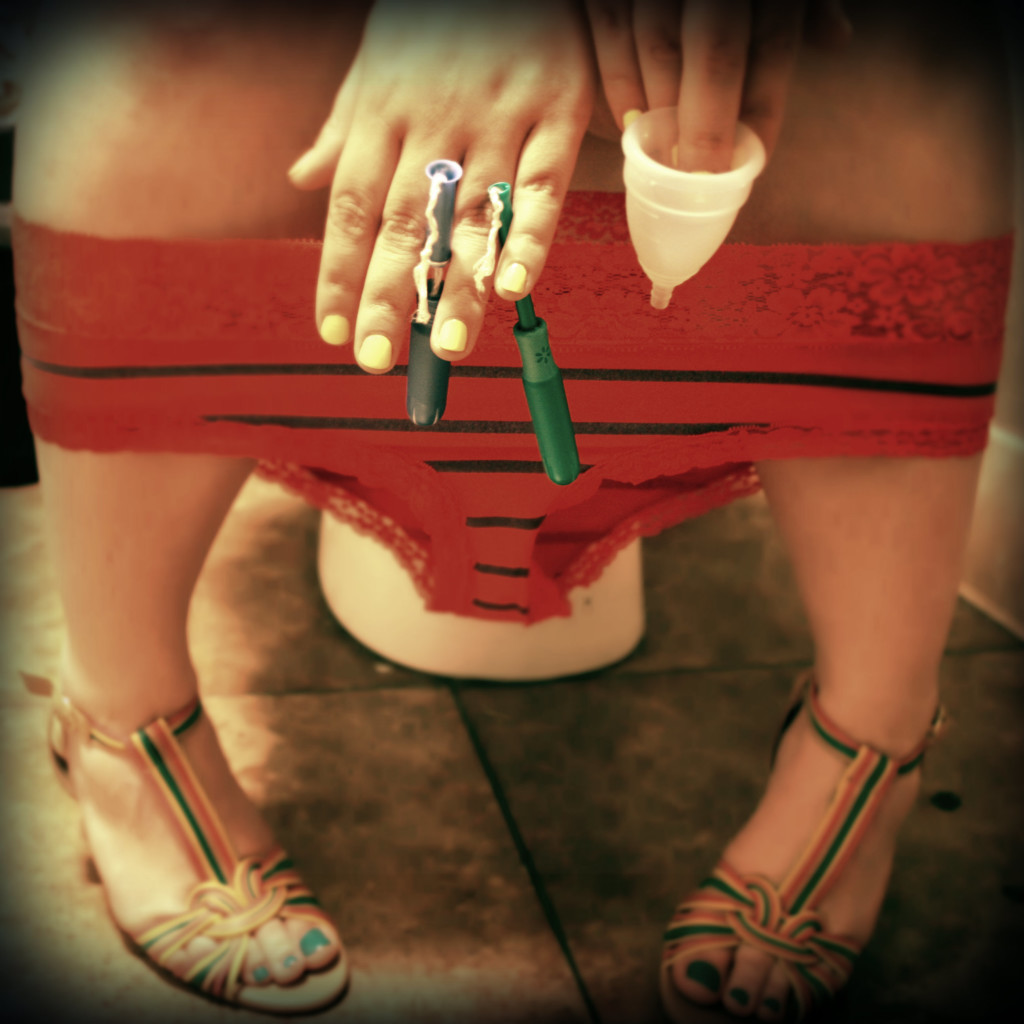
Photo by Sara Slattery
DIY Household Cleaning Products and Haircare

If you had asked ten-year-old me what baking soda and vinegar were good for, I would have peered into my mother’s kitchen cabinets, scrunched my face in confusion, and hazarded these guesses: “Baking soda goes in waffles to make them fluffy. Vinegar just smells bad.” And thus, I lived most of my life in darkness, never realizing the true power of these two lackluster kitchen staples.

CleaningSquare

Photo by Heather Griffith

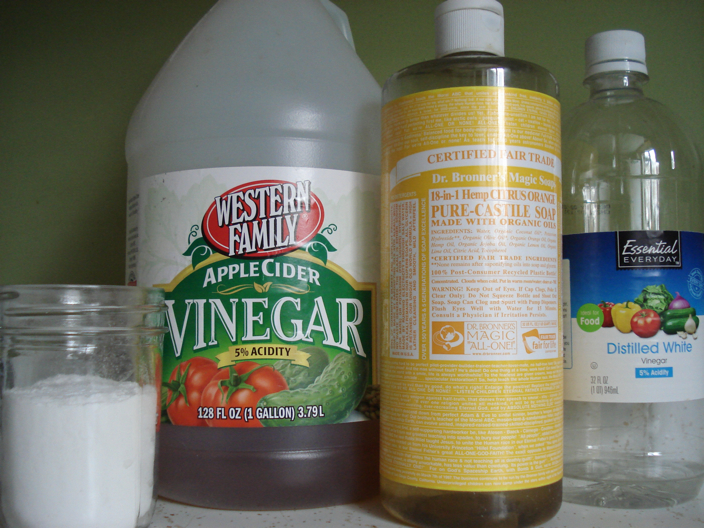
One look at the list of ingredients on any household cleaning product and your head will start to spin. (Unless you’re a chemistry nerd, in which case, you might actually understand what you’re reading.) Sometimes I wonder if it isn’t just a big hoax to get us to buy more petroleum-based products so oil companies can make money. Whether that’s true or not, you can bet your bottom dollar that you can save your bottom dollar by making your own cleaning products, and even shampoo, for a fraction of the cost of your usual products. The secret ingredients? Yup, baking soda and vinegar—they form the foundation for most of these recipes, with a few other household products playing supporting roles:

All-Purpose Cleaner

Use in place of Windex, 409, Mr. Clean, Lysol, or any other spray cleaner.

What you need:

- a spray bottle

- 2 cups water

- 2 cups white distilled vinegar

- 3 teaspoons liquid castile soap (like Dr. Bronner’s, sold at Trader Joe’s and some drug stores)

- 1 teaspoon of tea tree oil

Pour all ingredients into a spray bottle and shake well. If your spray bottle holds less than four cups of liquid, just cut the recipe in half. The castile soap and tea tree oil are optional, but they add cleaning and disinfecting properties.

Surface Scrub

Use in place of Comet, Scrubbing Bubbles, Soft Scrub, or any other abrasive cleaner.

What you need:

- a clean glass jar with a lid that seals tightly

- 2 cups baking soda

- ½ to 2/3 cup liquid castile soap

- 5 drops essential oil such as lavender, tea tree, rosemary or any scent you prefer

Mix ingredients together in the jar and store in a cool, dark place. (It should have the consistency of a goopy toothpaste.) Slap some of it on a sponge whenever you need to tackle some tough grime. The essential oil is optional, but will add antibacterial qualities.

Cheater version: add just enough water (start with ½ cup, and add ¼ cup at a time until the mixture is moist enough) to 2 cups of baking soda to form a wet paste and store in the jar. The baking soda will still work wonders, even without the soap and essential oil.

Toilet Bowl Cleaner

Use in place of Clorox, Lysol, Scrubbing Bubbles, or any other toilet cleaner.

What you need:

- 3 tablespoons to ¼ cup baking soda

- ¼ cup white distilled vinegar

Sprinkle the toilet bowl with baking soda and drizzle the vinegar on top. Let it soak for about a half an hour—go for a run, do some reading, get lost on Pinterest—and then scrub with a toilet brush.

Drain Opener

Use in place of Drano, Liquid-Plumber, or any other drain de-clogger.

What you need:

- ½ cup baking soda

- ½ cup white distilled vinegar

- 2 cups boiling water

Pour the dry baking soda down the drain, then vinegar. Cover with a small plate or jar lid and let sit for 10 minutes to a half an hour, and then pour boiling water down the drain. Don’t worry if your drain seems to “belch up” air bubbles: that’s totally normal.

Shampoo and Conditioner

Use the baking soda solution instead of shampoo and the vinegar solution instead of conditioner. It sounds weird, but trust me, it’s worth a try. Baking soda strips your hair of all of the grease and gunk, while vinegar detangles, seals your follicles, and makes your tresses shine.

What you need:

- 2 clean plastic squeeze bottles (reuse empty shampoo and conditioner bottles!)

- baking soda

- apple cider vinegar (not white distilled vinegar this time)

Into one bottle, mix 1 tablespoon baking soda for every 1 cup of water. Pour 1 tablespoon apple cider vinegar for every 1 cup of water into the second bottle. Make sure to shake each bottle before squeezing some of the solution onto your hair. Start with the baking soda solution: squirt some onto your hair, massage, and rinse. Use the same technique for the vinegar conditioner. (The intense vinegar smell goes away by the time your hair is dry, I promise. If you’re still nervous, add a drop of essential oil or vanilla essence to counteract the smell.)

Note: the ratio of baking soda to vinegar can vary between hair types. If your hair is too dry after using this ratio, try using less baking soda in your shampoo.

Recipes adapted mostly from Women’s Voices for the Earth and here and here on Grist.org. If this gets you on a DIY cleaning and personal care kick, the possibilities are endless! This primer on DIY household cleaners and this list of homemade self-care products are great places to start.

Give Brussels Sprouts a Chance

Brussels sprouts (aptly named for their prevalence in Belgium in the 16th century) are often considered the epitome of gross food. Every time a cartoon character has to eat something icky, every time someone wants to complain about a childhood dinner requirement, every time a parent wants to issue a threat to inspire fear into a child’s heart, it always falls on poor, misunderstood Brussels sprouts to be the bad guy.

This is especially unfortunate because it has implanted a dislike of Brussels sprouts in tons of people who have never even eaten them—or at least have never eaten them prepared well! My father was a victim of this stereotype. Unfortunately, my grandma did not know any better than the boiling method. As a result, my brother and I were spared the vegetable growing up and we assumed that if Dad (a foodie and not the least bit picky) didn’t like them, then they must be pretty bad. It wasn’t until I went to college and really started seeking out new recipes and tastes to take advantage of my kitchen when I discovered how tasty these little guys can be! Now I want to eradicate this damaging prejudice from everyone’s hearts, so all can embrace these delicious and healthy little cabbages.

Luckily, we can be the change we want to see in the world here. First, I will tell you the best ways to prepare the sprouts for maximum deliciousness (including some tasty recipes at the bottom). Then, having (hopefully) seen the light, you can prepare and enjoy some delicious Brussels sprouts to share with disbelieving friends.

The trick to enjoying Brussels sprouts is simple: Do not boil or steam them.

Think of the little guys like tofu—would you enjoy tofu, just boiled or steamed in water? No. (Unless, of course, you like bland things, in which case you probably already like Brussels sprouts: rock on!) The deliciousness of tofu comes from sponging up tasty sauces and spices, and the same holds true for Brussels sprouts. You can add whatever you want to them: brown sugar, balsamic vinegar, salt and pepper, cinnamon and cloves, Worcestershire sauce, whatever, and they’ll taste delicious.

So here is how to prepare them:

1.  Buy a bag at whatever grocery store/farmer’s market you frequent and give them a good wash in the sink.

2.  Place them on a cutting board and use a nice, sharp kitchen knife to cut off the ends—that’s the whitish, dirty-looking end, not the round leafy one—and chuck that in the trash or compost. If your Brussels sprouts look bigger than you would comfortably eat in one bite, you might want to cut them in half lengthwise as well. This also gives them a nice flat side to sit on the pan and get that lovely, brown, roasted color.

3.  Once they are clean and cut, put them in a bowl and pour in a dollop or two of oil (vegetable, olive, or other). You want just enough to coat the sprouts and keep them from sticking to your pan. Then, add in your flavoring of choice: classic salt and pepper, brown sugar and cinnamon, honey and balsamic vinegar—the possibilities are endless. Mix it all up with a spoon (or your fingers). You want the whole surface of the sprouts covered so they can soak up all of the flavors.Many people favor sautéed Brussels sprouts with garlic and onion, shallots, or a tasty meat like pancetta and bacon (see recipes below).

4.  At this point, I like to sauté the Brussels sprouts for about 5 minutes. Sauté is just a fancy French word for cooking in a pan with a tablespoon or two of vegetable oil on a medium heat, and moving them around a bit with a wooden spoon to keep them from sticking.

5.  After sautéing the Brussels sprouts, I like to put them into a 400º oven for approximately 30 minutes to roast them. When you try this method, keep an eye on them after minute 20 and assess how brown they are: you must take them out when they are chewable, but not burnt. Some folks turn them after 15 or 20 minutes to get an even browning, but I like mine with just the cut side browned.

Alternate Option: Some recipes call for you to sauté the Brussels sprouts until they’re browned to your liking. Then add a few tablespoons of water and continue cooking them for another 8 minutes or so. If you choose this method, be aware of how adding water may affect your flavoring.

6.  Pull them out when they’re to your liking and serve!

Some favorite Brussels Sprout recipes:

Remember there are lots of ways to make Brussels sprouts delicious; so don’t be afraid to try different things until you find something you like!