Tag Archives: frugal

Taking Your Workspace From Bleak to Chic on the Cheap

Due to office reorganizations and cross-country moves, I’ve worked in seven different office spaces in the past four years. None of them had similar layouts or color schemes, and all of them had different sets of supplies. Through these moves, I’ve put together a few strategies to add a little personalization to a space that is built to be one-size-fits-all.

Personalizing my office has some serious benefits for me: I stay more committed to the job because I feel at home in the space. I am happier to be at work because I am surrounded by things that make me happy. People who come to my office get much more of a sense of my personality and probably remember me better, because I make my space bright, cheery, and inviting. Also, I am way more motivated to keep my desk clean when it is cute and cheery, rather than covered in piles of paper. I even dust when I feel a little ownership over my space.

For my current office, I took on a few simple projects that made a big impact on my space. My hope was to infuse some color, happiness and whimsy into the area that I look at for eight hours a day—but I wanted to keep things simple so that I didn’t use too much work time setting it up. Most importantly, I am a university advisor, and sensitive issues often come up when I am meeting with students. I always want my space to be as inviting as possible. I want people who come in my office to feel like they know me, at least a little, from the moment they sit down.

Before

Before

After

After

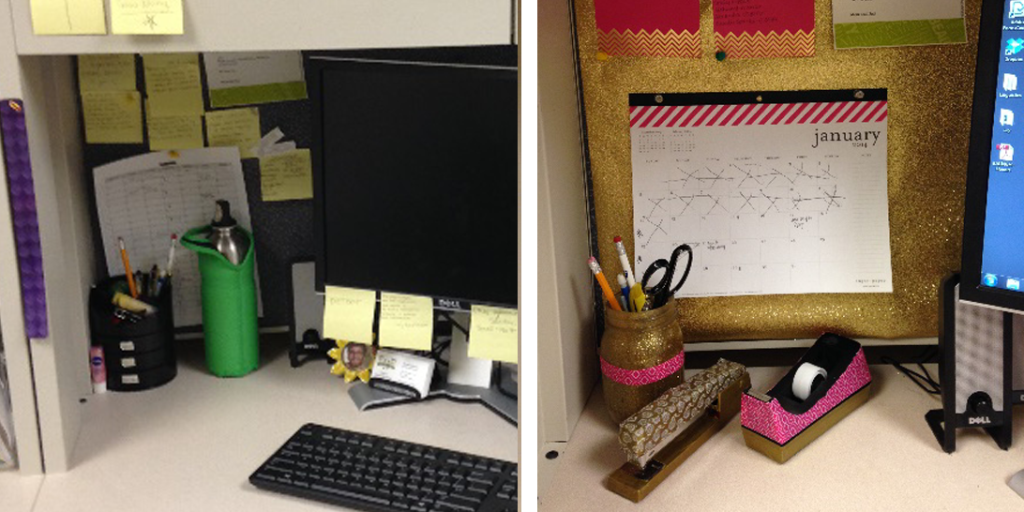
My before picture is blank, uninviting, uninspiring, and cluttered.

The after is much better. Glitter! Pink! Gold! Coordinated! Neat! More functional! Common theme! I actually enjoy working in my space more because it is so bright and fun. The office is still beige, and I can’t swap the furniture, but it feels great to have things be a little more personal.

Going through these projects, there were a few things that stood out to me as being really important to avoid frustration. First, choose a color scheme early. If I were really smart I would’ve used my school’s colors, but instead I just chose colors that I really like (side note, does glitter count as a color?). Second, make sure everything is temporary. I can rip all the washi tape off cords super easily, so if anyone gets a bee in their bonnet, I can take it all off. Third, make sure to stretch your materials: this will keep costs down, and is an easy way to keep things looking coordinated.

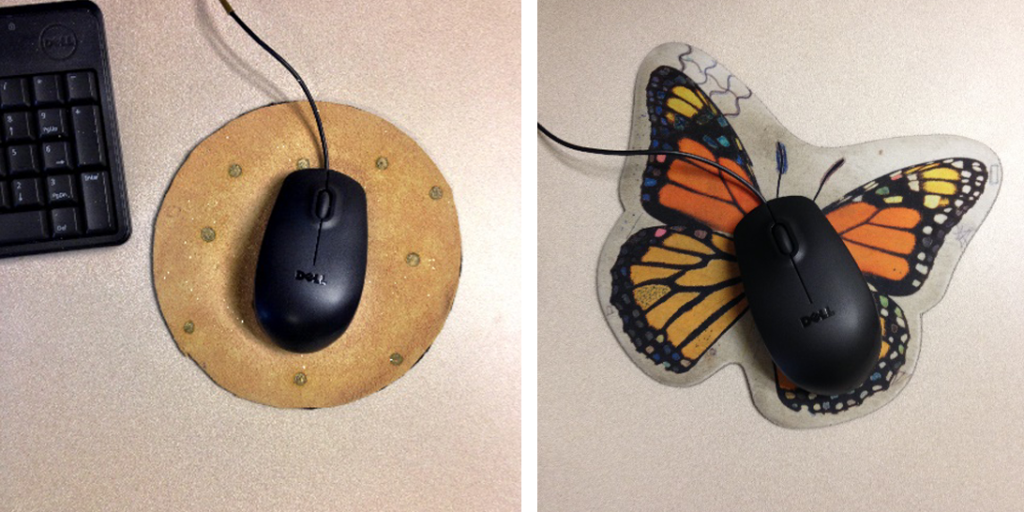
If there are any aspects of your office that actively bother you, change those first. For me, it was the stupid butterfly mouse pad left by the last person to use my office. Not only did it make me look like one of those women who is obsessed with butterflies, but it was also covered with ballpoint pen doodles, which I felt made me look unprofessional and sloppy. When I ditched that stupidity for my DIY, subtle, and in-theme mouse pad, I felt about a million times better. It might be superficial, but I no longer felt like I was projecting cat-lady whenever I met with someone.

Most importantly, consider both form and function. The washi tape on my cords is all about cord management, so that I don’t have a tangle of black cords on my desk. It was a huge plus that they came out so cute! If you don’t use a calendar, don’t hang one up. If you hate getting glitter all over everything, I suggest you choose materials accordingly. It’s worth noting that I hung glitter wrapping paper on my corkboard behind my monitors ten days ago, and I am still finding glitter in my purse, on my clothes, and sometimes in my hair. This doesn’t bother me, but it might bother you.

Don’t forget that implementation is critical. You definitely don’t want to spend a bunch of time at the office making these things, because then your boss might see you as less committed, rather than more. On the other hand, you don’t want to look like you are stealing office supplies, so you have to be a little strategic about how you prepare for your upgrades. I made the mason jar, bunting and mouse pad at home, and then spread the washi tape application and paper gem making over three or four lunch breaks. For the glitter background, I stayed about ten minutes late to take everything down from my corkboard, and the next day came in about 15 minutes early to hang the backing and put back my papers.

Here is the breakdown of what I did in my office, with links to tutorials:
Before and After

Before and After

I swapped the supply tower for a glitter pen jar, because I never use those supplies and that tower was just ugly. I covered my tape dispenser and stapler in washi tape, added a new calendar, took all the info off sticky notes and put it on cute stationary, and a hung glitter wrapping paper on my corkboard for a seriously sparkly background.
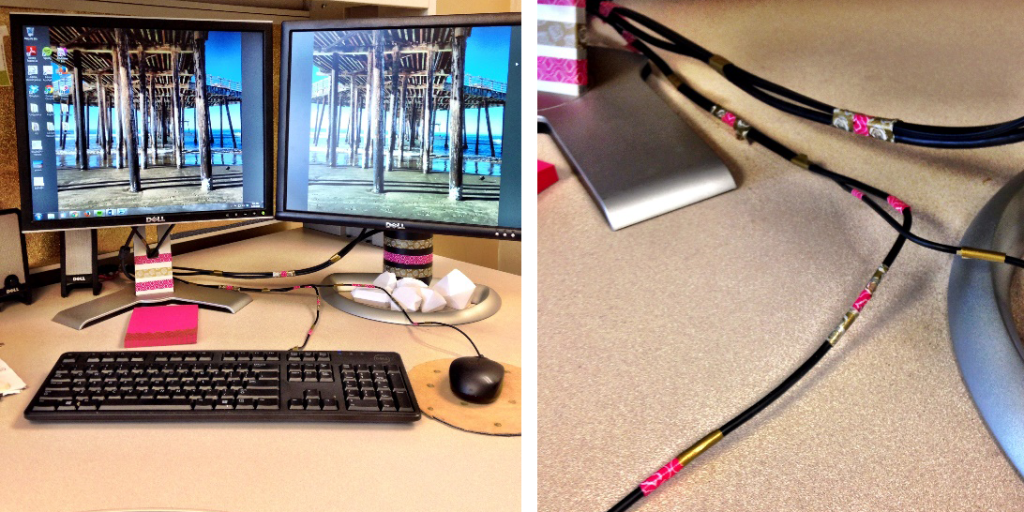
I controlled my cords, and added a little pop
I controlled my cords, and added a little pop

No more cat lady mouse pad!
No more cat lady mouse pad!

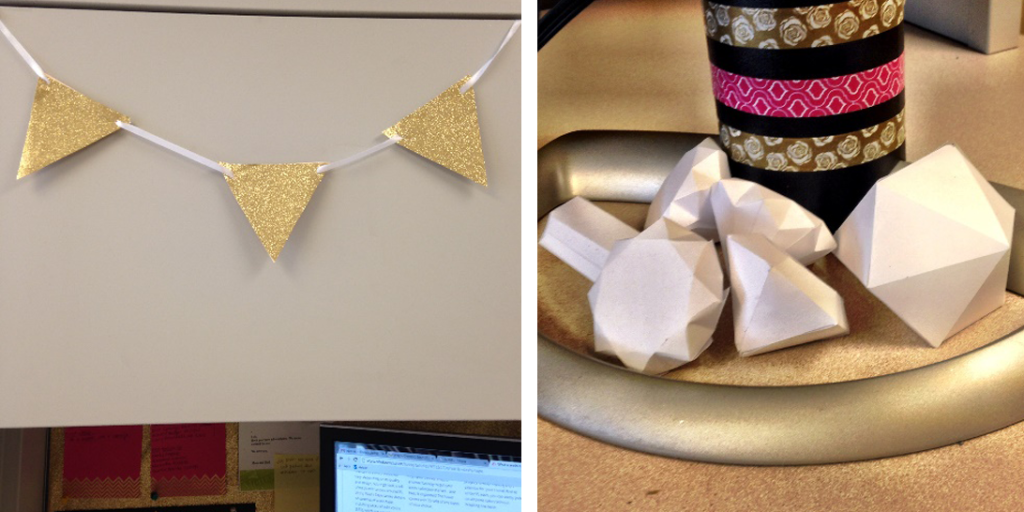
Hung some adorable glitter bunting and created a Paper Gem Garden.

Hung some adorable glitter bunting and created a Paper Gem Garden.

All in all, this cost me $35. Here is the budget breakdown (any repeated or free item marked with an asterisk):

Project Supply Source Cost
Bunting Glitter Wrapping Paper Michaels $3.00
Mod Podge Michaels $3.00 for a small bottle
2 File Folders * *
Ribbon Michaels $1.00 for 20 yds
Corkboard Background Glitter Wrapping Paper * *
Staples * *
Calendar Pre-made Target $1.50
Paper Gems Printer Paper * *
Mod Podge * *
Washi Tape Cords, Supplies Washi Tape, Three Rolls Target $9.00
Glitter Mason Jar Mason Jar Target $2.00
Modge Podge * *
Glitter Michaels $2.00
Washi Tape * *
Mousepad Basic Mousepad Target $1.50
Leather Piece Michaels $6.00
Mod Podge * *
Gold Paint Pen Target $1.00
Paper Pad Pre-made Local Stationary Store $5.00
TOTAL $35.00


Photo by Andy Sutterfield

Photo by Andy Sutterfield

Food on the Cheap

Once upon a time, I made a rash, but good, decision. I decided that I really wanted to live near my university instead of commuting four hours every day. But, I also knew that getting a job there would be hard without a local address. So, I did the fairly irrational thing: I moved there without having a job lined up. I had enough savings to pay my rent for a few months—except, oops, I totally forgot to budget for the other costs of living! Like food.

Photo by Sara Slattery

Photo by Sara Slattery

Food is kind of a big deal so I did some research, looked at basic nutrition, and then bought what was the cheapest. This was not at the “nice” grocery store with the nut bar and open bins of nutritional yeast and gluten-free oatmeal. This was at Grocery Outlet or Food Maxx. This was the “ethnic” Mexican, Vietnamese, or Indian market. This was the last half hour of the farmer’s market when the person behind the table wants to get rid of the last bag of oranges.

I took a notebook with me and, over a couple of shopping trips, saw what was cheapest and weighed that against my personal needs. For example, I find large grocery stores very overwhelming, so I get some stuff at Trader Joe’s that is the same price almost everywhere: milk, eggs, butter, bread, frozen vegetables—even organics, if I wanted them. I’m not including prices because they vary widely, and the best thing to do is compare prices at whatever is local to you!

In an attempt to balance my nutrition, I tried to have a carb, protein, and vegetable or fruit with every meal. For breakfast: hot rice pudding and fruit, or toast and an egg with frozen sautéed spinach, or just some oatmeal and brown sugar if I was feeling especially lazy. The oatmeal packets at the store are ridiculously easy to recreate. Lunch or dinner was maybe Spanish rice (rice, spices, canned tomatoes) and bean tacos, lentil and rice soup, black bean burgers, homemade French fries, pudlas, or stir-fry.

The Staples for a Cheap Kitchen

When I was living on the cheap, I filled my pantry with basic staples in bulk because they will spoil the slowest!

  • Dry rice
  • Dry lentils
  • Dry beans
  • Other dried goods (oats, bulgur, etc.)
  • Large bagged spices

I found that the following brought a lot more variety into my meals, so I bought as much as half my freezer and cupboards could hold! Discount and bulk stores, for the win!

  • Flour
  • White/Brown Sugar
  • Pasta
  • Potatoes
  • Frozen, dried or canned fruit and vegetables
  • Olive oil for cooking
  • Bouillon Cubes
  • Tofu
  • Eggs

Since we all have our own preferences and dietary restrictions, don’t feel limited because you can’t follow my examples above.  There are a lot of cheap alternatives for you to consider when stocking your own cheap kitchen:

  • Bulk Tea (instead of soda)
  • Corn Tortillas (instead of flour tortillas)
  • Bread ($2 for 12 servings!)
  • Fresh vegetables (when in season!)
  • Coffee (because everything is cheaper than Starbucks)
  • Mozzarella and Feta (the cheapest cheese I’ve seen)
  • Bacon Ends or Ham Hocks (great for flavoring soups and stews)
  • Meat and Fish on sale (throw it in the freezer if it is about to expire!)

Did you notice what’s not on here? I considered dairy, meat, and pre-processed foods “special items” because, when comparing price-per-ounce, they were way more expensive than other protein and carb sources like beans, rice, flour, and frozen/canned produce. Except for the occasional cheese wedge or free pizza, I didn’t see a lot of meat or dairy. It’s weird, but I was so into making affordable stuff actually taste good that I didn’t even miss meat. The key to cooking deliciously on the cheap is spices, spices, spices. I experimented with what I liked and started to add it to everything!

All this dried food requires a lot of cooking. I learned that it’s best to soak beans overnight to soften them, lessen gastrointestinal issues, and decrease cooking time! I just put some beans in a bowl, cover with water, and let them sit overnight. The next day, simmer until soft. I then discovered that it’s prudent to invest in a rice cooker if you like rice, and a crockpot if you hate standing over a stove. These meals usually come out to be cheaper per serving than frozen or boxed meals, and way more nutritious. It makes sense to try to safeguard your health when you can, because hospital bills in the future are definitely not frugal!

If you do like farmers’ markets, vendors usually lower their prices or are much more willing to haggle during the last half hour. They often don’t have long-term storage for their produce, so it’s better for them to get rid of it before it spoils. If you can pick from multiple markets, try them all, especially the ones in the less swanky parts of town: honestly, I’ve found the prices are much better there. I’ve seen the same vendors at multiple locations, and their lowest prices are usually in cities and more working-class parts of town, not the suburbs or the ladies-who-brunch neighborhoods.

I hope this article gives you some insight into eating cheaply without resorting to McDonald’s and Top Ramen! Some great resources with tips and recipes I’ve found include Budget Bytes, Broke Ass Gourmet, and Poor Girl Eats Well. If you’ve got any of your own suggestion, share them in the comments. Bon appétit!

Things You’d be a Sucker to Buy New or Full Price

As a millennial managing my personal finances in the wake of The Great Recession, I have had to find creative ways to cut back that I otherwise might not have. This includes buying used things when, in more prosperous times, I may have bought the item brand new. On this pauper’s pilgrimage, I’ve discovered that if you can find what you’re looking for secondhand, you’d be an idiot to buy it for the full price.

Thrifting Square

Photo by Sara Slattery

Tools, books, cheap sunglasses, furniture, stylish clothing… These are all on my list of things you should never buy new, because you can find them used on Amazon, eBay, at thrift stores/flea markets, or used bookstores, from half price to pennies on the dollar. More importantly, you can feel rich for a couple of hours while directly supporting your local economy! Got twenty dollars in your pocket? Well, well, well—look at Mr./Ms. Fancypants-Highroller!

There’s a reason why the word cheap has such a bad connotation: being cheap means that only the bottom-line dollar amount matters. If that’s the case for you, you might as well stop reading. However, being frugal means extracting a high amount of value relative to the amount of money invested. Who doesn’t want good quality stuff without breaking the bank?

Enriching the Local Economy

With relatively few exceptions, new goods are sourced globally from giant corporations. Putting aside the typical ranting against them, this means that rather than enriching your friends and neighbors, your money supports factory labor thousands of miles away and mostly enriches several hundred institutional shareholders.

Buying used and in secondary markets usually entails going to a local thrift store, which often is family owned (like one of my favorites: Lost and Found in Sunnyvale, CA), or buying from individuals at flea markets. The further your money travels, the less stimulating it’s going to be to your community. Generally speaking, it’s more responsible to spend locally.

Only Got 20 Dallaz in My Pocket

Thrifting is also a fun, inexpensive activity! Half the fun is going with friends to look at all the awful stuff that’s there—like I do (shameless plug). Also, sometimes you will see things at the flea market that were obviously shoplifted and are now being fenced for sale. Some might view this as participating in a legal wrong—cool, keep walking to the next stall. Personally, I play too much Skyrim, so I like think that I’m acting like a member of the Thieves’ Guild or the Ragged Flagon, reveling in the cloak-and-dagger nature of a ‘black market’ (when really its mostly just razor heads and Similac). It’s nerdily exhilarating, and I get a kick from it. Plus, I don’t really know for sure if it’s been stolen, and I can’t exactly go around lobbing accusations. Since the presumption of innocence is the bedrock of American justice, shop away, moral relativists! Besides, what’s more immoral: benefitting from shoplifting, or charging $40 for a hammer made at forty cents per unit by a nine year old Chinese kid?

Things to Never Buy New

  • BOOKS:

Especially the following:

-       Any book by Tom Clancy
–       Any book by James Patterson
–       Any book by Danielle Steel
–       Any book by John Grisham
–       Any copy of The DaVinci Code (Ew.)
–       Any copy of Wild Animus (You’re a sucker if you pay any money for this, they give it away on all college campuses)
–       Any objectivist propaganda by Ayn Rand
–       Any copy of Shōgun

  • TOOLS:

People are always trying to get rid of their tools—they bought new ones or they don’t use them anymore: whatever the reason, they want to get rid of theirs. You can buy tools at anywhere between 10-20% of what they’d cost at a Home Depot. And if paying a fraction of the cost for tools and enriching your local economy wasn’t enough incentive, you should be aware of the political campaigns Home Depot supports and determine whether or not they align with your own beliefs.

If you’re moving into your first place and you’re looking to build your kit of indispensable tools, look out for these items at your local flea market. You could save a nice bundle of money. The tools commonly spotted:

-       Hammer
–       Scissors
–       Basic screwdrivers
–       Razor heads
–       Razor blades
–       Duct Tape
–       Tweezers
–       Nail clippers
–       Saw blades
–       Drill bits

  • OTHER:

-       Sunglasses

Seriously, unless you’re buying Ray-Bans or Oakleys, all sunglasses are basically plastic shit made in China. Twenty dollars for cheap plastic crap is a crime, and retailers that sell them at that price ought to have bamboo shoots shoved underneath their toenails. At a flea market, you can buy them for about $5 a piece, or cheaper.

-       Leather jacket

This is important, because a brand new one rarely (if ever) costs less than $150 and they can cost as much as $200-400 or more, depending on the brand. But if you hold out for exactly the jacket you want, you can usually find it between $10 and $40 at a thrift store. These are the real gems of thrifting. If you have a nice leather jacket like I do, you wear it all the time. You will have saved hundreds of dollars and look like you stepped out of a Macklemore music video (can I refer to that song a little bit more? I definitely haven’t done it enough).

Getting Started

Yelp. Google. Seriously.

First, finding the thrift stores presents a logistical problem. You rarely ever want to hit just one. The most fruitful method I’ve found is to Yelp it, and then transpose the positive Yelp hits into a Google Map. From there, I group the stores into sectors, or ‘circuits,’ that I can hit as part of a planned trip or if I just happen to be nearby. This type of informational awareness allows me to attack all the thrift stores with optimal logistical efficiency. No wasted gas, no yo-yo-ing back and forth across town—you will be a precise, methodical, lethal thrifter.

If you choose to hunt at a flea market, make sure you have cash. Since there is no ‘check out’ save the person who is manning the stall, take the opportunity to hone your haggling skills. Some people will be receptive to it; others will not. The method of haggling I have found to be most effective is to hover and look indecisive. An experienced fleamarketeer will sense the opportunity, and swoop in and make you an offer. Make your best “Aaaggghh, I dunno…” face, and watch the price fall. Finally, take out some cash, make sure they see it, and undercut the second offer by about 10% or try to get a bulk deal if applicable. Do not do this at a brick-and-mortar establishment—it is a major protocol breach. Likewise, at a brick-and-mortar store, cash isn’t as important as it is at a flea market or garage sale, since most thrift stores take credit cards.

So support your local economy, save some money yourself, and have some social fun in the process. Thrift, you magnificent millennial bastard children of capitalism, thrift!