Tag Archives: Featured

How and Where to Find Your New BFF (of the Canine Variety)

When my spritely Papillon, Sydney, came into my life, I was a 19-year-old college sophomore to whom nobody should have entrusted a puppy. Ever. And yet, there she was. She was mine. The breeder very happily sent her home with me (with a hefty $600 price tag on her impossibly tiny head).

“DO NOT WANT, GET ME OUT.” “For the love of God just hold still and let me Instagram this moment.” (That’s just the kind of parent I am)

Sydney and I have been through a lot together: three different New York apartments, college (and everything that came with it), a semester abroad for me / a semester at my mom’s house for her, a college graduation, a cross-country move, and the subsequent three different LA apartments that accompanied said move. For a 19-year-old who probably should not have owned a puppy and a puppy who had no choice but to be owned by a 19-year-old, I’d say we did a pretty decent job!

Seven years later, this past June, my boyfriend and I welcomed a second dog into our home: an off-the-charts-bonkers Siberian Husky mix named Avery whom we rescued from a local shelter. Even though she came to us saddled with phobias we couldn’t even begin to translate into humanspeak (fear of mirrors, fear of stairs, fear of every single sound effect in Grand Theft Auto), working with her has been one of the most rewarding experiences we’ve ever had. Seriously, I think every single dog on the Pacific coast heard me squeal with glee when she finally sat on command.

The great pet-ownership debate generally revolves around the morally weighty “Breeder Puppy vs. Rescue” question. That’s what most people ask me about right off the bat: “I’m thinking of getting a dog. Did you get yours from a breeder or a shelter? What would you recommend?” Well, now that I have owned both a breeder puppy and a rescue pooch, I have to say that I don’t think there’s a clear “right” answer here. There are advantages to both! But if you’re unsure of which route to take, here are a few pros and cons I’ve gathered over the years about each adoption option:

Pros – Adoption

  • Obviously, #1: You are saving a life! Name a feeling that is better than that feeling. See? You can’t.
  • There’s a chance your new BFF might come home with some basic training knowledge, depending upon his history. We really struck gold in this department: Avery came to us completely potty trained.
  • It’s incredibly cost-efficient. It was $90 out the door for Avery, which included shots and her spaying fee. When we took her to the vet for her first checkup, the office visit was free of charge because she was a rescue! All we paid for was one additional booster shot and heartworm prevention meds. I jokingly/lovingly refer to Avery as our “discount Husky.” This is why.

Cons – Adoption

  • There is really only one major downside to adoption, which is the mirror image of the one major upside to breeder acquisition: because you don’t know this dog’s history, you don’t know everything about his personality. Now, if you get a puppy from a shelter, you’re in better shape than if you, say, adopted a 3-year-old dog. But more likely than not, you won’t know what sets this dog off. You don’t know what her nervous ticks are. Those things won’t reveal themselves during that first euphoric visit at the shelter as you loudly proclaim, “YES, THIS IS DEFINITELY MY DOG!” By the time her bad habits rear their ugly head, you will likely have bonded with your new buddy too much for any of them to be deal breakers. But even after you enroll the dog in obedience classes, you must display the patience of a thousand Buddhas. An adult dog whose origins are a mystery to you, and who already has ingrained habits, will take longer to train than a brand new puppy. That’s just science! So be prepared to wait a while for that first, magical, “Sit! GOOD GIRL!”

Pros – Breeder Puppies

  • So, here is the one significant pro about purebreds: you (mostly) know what you’re getting with this puppy. You’ve met its parents, or have at least seen lots of pictures of them winning blue ribbons at dog shows. You’ve researched the breed. This dog is a highly impressionable eight weeks old when he comes home to you; he’s a perfectly blank slate! Yes, you have to train the puppy. ASAP. But puppies are people-pleasers and generally learn pretty quickly if you work with them consistently. In my personal experience, I think getting a puppy from a breeder is a wise choice if you either a) have a family or b) are considering starting a family sometime in the near future. Dogs with kids are unpredictable. Kids like to scream and pull tails and put tutus and tiaras on dogs (or so I’ve heard). At least with this blank slate of a puppy, you have a chance of getting it to behave appropriately around your children with early obedience training. So, if family is a major factor in your decision-making process, that might outweigh some of the cons I’m about to rattle off about purebred puppies.

Cons – Breeder Puppies

  • They’re disturbingly expensive, and I’m not just talking about the price you pay for the puppy herself (though that can get really pricey too). Purebred puppies typically cost upwards of $500. I’ve even seen some of those crazy designer hybrids going for like 2k! (Bich-Poo, anyone?) Then, remember that the puppy is going to need to another round of shots at the vet (sans that sweet rescue discount!), and will eventually have to be spayed or neutered. You could be looking at $1,500 minimum just to get your puppy physically up to speed! Woof.
  • And then, there’s training the little bugger. Even if the breeder worked with the puppies every day, chances are he won’t know to go potty outside all the time when you bring him home. This takes insane amounts of dedication. I am not proud to say that it took me several years (yes, count ‘em, years) to get Sydney fully potty trained. Why? Maybe because I was a college student with a wackadoo schedule that the dog couldn’t even begin to predict. Nothing was consistent, and dogs need consistency if they’re going to fully commit to housebreaking. Otherwise, one can just imagine the internal struggle: “Hmm, she’s not home. She should probably be home. Is it a good idea to pee on the floor now? Anyone? Anyone? Bueller? Bueller? Okay, I’m peeing now.”
  • Another thing I learned the hard way: Purebred dogs have some really bizarre health issues that can unexpectedly crop up due to centuries of inbreeding and things like that (creeptacular, no?). Even if the breeder is highly reputable, these things can absolutely still happen. When Sydney was five, she suddenly started going blind and nobody could figure out what was happening. It turned out that she had a very severe case of glaucoma, and after spending exorbitant amounts of money at a veterinary opthamologist, we concluded that the illness was probably caused by nothing but genetics. There was nothing we could have done. * Therefore, because of things like this, I highly recommend getting pet insurance for your purebred puppy! I had it at one point, thought it was too expensive, and cancelled it. Now, I wish I’d held onto it, knowing what I know now about Sydney’s health. I signed up for a new plan last year that will hopefully cover any crazy unforeseen future issues!

*Sydney is in fact totally blind now, but she can hardly tell the difference! Dogs can teach us a whole heck of a lot about adaptability. Dogs pull it together and get on with life. It’s pretty admirable! I’m super proud of her, to say the least.

Addendum: Breeder pups

Not all brand-spanking new puppies are purebreds. There is indeed such a thing as a backyard breeder: for example, a neighbor whose beagle ran away and got pregnant and now has six puppies to give away. You might find out about these puppies on Craigslist, at a local vet’s office, or just through word of mouth. Backyard breeders are generally discouraged, though, because the American Kennel Club looks down on the practice (I mean, it’s usually people who didn’t get their dogs spayed and let them just go get preggo, so obviously that’s a big issue). However, those puppies are the same ones who might wind up in a shelter if people don’t take them home right away. So if you hear of someone locally who has a few puppies to spare, it might not be the worst idea to check them out. That way, you get that impressionable 8-week-old puppy you’ve been searching for, you save a lot of money, and you rescue a pooch that might eventually land in a shelter. These “breeders” are under the radar though, so it might take you longer to find this kind of situation. I personally have never found a puppy this way, but I know it’s an avenue that exists!

Do not let the perfect pose deceive you. You’ve seen America’s Next Top Model. You know how many takes wind up in the trash. Avery, you wanna be on top?

So, here’s the thing: if you don’t have a family situation that warrants a more predictable dog, I would strongly recommend heading over to PetFinder.com and finding the peanut butter to your jelly at a local shelter. I think if I had it to do over again, I probably would have gotten both my dogs at shelters. But then again, Sydney was and still is the perfect dog for me. I wouldn’t change a thing about her! So perhaps the moral to the story is this: in the end, the perfect dog for you is the one that best suits you and your lifestyle. As long as you’ve thought long and hard about your needs and don’t jump the gun, the right puppy is out there for you!

Here are a few helpful, awesome links that have assisted me throughout my pet-parenthood:

  • http://PetFinder.com  — This is how we found Avery! It lets you sort through shelter pets in your area by size, breed, age, etc, so you get exactly what you’re looking for!
  • http://www.akc.org/ — For purebred puppy searches and breed information. Any reputable breeder will be registered with the American Kennel Club. So if you’re looking for, say, American Eskimo Dog breeders in the Chicago area, you can find them on this site!
  • http://www.andreaarden.com/ — Andrea is a New York-based dog trainer with whom I briefly worked back East. She’s very well known and highly knowledgeable! Even if you’re not in the NY area, her blog is full of great pointers for all kinds of behavior problems.
  • http://www.karmadogtraininglosangeles.com/ — A really fantastic LA-based group of dog trainers who are currently working with our discount husky. If you’re in Southern California, you might want to check these guys out! They have great rates for both group sessions and private sessions, and also do board-and-train if you want to go on vacation and come home to a well-behaved dog!
  • http://www.petinsurance.com/ — VPI Pet Insurance is the plan most vets recommend and has some really reasonable rates, even if you only want it for emergency situations. You won’t use it all the time, but you’ll be glad you have it the day your puppy eats a pair of underwear and you receive that inevitable mind-boggling vet bill! **

**Yes, puppies eat underwear. All the time. Or they try to. Dirty laundry = heaven on Earth. At the very least, they will humiliate you when you have friends over by trotting out of the bedroom with a pair of racy unmentionables pulled fresh from the hamper. This is a true story.

Happy puppy-hunting, boys and girls!

That Time I Went To The West Bank

In the fall of 2011, I was living and freelancing remotely in Tel Aviv, which is a major metropolis along the Mediterranean coast of Israel—vibe-wise, it’s somewhere between Manhattan and Miami. My good friend Idan had promised to take me to Hebron, a city in the West Bank controlled jointly by the Palestinian Authority and the Israeli government. He had been stationed there for a while during his time in the IDF (Israeli Defense Force, the military service which is mandatory for young Israeli men and women) and had been meaning to take another visit, especially because of the significance of the city to the Jewish religion—Hebron contains the tomb of the Matriarchs and Patriarchs: Sarah, Abraham, Isaac, Rebecca, Jacob and Leah.

West Bank Square

Photos by Alyssa Kurtzman

I was intrigued to see such a significant (albeit difficult to get to) spot, especially with Idan, who is a veritable encyclopedia of Jewish lore and, even though it’s not his first language, probably speaks better English than I do. While in the IDF, Idan had been a pretty big-deal military paratrooper but sadly can’t disclose most of his airplane-leaping past. A slight guy, he has a seeing-eye-school flunkout Golden Lab named Ray (irony intended), and his drinking stories usually end with “and then I beat the shit out of him!” We made plans to go to Hebron in November, a few days before I was scheduled to fly back to New York. Needless to say, I decided against telling my parents in advance that we were taking a jaunt into Palestine.

Let’s pause and take note that everyone and their urologist has an opinion about Palestine. It’s a polarizing topic, and I expected to find it just as tumultuous a place. The furthest I had previously been into the West Bank was a couple months earlier, when my friends and I had raced up the Mount of Olives in Jerusalem for kicks and, needing a place to buy water, wandered into East Jerusalem (which was totally uneventful). I was very curious to see what deeper parts of the West Bank would be like, particularly in a city both so theologically important and so marked by conflict. Control of Hebron has changed hands and seen violence many, many times since Israel’s independence in 1948. Currently, a tense peace is maintained in Hebron by the fact that both peoples manage to get around without almost ever seeing each other.

The day came for our field trip to Hebron. Idan and I hopped an early coach to Jerusalem, where we switched to a second bus with reinforced, bulletproof windows heading into the Territories. It had occurred to me earlier that I might need a passport, but Idan kind of rolled his eyes at me when I brought it up and ensured me that there was no sort of “border” process. Much of the highway we passed through, as we wound our way eastward over some mountains, had cement curved walls extending from the cliffs above, apparently to prevent kids from hurling rocks down onto passing vehicles. Adventures!

After an hour or so, the bus stopped in Kiryat Arba, a Jewish town bordering Hebron, and the bus driver made an announcement. Hebrew is not a strength of mine (let alone muffled Hebrew) so Idan translated: the bus wasn’t going any further. Why? Who knows. “Okay, no problem,” said Idan. “We can hitchhike the rest of the way.”

I guess if you’re going to hitchhike for the first time, Palestine is as good a place as any.

We waited at a main road between the two towns until a woman in a small car pulled over and rolled down her window. Idan told her we were going to Hebron, and she said to hop in—she was headed into the city center to set up for a friend’s wedding. We wedged ourselves into the car, which was stuffed with streamers and balloons, and she streaked off up the windy road around another steep hill. She let us off near the entrance to Hebron, which was surprisingly desolate for a Sunday (a weekday in most Middle Eastern countries). We headed toward the giant, ancient tomb, observing some of the homes along the way.

Photos by Alyssa Kurtzman

Jews and Arabs in Hebron live quite literally on top of each other. Some of the buildings along the border of the two communities are owned by differing families, one (Jewish) entering through a door from one road and taking the bottom floors, and another (Arabic) entering through a door from a road on the other side, and residing in the upper floors. Two different tenants, living in one building, never seeing each other. This isn’t to say that these two families would lunge at each other with kitchen knives if ever they met, but it does point to the kind of tacit truce that exists between their communities, each claiming their right to such an important religious focal point but trying hard to avoid an excuse to engage in any more violence. Interestingly, many of the homes have locked screens completely covering the terraces, not to keep the people inside safe, but to keep them from throwing rocks or bottles onto the street below.

On our walk over, I began to hear what sounded like speakers switching on all around us. I can’t say that I wasn’t a little on edge by this sudden, 360-degree sound, but Idan recognized it immediately as one of the five daily Muslim prayer calls. At once, dozens of loudspeakers all around us began booming out the ululating pre-taped prayer chant from every mosque in the city.

Standing in the shadow of one of the most important relics in monotheism, hearing these ghostly echoes bouncing off the hills around you—this is a point at which you become keenly aware that you are in the middle of a place that is vital enough to have sparked wars, both on the ground and in the chambers of the United Nations. The vibration of the panoramic sound is absolutely unreal—it’s like being swallowed up by religious purpose, like the ground under your feet is the nucleus of ideological gravity.

I’m getting carried away here. Trust that it was a sound I’ll never forget—especially because I managed to record it the next time it happened that day. You can listen to the recording here and I recommend you give it a listen, because, whoa.

The prayer ended, the world stopped vibrating, and we proceeded to go find cigarettes for Idan. Waiting for him, I hung out at a gift shop next to the tomb, where there were plenty of tchotchkes for visitors of any of the three major monotheistic religions. We then walked up the long ramp to the entrance, which is about halfway up the massive structure. A young, bored-looking guard waved us in, which was pretty illustrative of the trip so far—simpler than I had ever imagined.

A classroom inside the huge building’s entrance was filled with fidgeting young boys studying Talmud. Idan went to grab a yarmulke (the round Jewish prayer cap) as I looked around. There’s something really exciting and unnerving about visiting a place that’s extraordinarily important to your culture and that almost none of your ancestors have probably ever seen in person.

We followed some signs to a large chamber, where individual gated mausoleums marked each burial spot with a banner depicting the religious figure’s name in Hebrew: Abraham, Isaac, Jacob, Sarah, Rebecca, Leah. I obviously can’t say if there are actual skeletons of those people underneath each banners, but this is the gravesite that a world of people have decided to believe in, and that’s pretty cool.

The entire chamber was almost entirely empty. Idan, who’d been there before, stepped away for a moment to help some praying scholars form a minyan (that is, a group of at least 10 Jewish adults needed to perform certain prayers) while I hung out solo. There were a couple of stone basins lit up with traditional memorial Jewish yarzeit candles, and I decided to light one for each of my deceased grandparents. A nice plan, except there were no matches to be found, and no Idan nearby to supply me with a lighter. So, not wanting to leave and disturb someone in the halls asking in terrible Hebrew for a light, I started to crawl around looking for a spare match. If I never expected to be in the tomb of my religion’s founders, then I can safely say I also didn’t expect to be slithering on the floor there, examining broken matches like a hobo. I finally found the remains of a matchbook, and then there was light. Kin, welcome to the tombs.

Photos by Alyssa Kurtzman

I found Idan outside the main chamber, and we left to explore the rest of Hebron. We went wandering up toward the Arabic neighborhoods on the hills above us, exploring a very old-looking cemetery as I took photos of some of the crumbling abandoned buildings (and one gutted 70’s-era Schwepps Truck) surrounding us. I stepped into the doorless atrium of one former home, empty except for a tipped-over desk chair. Idan stepped in behind me as I was snapping a picture and gasped. I turned nervously to him: “What?” “We used to smoke in here!” Ah, yes.

These vacant areas of the city really were like a patchy, cement playground. In parts where the hills were steep enough and the buildings close enough together, you could leap from rooftop to rooftop. (Try not to sing the Aladdin song. Try not to sing the Aladdin song.) Idan showed me different parts of the city where he had been stationed: tall guard towers, assorted little barred kiosks near schools and markets. Eventually, we had wandered high enough that I worried we were encroaching on the less outsider-friendly neighborhoods. “Oh, don’t worry,” said Idan, reassuring me that we had been in that section for some time now.

Along one road above us, two boys poked their heads out from behind a stack of burlap sacks. “Salaam!” they greeted us. “Salaam!” we said. Then, hesitantly, they said “Hello!!” “Hello!” we said back, still from a distance. The boys looked gleeful, probably that they had gotten us two idiots to mimic them. From behind the stacks emerged someone who looked like their father, investigating what his sons were yelling at. We exchanged waves, and then he shouted something down to us in Arabic that I didn’t understand. Idan turned to me. “He wants to know if we want to come up for some coffee.”

I can’t pretend that I wasn’t a little nervous to approach a strange Arabic man, wearing jeans and no head cover, accompanied by an Israeli male that I wasn’t married to, in the supposedly unfriendly section of a city in the mostly hotly contested territory in the world. But I knew to follow Idan’s experienced lead. Good thing we both love coffee.

We walked up to the gate of the man’s home, and he let us in. We followed him around the back of the small house, where children were playing in a little yard next to a wooden shed. When we walked through the doorway into the house, I half-expected to find a gathering of other tourists, similarly puzzled to have been invited in. Instead, we were led into a beautiful parlor with intricately upholstered furniture. The man invited us to sit, and we started chatting. His Hebrew was about as stilted as mine, which made it one of the most productive conversations I’ve ever had in that language. He told us he was a sandal-maker, and we told him we were visiting from Tel Aviv but I was originally from New York. The two sons came in with their sisters, sitting down and pointing at us, giggling to each other.

The man’s beaming wife came in with a tray of beautiful silver Arabic coffee cups. In case you haven’t had it, Arabic coffee is kind of like espresso but stronger, darker, and brewed with almost equal parts grounds and sugar—at least if you make it right. We all took a cup and then she sat down, too. At this point, the sons were bored enough to turn around and start playing some shoot ’em-up computer game with Arabic subtitles, but the girls stayed put. One of them started playing with the big SLR camera around my neck, and her mother shooed her away. “That’s alright!” I said. I showed her how to look through the viewfinder and how to twist the lens to zoom the picture in and out, and she was entranced.

An older woman came in and the man introduced her as his mother. The granddaughters jumped aside so she could sit, and she asked her son a question, which he relayed to us. Are we married? I don’t know the Hebrew or Arabic word for ‘platonic’ but I think leaning back and shaking your head with your eyes wide open is universal code. “No, no, no, we’re friends.” The women both started laughing at this absurd notion, and Idan and I just kind of smiled and shrugged. Then, the man asked us if we wanted to see his factory. (Actually, I don’t know for sure if he explicitly said “factory,” because Idan had to translate that one for me.) I still couldn’t believe where we were and how unremarkable it all seemed—not that it was a mundane experience, but that it was exactly what you might expect from a conversation over a coffee with some friendly people you don’t know.

After we finished the coffee, back outside we went. This time, we walked down into that little shed in the backyard—the sandal factory. Inside were four old men working at ancient-looking sewing machines and smoking cigarettes. Our host showed us a few finished products and told us that his sandals were some of the best quality you could find in the Israeli markets. Idan and I promised to tell our friends.

And that was it. Idan shook the man’s hand, we thanked him and his family for hosting us. I wish I had gotten a photo of all of us together, but regretfully I didn’t even think of it, not to mention my new little friend was having too much fun with the camera for me to want to take it back any earlier than necessary. We didn’t realize until later that Idan had been wearing his yarmulke that whole time.

The rest of the trip was entirely uneventful: We watched stray dogs and ate sandwiches from the gift shop while we waited for the bus back. When it came, we hopped on and headed back to Jerusalem.

I don’t know what groundbreaking lessons are to be grasped from our day in Hebron, except perhaps that 1. Religion is quite a powerful thing and 2. People are generally as generous as they are curious. That said, I can’t say that I would have traveled to such a foreign place without a trustworthy friend who knew the city so well. Before the trip, I never expected any experience in Hebron to top the Tombs in terms of enlightenment, but then I got a rare chance to see the expectation of culturally-rooted animosity completely disproved. Also, I can say that I have breathed the ground-dust of the holy tombs of the Matriarchs and Patriarchs, and it smelled like history.

Let Me Fix You: Box Spring to Bed Slats

Scouring thrift stores can be a great, cheap solution for outfitting your space with vintage furniture, but it can also be the source for a growing to-do list of DIY projects. Such was the case with the beautiful wooden bed frame I found at my local Salvation Army. I scooped it up for $120 and brought it home to my new apartment only to discover that my box spring now posed two major problems: (1) the box spring, combined with my modern day super thick pillow-top mattress, made the bed too high to get into (like step-stool necessary), and (2) at some point during the move, my box spring developed this squeaking sound that creaked every time I rolled over.

So, I could get a new box spring (but it would set me back another $100 and it still wouldn’t solve the height problem) or I could replace my box spring with an alternative. I went online and discovered many mattresses today, particularly those of the pillow-top variety, don’t need to be flipped and thus don’t require a boxspring anymore. My first thought, of course, was: IKEA! They don’t believe in box springs either! Which would have been an excellent solution, if only my new bed frame had had a center rail—an integral structural support to the thin slats sold at IKEA. Not eager to test out their buckling potential, I looked into: a single sheet of plywood, which was nixed for its apparent susceptibility to mold growth, or a bunky board, except that they are designed to only be used in addition to slats (which made me question why people buy them at all?). This left me with only one option: it was time to make my own bed slats.

Step 0: Googling

I started researching making my own bed slats and found this excellent slat tutorial.

Step 1: Acquiring Tools

You know what’s awesome about doing all your previous DIY projects in your Stepdad’s back shed? Power tools. Do you know what my apartment doesn’t have? Power tools. It does, however, contain a wimpy (albeit visually appealing) toolbox! But, given the scope of this project, and even though I had some woodworking knowledge under my belt, doing this on my own was going to require purchasing a few things.

With the number of DIY projects starting to build up in my apartment, I decided it was time to invest in a power drill of my own. Turns out, a power drill/portable saw combo at Home Depot only costs $10 more than just a power drill. Considering I was already set to spend the money, naturally, I bought the combo. It was the cheapest brand, Ryobi, but at $99 I wasn’t being picky. I double-checked reviews online, compared the features to the other drills around it, made sure the set came with a lithium-ion battery (not nickel-cadmium, which was the former battery standard but is now being phased out), and that the battery pack would work with any future Ryobi power tools I chose to purchase (next buy: power sander!).

But once you’re the proud owner of a fancy new power drill, you still need two things before you can actually use it: drill bits and screws. I opted for a slightly larger drill bit kit because I wanted to make sure I had a set that included all the basic screwdriver heads. Because I had no idea what kind of screws I’d need for all my drill powered future projects, I settled on this assorted wood screw pack to get me started. I also purchased a variety pack of nails just in case this whole plan blew up in my face and I had to resort to my good ol’ hammer. (For more tips on what you should have in your toolbox, check out Michelle’s suggestions here.)

Note: I have yet to use my portable saw but my vastly more experienced Stepfather strongly suggested I buy myself a Work Mate before using it. It’s a foldable and portable work table with clamps that you can use to saw things more easily (read: without hurting myself).

Step 2: Acquiring Materials

Chances are, wherever you go for wood, they are going to have an overwhelming number of options. There are several key decisions that you will have to make:

Note: Before you go to a lumber supplier (in my case: Home Depot), it is important to measure–actually measure with a tape measure and everything. Don’t be rushed, and don’t skip this, or you’ll end up making the same mistake I did.

First thing you have to decide is what type of wood you want. For a project like this, where no one will be seeing the wood, you can go with a cheaper soft wood like pine or Douglas fir.

Next, you need to decide on what thickness and width you want your wood to be. When I think about lumber, “2-by-4” is more of a name than an actual description. Turns out it’s actually both. The first number is the thickness of the wood and the second is the width. So a 2×4 is 2” thick and 4” wide. Unfortunately, to be extra confusing, lumber is actually identified by what they call nominal lumber sizes, meaning that it is labeled as the size it was before the wood was planed and cut. Therefore a 2×4 was 2” thick and 4” wide. However, now as it lies in front of you, the wood is only 1.5” x 3.5”. Not confusing at all, right? I totally didn’t know that until I was researching for this article, so of course I took the length of my bed (72”) and decided I’d need eight 6″ wide boards. With each of the eight boards spaced 3″ apart this would give me: 48″ of wood + 24″ of space = 72″. When I got home and realized the real measurements of the wood, my 3” between each board turned into 3.5” but it still worked. I wanted the slats to be as thin as possible for the mattress to sit on while still being strong enough to hold it up without bowing, so I went with 1” thick wood. Don’t be afraid to ask for help! The blog post I was following had me looking at 2×12 boards, but the employee helping me saved me a ton of money by suggestion I use 1×6 boards instead.

The next thing you need to figure out is length. My 1×6 boards were each 72” long. (Again, the blog had suggested 16’ (192”) boards, but these were way more manageable and cheaper.)  72” is a lot longer than my full bed, so I needed to trim them down to size. I may now be the proud owner of a portable saw, but I still had the friendly folks at The Home Depot cut my wood for me. The first time I tried this, however, I had been lazy and rushed in my measuring, so the super quick measurements I scribbled down were actually wrong. When I got my perfectly trimmed 52.5” boards home, I discovered that they were too short by 1.5”. One thing the blog had right, which I ignored, was the common bed sizes: if I’d listened to them regarding the width, I would have cut my wood correctly (to 54”) the first time and not wasted $30.

When buying wood, it’s also important to check for defects (like these common wood defects) in each board. When I got home with my second round of correctly cut 54” wood, I realized I had one “weak” board, meaning that the board was easier to bend in the middle than the rest. I already had my boards spaced 3.5” apart and I didn’t want to lose a whole board and risk putting too much weight on the remaining ones. Instead, I put the weak board on top of the metal frame on the end, where it would be more supported and have the least amount of pressure on it.

bed 2Step 3 (which should have been Step 1): Designing using your vast structural engineering knowledge… or what you learned from Google

So, at first, the plan (devised from the blog I’d found) was just to get a bunch of boards and lay them across my frame. This would have been great except that, unlike their example, my bed frame didn’t have anything on the sides to keep the slats from moving or, worse, slipping off. Not wishing to experience this in the middle of the night, I had to do a little extra planning:

Let Me Fix You- Box Spring to Bed Slats

Thanks to my earlier wood measuring error, I had a few extra boards to work with, so I decided to add two support boards to keep the slats from moving and/or slipping off the frame. Once flipped over, the supports would hit against the metal on the frame, thus keeping the slats in place, and look like this:

Let Me Fix You- Box Spring to Bed Slats (1) If only I had made these drawings BEFORE I started and not just for this article. Add that to the lessons-learned list.

This was the final product:

Bed Slats square

After a month of excellent sleep, without injury or sagging, I think it’s safe to call it a success!

Budgeting Your Overwhelming Trip Overseas

As I demonstrated in part one of this topic (Planning Your Overwhelming Trip Overseas), when it comes to trip planning, Effie Trinket has nothing on me. I charted a course for my best friend and myself through Paris, Rome, Florence, and Venice, scheduling in every sight we wanted to see and restaurant we wanted to eat at. In two weeks. On a student budget.

traveling square

Photos by Remi Coin

Since my first installment was an overview on how to approach planning a trip abroad, I wanted to follow up with a deep dive on how I budgeted the trip. It can be tricky knowing where to splurge and where to pinch! Again, this article comes from my personal knowledge traveling France and Italy, but these tips can definitely be of use when planning any trip.

When you start budgeting your whirlwind trip overseas, break down your choices and approach them step-by-step as you estimate and add up prices. Naturally, every traveler will have personal preferences on where they want to save money and where they want to go a bit crazy. My friend might have rolled her eyes at me when I laid down 40 euros to make a necklace of hand-blown Murano glass beads in Venice, but I maintain that maybe she didn’t need a ¼ liter of wine at every meal, either! It was no big deal, though, as neither of us expected the other to pay for something huge unless we both wanted to. Make sure to plan what you want to spend the most on, and consult with your travel partner(s) so no one is taken by surprise.

1. Airfare – This will likely be the biggest price tag, with round trip plane tickets overseas easily going into the thousands of dollars. You can save a lot here by planning ahead! Studies have suggested that the optimal time to buy plane tickets is either weeks in advance and that tickets are pricier in the morning (when business people are typically booking on the company dime) than in the afternoon (when future vacationers come home from work and plan their own trips). Websites like Kayak, Expedia, and TripAdvisor can also help you find cheap airfare by allowing you to plug in numbers and play around with different airports in nearby cities and compare prices from many different airlines. These sites even let you set up notifications for certain flights, so the site emails you if one of your saved flights lowers in price.

2. Accommodations – Depending on your comfort and safety preferences, the cost of your accommodations can vary greatly. If, like many young backpackers, you are planning on hitting up the local hostels, you still have a wide range of options. Websites like HostelWorld and HostleBookers can be hugely helpful in finding accommodations that fit your preferences and budget. These sites have listings for tons of places and come with reviews, photos, lists of amenities, rates, availability, and maps to show where you’ll be in the city and where public transit is located—everything you need to plan your trip.

When I was sorting through this wealth of information and options, I considered price and location first and foremost. Often, the cheapest accommodations are distant from the main attractions and events the city has to offer. Do some research into the city’s public transit: is there an easy way for you to get where you want to go, and does the transit run as early/late as you’ll need? Also, keep in mind that staying out all day without a stop at “home base” can be draining. My friend and I went abroad during July and were often hot and exhausted after lunch. Finding a park to nap in became a frequent routine that was critical to our enjoyment of the rest of the day. If that doesn’t jive with you, make sure you’ll be able to head back to the hostel fairly easily when and if you need to.

Aside from price and location, it is also important to consider the atmosphere of your accommodation. In Italy, we stayed in a vastly different hostel in each city. A Venice Fish was a communal, hippy-ish house full of excitable, partying Australians. After Venice, we stayed in PLUS Florence, one of a chain of hostels under the PLUS name. Though we were worried that it would feel distant and corporate, it turned out to be an awesome experience and it was very geared towards ease of the traveler, with everything from a money exchange at the front desk to preplanned daytrip offers for the guests. In Rome, we stayed in these cabins outside the city. About half of them seemed to be populated with other travelers, while Roman citizens rented the other half to temporarily escape the hustle and bustle of the city. This seemed like it would be a really relaxing stop at the end of our trip, but since the cabins were sorted by type of occupants, we ended up in one end of a duplex shared by five or six enormous bros who drank and listened to dubstep until approximately 4 o’clock each morning. In short, even though you will never know exactly what a place will be like until you get there, you are going to be spending a significant amount of time at your accommodations, and it is worthwhile to scour reviews and photos to find a good match for your personality and preferences.

3. Travel within City/Country/Continent – This item varies a lot depending on where you are going. In some places I’ve been to, like West Africa, one could take daytrips from a central location very cheaply and easily, but traveling from country to country took either a good deal of time (a few days) or much more money (flights around Africa are nearly as much as flights from North America to Africa!). However, traveling around Europe was (relatively) cheap and, because it is such a frequent destination for people in their 20s taking a modern-day Grand Tour, there are many discounts available to young travelers. RailEurope is an excellent tool to plan and book tickets, as you can layout your trip and get price quotes for each leg or find special offers that help guide your planning. Another benefit is that you can buy passes that will work on any one of a number of given days. That means if you decide to stay an extra day or leave early from a city, all you have to do is look up when the next train comes and hop on!

Once you’re inside your chosen city for a few days, you’ll want to get around to all the sights. You can certainly take taxis everywhere, but most of us just don’t have that kind of money, or we would rather spend it on awesome stuff instead of a yellow car that smells like cigarettes. Getting familiar with the city’s subway or bus system is a must. The bonus to this is that you can spot the deals ahead of time and get the most ride time for your money. Our lack of foresight in this aspect of our trip was what ultimately led to our ferry ticket in Venice, as we were trying to make it back to a station large enough to have 5-day passes for sale without having to purchase another one-way pass. C’est la vie! But it is a fate you can now avoid.

4. Food Budget – I am a huge foodie, make no mistake. A big part of traveling for me is trying the weird things they like to eat there and the classic foods for which they’re famous. That being said, I revolved my Italy/France trip around art, not around food. Still, I was able to find a plethora of tasty food options all over every city. For me, the Rick Steve’s guide to Europe was invaluable. It (and other travel guides like it) collects the tastiest and most interesting food options and sorts them by neighborhood and price. With short descriptions of the restaurant’s atmosphere and fare and a little pricing scale, we had no trouble choosing a restaurant just a short walk from wherever we were.

When planning ahead for a budget, it’s extremely helpful to use these guides and the benefit of your home Internet to plan ahead a bit and check out the online menus and price lists of the type of restaurants where you plan on dining. Though there is, of course, no need to commit to a specific restaurant tour just yet, this will help you estimate costs and allow you and your travel partner(s) to consider where to save and where to splurge.

5. Attractions and Shopping Budget – This part is very broad and very dependent on your interests, budgets, and need to bring home cheesy souvenirs for your loved ones. Keep in mind that you will possibly be paying for things like entry fees for museums, covers for bars, tasty bottles of wine, key chains that say “I ♥ NY,” and other things that spark your interest. Consider your buying habits and maybe even make a list of what kinds of things you plan to purchase while on vacation, so you can more easily budget your money for those items and not buy the first 20 euro Eiffel Tower paperweight you come across.

As for attractions, the Internet is the perfect resource for discovering that admission to the British Museum is free but a ride on the London Eye costs 26 pounds. You can also often find similar tourist deals as you did for transit—for example, the Paris Museum Pass gives you free entry, with skip-the-line privileges, to over sixty Paris museums and monuments. That is something I wish I had researched before spending two hours outside the Musee d’Orsay.

In closing, plan your budget, stick to it when you can, and most importantly, have fun!

Photo by Remi Coin

Photo by Remi Coin

An Introduction to Cosplaying

Costume play, more widely known as cosplay, is the hobby of dressing up as characters from various fandoms such as anime, video games, TV, movies or comics. Cosplaying has been gaining popularity since the 90s, but it has been around much longer (Trekkies of the 1960s, anyone?).

Photo by Meaghan Morrison

Because cosplaying has been gaining pop culture’s attention so rapidly, there are many misconceptions about what the cosplay community is. We’re not all antisocial, Japanese-obsessed, overly sexualized, master seamstresses!  The community is made up of all different types of people—people with different body types, different fandoms, and different levels of craftsmanship.

All bodies welcome

Many people in the community (or outside the community) think that, in order to cosplay, the cosplayer must have a body type that exactly matches the character. While I don’t support this idea, I know there are many bigger women out there who work hard to cosplay to fit their body type, simply because they prefer to cosplay that way.

Several of my friends will take an existing character’s costume and make small adjustments in order to make themselves feel more comfortable in the costume. I’ve seen girls take a nearly thong bottom of a character such as Kitana from Mortal Kombat and change it into shorts: this method maintains the idea of the character while allowing the cosplayer to stay in their own personal comfort zone.

Clever craftsmanship

Craftsmanship is also a big area of discussion in the cosplay community. Not everyone has the skills or resources to make everything from scratch, but thankfully China exists. There are many websites that sell a variety of premade costumes from popular series for a relatively low cost, such as EZCosplay or Hello Cosplay. But, be aware: it is a cheaper costume, so it isn’t always the best quality—less money spent usually means cheaper fabric and shoddy stitching! If you are willing to spend more than $150, there are many people who do costume commissions. Commissions can be perfect for your body and style, but can easily skyrocket in price because you are paying for a person’s time and energy on top of the materials that go into making the costume.  If you’re interested in commissioning a costume, try finding a costume artist on Etsy, Storenvy, or Cosplay.com.

Those who are able to make their own costumes are able to make costumes for a lot less than even pre-bought costumes in most cases. Making your own costume doesn’t necessarily mean buying the fabric and making all the pieces from that. Depending on the costume and the complexity, it is really easy to go to a local Goodwill, Salvation Army, or any other second hand store to find pieces that will work for your specific costume. I know I’ve even pulled some random clothes out of my closet, put on a wig, and called it a Mary Jane Watson cosplay.

Photo by Meaghan Morrison

There are many things that can be done to make an affordable costume depending on the series. Granted, if you are trying to make full body armor, it probably won’t be inexpensive. Several of my friends make full body armor or chainmail costumes that easily take up to several months to complete. I haven’t had the opportunity to make such a complicated costume yet, but with all the sewing I do for my costumes, I put in twenty to fifty hours of work start-to-finish per costume.

When I look to make a new cosplay, I start by choosing a series I really enjoy and then pick which character I want to make. I tend to pick characters based on my opinion of the character, as well as the character’s design—I don’t want to make anything that isn’t visually appealing! From there, it’s all about gaining as much reference material as possible: the more angles I can get of the character, the better off I am for my fabric decisions and overall construction.

The pros of cons

Cosplaying is an easy way to make friends through various events and conventions. Events and cons can range from several hundred people, such as hyper-con, to tens of thousands of people (such as San Diego Comic-Con or WonderCon). There are many events going on—it’s just a matter of finding them near you!

Events and cons are easy to find via Google or even just by talking to other people in the community. The cosplay community is a very tight-knit and strives to help one another to be successful in the hobby. To start a discussion online, try visiting Cosplay.com for tips on building your cosplay, or share pictures of your art with other cosplayers on DeviantArt.

How to Turn 26

In the weeks before I turned 26, a tide of nausea briefly rippled through my stomach. It was equal parts vanity, regret, and mortal terror. Turning 26 is not as easy as turning 25, 27, or even the dreaded 23 (when nobody likes you, because, what’s your age again?). There are no more additional perks that come with age—renting a car at reduced cost came at 25, and there is nothing else coming down the pike until Social Security (hah) and being able to get the senior discount at movie theaters and Denny’s (assuming your digestive tract somehow grows an iron coating, or perhaps you stop caring about having to buy new underwear). When you turn 26, you leave the 18-25 demographic—meaning that advertisers now care less about what you think because, statistically, you act and buy and think like a young person no longer.

Photo by Sara Slattery

I began to think of all the things I hadn’t done, all the plans I’d made and failed to live up to, all the ambition that couldn’t measure up to the demands of reality. The thought popped into my head “…what if I am turning 30/40/65/on my deathbed, and I still feel this regret?

Suffice to say, I got quite inebriated that night. But, there is really nothing quite like existential terror to shake you out of your routines or thoughts or beliefs that are, for lack of an accurate and more polite term, bullshit. There is nothing quite like existential terror to make you really step back and evaluate what you are doing, why, and whether or not it’s the right thing to do.

1. Vanity – “I’m too old for this sh*t.” – Roger Murtaugh, Lethal Weapon

You have to take a look at the things you do and the things you did. Some folks can line up shots on Tuesday night and be fresh and ready to go for round two at 5 pm Wednesday. If you are 26, chances are you are not one of those people—I certainly am not.  Put down the Keystone Light and the shot of vodka if you know deep-down you’d rather have a pint of a microbrew or maybe a nice glass of red wine.

At first, when I had this epiphany, I just thought that it was about me getting old and boring, but this couldn’t be further from the truth. It meant I cared more about the journey than the destination—less about getting messed up, and more about really enjoying a nice thing. Youth is turbulent and extreme, and this is just the curve of human experience normalizing. The volume on life doesn’t need to be at 11 all the time. Also, you may now come to understand that these types of volume-11 activities were stupid or embarrassing more often than you are comfortable admitting out loud.

2. Regret – “Sometimes I can hear my bones straining under the weight of all the lives I’m not living.” J. S. Foer, Extremely Loud and Incredibly Close

Life is a game in which you have a finite number of points to allocate to skills, and a finite amount of experience. You must understand that you cannot be both a cowboy and an astronaut—a choice must be made, and that pragmatism will do everything it can to micturate upon the rug that brings together the room that is your life. Money and your means of living will do everything they can to dominate your decision making, making them predicate to happiness—if you let them. It’s your job now, as a 26 year old, to carve out happiness from the charred husk of post–Great Recession America. This will require willpower, creativity, and periodic bursts of self-destruction borrowed from your youth (known prior to your 26th name day as “fun”). This project will take you roughly 30-40 years, so plan it out.

And speaking of “fun,” if you are still doing this stuff well into your 30s and it isn’t otherwise causing your life problems, then don’t listen to critics who’ve “grown up”—if you like doing it, find folks who also like doing it, and make them your friends. Don’t feel bad: remember, it’s keeping you sane and letting you live your life the way you’ve planned it. Unless it’s hurting your health or relationships, don’t be easily shamed by people, especially older critics. (If you feel particularly saucy, remind them that the economic meltdown was voted in by their generation, and that you are dealing as best as you can with the mess they made. It seems to be popular to hate on Millennials—don’t tolerate it. Stand up for yourself.) Eat. Drink. Be merry.

If you wanted to do something, take the time now. Nominally, you’re still young. Go on that adventure, that trip overseas, the road trip across America. Do that thing you always talked about doing, but never got around to doing. Do it now, and let no mortal stand in your way.

Most importantly, do away with the notion that you or anyone else in your peer group has this part of life figured out. If it looks like it, they’re only good at faking it. I’m pretty sure even Mark Zuckerberg went through a “what does it all mean” phase while sitting on a throne made of 100-dollar-bill bricks rubber-banded together and stacked like cocaine-stained legos. There is a relative scale, but more or less we all feel it. Don’t try to compare yourself to other people—they aren’t you. They don’t want what you want, and they haven’t been through what you’ve been through. I was surprised to find that some people I know who are happy on paper are filled with the same existential terror and they question themselves even harder than I did. If you still haven’t found what you’re looking for, go out and find it.

3. Mortal Terror – “Someday, I am going to be dead.” Everyone ever on at least one night, staring at the bedroom ceiling

Yeah, you’re going to die. Unless humanity manages to pull its crap together and invent clinical/biological immortality (which, awesomely enough, exists in lobsters), you are probably going to feel the icy grip of death wrap around your chest and squeeze out your final breath. Did that make you uncomfortable? Good, that means you’re paying attention.

Let it inspire you. Let it motivate you. That mortal terror you feel is a fire underneath you that you need to transition through this phase and accomplish what you wish you had already done. You are down two touchdowns in the game of your 20s, and you need to rally a comeback.

Let your life be worthy of a bard’s song. Hit each day like it’s a good day to die (as if you were a Klingon). Your days aren’t long, and they’re getting shorter.

Establishing a Face Care Routine

“Maybe she’s born with it, maybe its Maybelline.” I don’t know about you, but I have grown up hearing these words spoken in commercials, seeing them written on advertisements, and watching them parodied in many improv shows. Maybelline wants us to believe their products are so natural, no one can tell you are wearing any makeup at all.

Photo by Sara Slattery

Though the sentiment is okay, I never really liked wearing that much makeup and don’t particularly like companies telling me I have to wear it in order to look the way I want to. So, I established my own face care routine early on to try and find what makes my skin feel the best—that way, on days when I am the laziest person in the world, I can still venture out into the real world as confident as if I had been airbrushed by professionals that morning.

Here are a few tips for establishing the right face care routine for you. Whether you be male, female, or an alien from outer space, taking care of your skin is important!

First things first: Wash your face!

First and foremost, to ensure your skin is looking radiant, find a cleanser that works best for your skin. There are a lot of different products out there, so do your research and (if possible) talk to a dermatologist about your skin and what would work best.

Feel really oily all the time? Try products that help balance your pores, such as Cetaphil Cleansers. Or if your skin is really dry and needs extra moisturizer, try products that have lotion in their cleansers such as CeraVe. Or if you are like me and get stress acne, Neutrogena Stress Control acne cleanser works very well for exfoliating my skin. Regular soap and water works… but not that well, and it can dry out your skin. What’s great about cleansers is they are specifically made for the skin on your face.

The right cleanser for you all depends on what your skin reacts to the best. But be realistic! A lot of cleansers contain chemicals or ingredients that help some people’s skin but create problems for others’, so you will need to try a few before settling down. Commercials and beauty ads will always try to sell you on The Next Big Thing but these cleansers are usually just trends that come and go like any other product. Take a long look in the mirror before you browse the cleanser aisle and think about what works best for you. Your skin reacts to the world around you, be it stress, weather, or hormones, so finding a cleanser that works great in all areas will be one that lasts.

How often should I wash my face?

This is also something that will depend on your skin and how it reacts to products. Overall, the best skin routines include washing your face once or twice a day. I know a lot of people who keep their products in the shower and wash their face when they wash their hair. However, depending on what your day, week, or month has been like—whether it’s been super stressful or you are spending all your time outside in the dirt—you might need to change up this routine.

If you wear a lot of makeup, washing your face is paramount because of the extra products on your skin. Wash your face before you apply and after you take it off to make sure all the extra products are gone. You also shouldn’t scrub your face too much. The skin on your face doesn’t go through the same wear and tear that your hands or your feet do, so extra scrubbing or cleaning will eventually strip your skin of its natural nutrients and could dry it out, creating more problems in the long run.

After you wash your face, apply a gentle non-scented moisturizer such as Vaseline or Neutrogena face creams to ensure your skin won’t dry out. If you have oily skin, there are moisturizers that help to prevent extra oil while still moisturizing your skin, such as Cetaphil Oil Control Moisturizer.

What about facials or face-wipes?

I won’t advertise for super expensive and fashionable beauty products, but some of them are really fun to use and make your skin feel great afterwards! You’ll find the fun facial products such as charcoal masks, salt scrubs, and sparkly soaps in a number of stores like Lush or Sephora. Though a daily skin routine doesn’t need these to be successful, they are fun to have and to use. If you are interested in buying some mask products or facial creams, do some research and ask question of the sales representatives about what would work best for your skin and won’t undo all the hard work you’ve put in your daily routine! Use these products at most once a week to give your face a shiny new start.

For those who are on-the-go or just lazy like me, there are some face-wipe products that allow you to clean your face of dirt, sweat, and makeup in a flash, keeping your pores clean and clear. Neutrogena Face Wipes and Oxy Daily Cleansing pads are a good shortcut for those who don’t want to go through the whole process every day. These face wipes can be used as a substitution for most of your facial cleaning, but their powers only go so far. Nothing can replace a cleanser and hot water when it comes to getting dirt out of your pores.

Can I still wear makeup?

For those who wear make-up, the best way to help your skin is to use as little pore-covering makeup as possible. Heavy foundations, if applied too often and not cleaned off properly, can cause some major issues for you
r skin. The best way to help your face stay as clean and clear as possible is to find foundations that are light and let your skin breathe throughout the day—such as a mousse or a light cream. If you can, only apply foundation to problem areas, such as old acne scars or under your eyes. That way, the rest of your skin can enjoy its natural state.

Powder foundations are also a good substitute. After you apply your moisturizer, use a fluffy brush to apply the foundation power on your face, creating a light and even tone. At the end of the day, make sure to wipe all of your makeup off and wash your face so it can breathe overnight!

Popular beauty and skin care brands will offer a wide range of products that cover every problem that your skin could have. Morning puffiness, blackheads, whiteheads, oily, dry, spotted—you name it, there is a cream or a scrub that claims to take care of it. Even though a lot of these products sound really great, a lot of them are just like any other scrubs and cost twice as much. So, when it comes to super cool facial creams that promise to fix everything under your skin, think twice before you purchase and first find out if it’s something you really need or want.

It also takes a while for your skin to react to this new cleaning routine, so don’t be surprised if there are no results within the first couple days of your new regimen. Sometimes cleansers react badly to skin, so if you see angry red blotches on your skin or it gets exponentially oily or dry, find some new products. But, if by the end of one to two weeks you are starting to see a cleaner brighter self in the mirror, then go forth with confidence!

Let Me Fix You: The Pink Chest

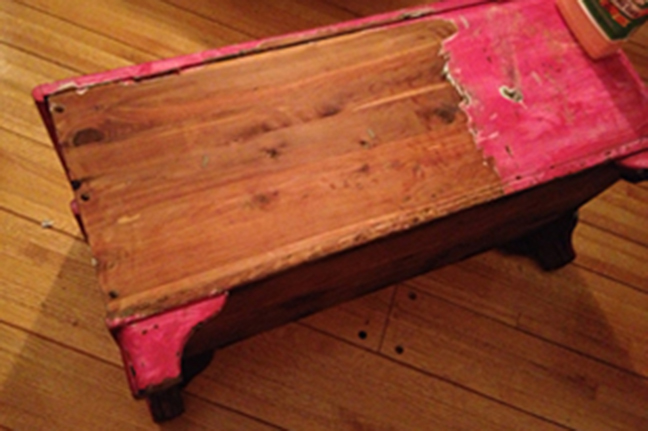
When you live with someone who has a trunk obsession, you might one day find an ugly, ugly, ugly hot pink cedar chest sitting in your living room. Now, because you have taste (and they do too thankfully), the only way this atrocity can stay is if you take it back to its original wooden self. Bring. It. On.

Before I get started though, let me warn you that this is not so much a DIY instructional as it is story time: the trials and tribulations of someone who’s just gonna do stuff and hope for the best.

The paint job was straight up shit. Bad paint jobs mean one of two things: either the previous owner was a crap painter or they were trying to cover something up. You never know what you’re going to find, but with the beautiful, untouched cedar wood visible inside, there was a very good chance that treasure lay beneath.

The Stripping

First I wiped the chest down with Murphy’s Oil Orange Multi-Use Wood Cleaner Spray (think Windex for wood). The goal wasn’t to clean it, just to get the crusty chunks of dirt off. I decided to start with the back of the trunk, figuring this is where I’d do the least damage if things went awry. In lieu of the regular, noxious smelling paint stripper I’d used years ago, I decided to try Citristrip because it claimed to be low on fumes yet high on results (since my work space was doubling as my living room).

The basic idea behind all paint strippers is that you apply a coat on top of the paint, wait, and then scrape the paint off. I poured out the Citristrip (which has the consistency of melted Gak) smeared it around, poured some more and smeared again. The directions suggested using a paintbrush, but I opted to finger paint with a pair of rubber gloves. And then I waited the requisite 30 minutes for it to do it’s mojo (and another 10 because, well, I forgot to check on it).

With Citristrip, you don’t see the paint bubble up like you do with the oh-so-fun smelling stuff, but the paint will discolor enough to let you know it’s working. You can keep it stripping for up to 24 hours, though I never left it on more than two. But the thicker it is and longer you leave it, the easier the paint scrapes.

I used a 3” putty knife to scrape. I tried to follow the grain, scraping in one direction for the longest possible pass so that most of the paint ended up on my putty knife. Then I wiped it off on a paper towel, threw it into a plastic bag, and got ready for the next long swipe. Most of the paint scraped off like buttah. For the paint stuck in cracks and gouges, I used Ikea’s curved paring knife. Beware: aggressive scraping leads to wood shavings. If (and when) I saw strips of wood peeling off, I stopped and moved on.

pinkchest_648x431

Because I was only working on a modest sized towel, and I like my furniture and my shiny hardwood floor, I had to be very careful about dripping and spraying. This meant I could only strip one side at a time instead of doing the whole thing at once.

The Scrubbing

Even after you scrape off most of the paint, there’s still a goopy, residue left on the wood that just smears if you try to wipe it up with a paper towel. In my head this gunk was full of stripping chemicals that were going to hurt the cedar if they stayed caked on. So I washed each side individually after I stripped it and then I threw it in the bathtub (where it fit perfectly) to scrub it some more.

Originally I was using the Orange Cleaner spray with grade #00 steel wool (steel wool comes in several grades). But by the time I’d stripped 3 sides, I only had a 1/4 of the orange spray bottle left, so I moved on to the more economical Murphy’s Original Oil Soap. The steel wool not only picks up the gunk left by the paint stripper, but it also acts as a gentle sander. Unfortunately, the #00 was just a bit too fine which meant it would get matted with all the crud much more quickly. I almost went through the whole 12 pack, hence switching to the coarser grade #1 steel wool which was much better at lifting up stubborn paint.

The advantage of doing this in a bathtub (or if you’re lucky enough to be outside near a hose) is that there’s a constant supply of water and boy oh boy did that liquid blacken. The water that came off was nasty (a putrid diarrhea color) and it sprayed everywhere. Good news was that it smelled nice. It was probably in the bathtub for hour until the water finally ran beige.

The Sanding (or My Big Mistake)

I left the trunk to dry overnight and when I woke up in the morning it looked awful. I have scrubbed this thing to an ashy death, killing all the potential I spent hours scraping and scrubbing into existence… not really, but it felt like it. Having already read things like this, I was aware that this was another step in the process but it wasn’t any less horrifying.

My naivety led to me to think that all the ashy discoloration would simply go away with some oil and that sanding was only for the rough patches. The wear and tear was cool, why sand that away? So I gave it a mild sanding with some 320 grit sandpaper (yes, sandpaper has grades too) and then I moved on to oiling. In retrospect, this was my big mistake, but more on that later. The only thing I actually sanded was the trim because it had this funky peach fuzz going on along with a faint greenish hue left by the original olive colored paint.

The Finish (But Not Really)

Now for what felt like the daunting part: choosing a finish. There were way too many choices, but I surmised the standards were oil, varnish, shellac and laquer. My biggest concern was ease-of-use in a small space, but I also wanted a natural shine, not a plasticy one, so I went with oil.

Typical oil finishes are Danish Oil, Teak Oil, Tung Oil and Linseed Oil. I didn’t want to stain the cedar wood, I just wanted to, ya know, “moisten” it. Linseed was crossed off simply because none of the pretty, DIY blog posts I’d read used it, Danish oils usually have some stain and other chemicals in them, and Teak tends to darken the wood, so the last man standing was: Tung Oil.

Turns out most stores don’t sell the real stuff (the one I found at Home Depot was a Tung “finish” that had more chemicals than oil in it) so I ended up buying Hope’s 100% Tung Oil from Amazon.

I snapped the rubber gloves back on, poured the honey-like oil on a rag (the size of a wash cloth courtesy of an old towel) and rubbed it in. The smell wasn’t amazing (burnt chestnuts?) but tolerable. I did two coats and let it dry.

For the sallow colored trim, I discovered that Minwax made stain pens with which I could essentially Sharpie my furniture. I picked the Red Mahogany color and even though it didn’t stain perfectly even, probably because I’d oiled it first, it gave the illusion of natural wear over the years.

Finally, I waxed the chest with Feed-N-Wax (because other people said to) and hoped that I was done.

The Real Finish

Unfortunately, even after the wax had dried, there were still noticeable parts of the lid that looked ashy/greenish/blah. Annoyed but determined, I found some 60 grit sandpaper in the toolbox and started sanding my little heart out. Not only did the sanding clear up the discolorations, it actually brought out more the wood grain than I expected.

I’m halfway done with sanding and kicking myself that I didn’t do this earlier. What can I say, I’m an idiot perfectionist. The current plan is to try out a power sander and then oil it back up sans annoying imperfections. I might hold off on the waxing though, it dries matte and I’m not sure I like it. I know I’ve sanded away the shine, but I’m making the prettiest goram chest I can, even if I have to backtrack.I started this project having no idea what I was doing, but at the end of the day it’s all trial and error whether you have a manual or not. Just accept that you might screw it all up… or you might not. I’m still figuring it out.

Extra Credit: Apparently, to avoid spontaneous combustion, this is how you dispose of oil soaked rags:

Planning Your Overwhelming Trip Overseas

When the Venice ferry stopped at the Rialto station and several Italian men in serious-looking uniforms boarded and started checking people’s tickets, I thought, “Man, I coulda planned this better.” My best friend and I did not have a ticket for that particular ferry, and we were promptly and sternly written a 70 euro ticket (each!) and deposited—red-faced and stammering excuses—at the next stop, a 45 minute walk from our hostel.

When traveling abroad, it can sound fun to go with little to no plan. It sounds very romantic and exciting to frolic about Europe (or wherever you’re headed) with every intention of going wherever the winds of adventure take you and departing whenever these winds happen to blow. That might work out really well for some people. For most of us, though, that might lead to being stranded in Milan with no money, no place to sleep, no plane ticket home, and numerous bags of expensive Italian dresses.

I consider myself a fairly thorough trip planner and, aside from the misstep with the ferry police, my 3-week trip to Paris, Venice, Florence, and Rome was amazing and filled with safe, clean hostels, cleverly-purchased transit tickets, top-notch food, and a plethora of art and activities for the student budget. How did I plan it, you ask? That’s what I’m here to tell you! Though this article comes from my personal knowledge traveling France and Italy, these tips can definitely be of use when planning any trip!

Step 1:

Make a “Places to go, Things to see” list. If you are going with a friend or group of friends, it is important to consult with them early about this. Maybe the biggest problem you’ll face is that your friend digs architecture while you want more paintings. Maybe, though, your friend wants to hit up every DVNO nightclub he can find, while you expect him to get up for your 6 am snorkel appointment. Even if you are good friends, it’s important that you discuss styles of vacationing (I’m a big “main attractions” and “foodie spots” girl; others are into nightlife, outdoor adventure, leisurely relaxation, etc.), as well as pace of vacationing (squeeze in 3 museums, 1 monument, 2 long meals, and a play every day or slow it down some?).

Step 2:

Narrow down that list to fit in to your budget (both time and money). Again, pace of the vacation plays a big role here. If you want to fill each of your days to the brim, go for it! Just be wary of wearing out. Also keep in mind the locations of all these “must sees.” If your budget allows you to hit up every European capital and then go to Greece before heading home, that’s awesome! But most of us can’t make that happen. Remember that it costs both time and money to move around a country or continent, and it might ultimately be worth it to you to skip out on Madrid in order to spend two more days in Barcelona.

As you research, you will probably have to do steps 1 and 2 several times, but that’s okay. Better to go to wherever you’re going with a practical sense of what you’ll be able to do, rather than be there and either spend your time running around like crazy or leave fuming about missing the second, smaller Jewish History Museum in NYC.

Step 3:

In order to do step 2 more effectively (and you’ve probably already done this), it’s now time to start making choices and estimating and adding up prices.

  1. Airfare – Use sites like Kayak and TripAdvisor to find the cheapest airfare. You can even set up alerts for your chosen trips!
  2. Accommodations – Hostels are the way to go for the discerning, frugal traveler. Websites like HostelWorld and HostleBookers can help you out with reviews and amenities of tons of places.
  3. Travel within City/Country/Continent – Look for youth and student discounts for trains. Also, most city subways and bus systems have a week long traveler pass for a discount.
  4. Food Budget – If you want to splurge on food, plan on it and save! Also, use Yelp or travel books to figure out how much your average meals will cost to budget.
  5. Attractions and Shopping Budget – This will be very different for different types of travelers, but planning it out will help you stick to a budget.

I’ll share more on these next week in my article about Budgeting for your Overwhelming Trip Overseas.

Step 4:

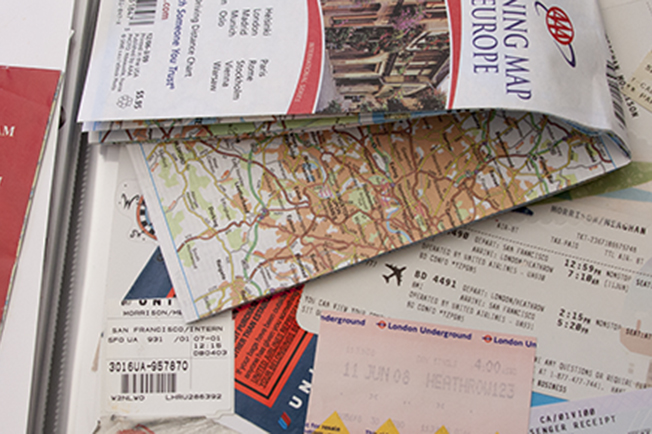
Chart out your course. Now that you have brochures, maps, bookmarked webpages, some sort of budget, and hopefully a travel guide (believe me, I used mine everyday!), you are ready to set out an itinerary. “But,” you protest, “I don’t want to plan out every millisecond of my trip! I want to play some things by ear, check out the local scene, have some freedom!” Of course you do—this is your vacation after all. However, planning ahead, even with a vague sketch of a plan, can save you a lot of money and can help ensure that you make the most of your time abroad, so you never have to say, “Man, I wish I knew that electro K-pop festival was coming to Berlin before I left for Moscow.” Which is a thing I am sure countless disappointed electro K-pop fans have said.

When charting your course, your finalized list of necessary stops and cities is invaluable. You want to amp up the research at this stage, looking into the goings-on of these cities. Are there festivals or events or holidays you really want to be there for? Are there any of these that you want to avoid? I was in San Francisco for Pride a few weeks ago and, let me tell you, I did not envy the clueless tourists trying to navigate BART to get to the airport with 80 pounds of luggage. You definitely want to avoid experiences like that—though enjoying Pride in the city on foot with nowhere to get to except for your hostel that night would be awesome.

Of course, you also want to use logical proximity to chart your course. Keep in mind the general order of your destinations. Also, decide if you want to do a circular route so you can fly in and out for the same city (cheaper) or a straight route from, say, London to Budapest (no backtracking, but pricier airfare). Like I said above, you can often tweak your plans for hopping from city to city and country to country, especially with an open rain pass. That way, all you need is the general timeline of your trip and you can change the rest to suit your whims.

Some people (me, for instance), are a bit more diehard in the planning department. I know that my traveling style is squeezing every last drop out of cities, and with that trait comes a bit of a micromanaging vacation planning style. In a three-day trip to London, I managed to get in more than my travel partner would have done in a week on his own. If this sounds like you, then you will be doing even more research. Which night is 80s night at that club? Pencil it in. That antique store closes on Mondays? We’ll do the zoo that day instead. The tactic I found most useful for my short London trip was to jot down the times each of my necessary attractions was open and pin those times to a tourist map. Then, I used iCal (no Google Calendar yet, but that would have been perfect) to set aside times to do each item on my long list. I moved everything around based on open times and location until I had a strict 9:00 am – 8:00 pm schedule for each day, squeezing in Harrods, Buckingham Palace, Parliament and Big Ben, the London Eye, the Tower, Westminster Abbey (my favorite!), the British Museum, Saint Paul’s, the Globe (play included), Covent Garden, and Hampton Court Palace. Probably you fall somewhere between that (my highest level of dedication to trip planning) and complete laissez-faire (homelessness in Europe, basically). Do the level of charting that seems appropriate to you to make sure you feel comfortable and confident but not overwhelmed.

Step 5:

Get out of here! You’ve set a plan for your adventure, you’ve got your tickets, your passport is burning a hole in your pocket—it’s time to go! But, before you do, remember: not everything will go according to plan. The Eiffel Tower might be closed for maintenance, the Great Wall might have crumbled a little bit, Venice might sink! Your superb planning cannot account for every little thing, so it’s important that you roll with the punches and stay flexible.

That can get tough sometimes, but remembering that you’re on vacation and it is your job to have fun (or at least be relaxed) can often help. Even if things don’t “go wrong,” don’t be afraid to change your plans. You can have an amazing, unexpected adventure that way! One of my favorite days in Rome was one when we were too tired to navigate the city on our own and signed up for a bus tour of a vineyard with our hostel. Totally unplanned, totally amazing.

Stay sensible, stay safe, and most importantly, have fun!

EuropeSquare

Recognizing and Helping Depression

In thinking about writing this post, there were a lot of angles I considered coming from. Do I talk about how, in my work at a university, I frequently see students who are buried under the weight of this nebulous and frightening disease? Do I talk about family members or partners or friends or other loved ones whom I have been able to help or, in some terrible cases, not been able to help? What I hope my internal editorial struggle conveys is that depression is incredibly common. According to the CDC, about 1 in 10 adults report experiencing depression in their lifetimes. The number is even higher for young adults.

Seeing a friend, family member or loved one who might be depressed can be scary and overwhelming. But depression is both recognizable and treatable. This should bolster you, knowing that if you can catch depression in yourself or recognize it in a good friend or loved one, you can go a long way toward making someone’s life better.

Depression and other mental health issues are still incredibly stigmatized in the U.S., and so it’s important to remember a few things: people are never, ever at fault for their mental health problems, and treating them like they are only alienates them and makes it harder to help them. Second, you will probably not get a bouquet of roses from someone you are helping, but that does not mean you didn’t make a difference.

Below are some basic signs that you or a loved one might be depressed. Keep in mind that depression is complex, that this is not an exhaustive list, and that this is not in order of importance. It is a good place to start, however, if you are feeling concerned. Here are some common aspects of depression:

  • Feelings of hopelessness and/or pessimism—like nothing will ever get better.
  • Feelings of guilt, worthlessness, and/or helplessness—like nothing matters or you can’t do anything right.
  • Irritability, restlessness, or being easily angered (this is especially common for men).
  • Sharp and unexplained change in behaviors, including the following:
    • Disinterest in activities, hobbies or work that were once very important or fun;
    • Feeling very tired or excessive sleeping;
    • Insomnia, early-morning wakefulness;
    • Change in eating behavior, like overeating, skipping meals, or a loss of appetite.
  • Difficulty concentrating, remembering details, and making decisions, especially if this was not an issue before.
  • Thoughts of suicide or suicide attempts.
  • Persistent aches or pains, headaches, cramps, or digestive problems that do not get better, even with treatment.

If this sounds like someone you know, it’s really important that you reach out to them. Here are some basic steps for talking about depression with someone you love:

  1. Express your concern. If you see something, say something. Depression can be incredibly isolating, and so it’s very important to show that person you notice and are concerned.
    • Do this with as much care and kindness as possible, in a private and controlled environment. This is not a good discussion to have on the bus or in a crowded coffee shop. Talk about specific behaviors you’ve noticed, but don’t make the observations sound like you are accusing them of having done something wrong. Something like “I’ve noticed you’ve been missing a lot of work recently, I’m concerned that something might be wrong” is much better than “Why have you been missing so much work?” because it is less accusatory.
    • The person you are speaking with may rebuff you, get angry, or be relieved that they have someone to share with. It feels best when people are relieved, but don’t expect this reaction 100% of the time. If the person you are concerned about is angry at you, do not take this personally. Depression can come along with strong feelings of shame and anger, and this can make it easy for the person to deny the severity of what they are experiencing and lash out at you. Remember, bravery isn’t a lack of fear, it’s doing something despite your fear. Even if you are worried about their reaction, it’s still important to reach out.
  1. Listen. Give your friend the space to express themselves and really listen. Don’t jump in, don’t talk about your own experiences (especially don’t tell that story about your cousin’s friend’s brother), and don’t give advice. Also, don’t be offended if they are not interested in telling you their life story. Create a welcoming and safe space, and allow your friend to be supported by you.
  1. Refer. I know, I know, we just talked about not giving advice, but this is different. Having a resource or two on hand to give to your friend is incredibly important. This can be anything from a hotline, to the number for your therapist, to the counseling center at your university (if you’re still in school), to an article online talking about depression.
  1. Follow Up. Check back in with your friend after a day or two and see how they are doing. Again, express your concerns, and listen. You can’t make someone get help, and you shouldn’t follow up in order to make sure that they do. This is mostly to let them know that you are consistently going to be there for them, and that you are not going to bail after one (likely very intense) conversation.

Lastly, here are some resources to keep in your pocket:

  • In an Emergency: Call 911 – If someone is thinking about attempting suicide or if they have already attempted suicide,  it’s critical to get highly trained professionals on your side. Don’t hesitate to call 911.
  • National Institution of Mental Health – Information about Depression: Interested in some more information about the prevalence and effects of depression? That is provided here in a helpful way and contains much more information about the many types of depression, treatment options, and experiences of those who have been diagnosed with depression.  http://www.nimh.nih.gov/health/topics/depression/index.shtml
  • Suicide Hotlines: Sometimes it’s critical to have someone to talk to and give you strategies to not harm yourself, or to help you work through whether a friend is in need. These are free and most are available 24 hours.  They have services specifically for veterans, Spanish speaker, and teens, among others. Call if you need help yourself, or if you need help helping someone else. Sometimes friends aren’t available or don’t have the right tools, and this is where these folks come in. http://www.suicidepreventionlifeline.org/
  • Online Emotional Crisis Support: Not everyone feels comfortable on the phone or has access to a private place to have a conversation. This is the chat room version of the service above.  http://www.crisischat.org/
  • College Student Helpline: Depression for college students is very common. 18-24 year olds experience a wide range and, according to some researchers, the highest prevalence of mental health problems. These folks are specifically trained to help college students.  http://www.ulifeline.org/
  • Grad Student Helpline: Many studies have shown that for whatever reason (high stress, high pressure environment, self-selecting factors), grad students are at a very high risk of poor mental health. Like the resource above, this helpline is specifically geared to help graduate students and to understand the issues they face. http://gradresources.org/

DepressionSquare2