Tag Archives: entertainment

An Urban Explorer’s Guide to Living Cheap

I am an urban explorer. Not the kind that sneaks into abandoned buildings or climbs through underground tunnels. The kind that loves to explore the culture of her urban environment. I don’t feel at home in a city until I have a favorite restaurant, can recommend a venue, and am a regular at a cafe.

But urban exploring comes at price, one that often exceeds the budget of a student or a struggling 20something. When I was living in Portland, I was a struggling 20something, freshly out of undergrad, and trying to support myself in a brand new city. I had only a year in Portland before moving to Eugene for graduate school and so I promised myself that I would make the best of my time and explore as much of the city as possible. This was my decree, and its success was in its limitations.

When on a mission to explore a new city, you have to decide what is possible. Can I go to every café in town? No, not in a city with 175 coffee shops per capita. Can I go to every restaurant? Again no, especially if you are living in food heaven. Can I go to as many free and cheap events as I can find? Yes, that I can do. And so I began my search for affordable activities in the hipster capital of America and aptly started a blog called Portlandia of the Free (Or Cheap).

I posted five free or cheap events to my blog every single day of the week for almost a year. All of them were $10 or less and, yes, I could always find 5 events to post. In fact, I often had to narrow down the list to my top five events for the day. How did I find all of these events? The simple answer is I looked for them, but the secret is where I looked.

Become Best Friends with your Local Magazines

I am not joking when I say I think of the Portland Mercury and Willamette Week as close friends. As I write this, I find myself smiling in memory of the times we spent together, me searching through their pages for events to post to my blog and discovering the best and weirdest activities. Like the annual Naked Shopping Spree at the Red Light Clothing Exchange, where people run out of fitting rooms naked and compete to put on as many clothes as possible in three minutes, while Portland’s fantastic Prince cover band plays music to the chaos.  Or CHAD Chats, Portland’s version of TED Talks, where people share sardonic PowerPoints and get drunk, of course. Or when I discovered that a local pie restaurant was letting the public judge which pie they would put on their menu next, immediately following a chocolate festival full of free samples. Food, drink, nudity, and sarcasm: that’s what makes Portland go ‘round.

I would not have discovered any of these events without my trusty local magazines. I seriously found most of the events for my blog through these publications, which is why, whenever I go to a new city, the first thing I look at is their weekly magazine. Not every city’s magazines are as good as my dear friends Willamette Week and Portland Mercury, but I guarantee you’ll find something unique and inexpensive to do.

Don’t be Afraid to Sign-up for Email Lists

As I started to attend all these events, I began to wean myself off depending on weekly magazines. I decided to get event announcements straight from the source: the venues themselves. So, I signed up on every mailing list I came across. I still get emails from Collage, a craft store that holds $5 classes every Friday and In Other Words, the feminist bookstore from Portlandia that hosts a range of free events. I also found that I wasn’t the only one curating cheap activities and joined mailing lists like Portland on the Cheap or Around the Sun. Now instead of searching for free activities, the entertainment was coming straight to me, and often I was getting in on sweet deals. I felt like I was “in the know,” which is exactly how you want to feel when you move to a new city.

Ask People Where to Go

Regardless of all my searching, there are some places I never would have found unless I asked. That great inexpensive Mexican restaurant in an alley behind a strip club my roommate recommended to me, or the gathering of local poets every month where you could hear people who didn’t perform at the big poetry slam. These were the places that finally started to make Portland feel like home, because you can explore a city all you want, but you don’t stop being a tourist until you find a community.

So, venture out there, but don’t just look for places, look for people. They’re the best form of free entertainment.

Photo by Andy Sutterfield
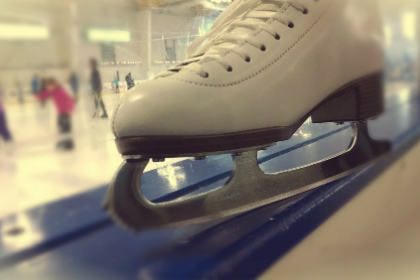
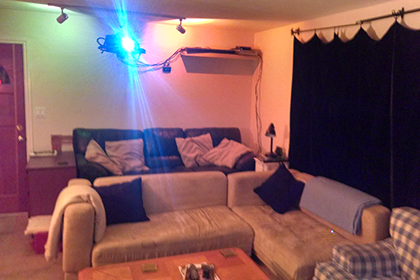
Photo by Andy Sutterfield

Demystifying Figure Skating

When I was five years old I became obsessed with figure skating. Not just mesmerized or fascinated, but outright obsessed. I watched it every chance I got on television and imagined throwing myself into the air to spin like the skaters I idolized. I even used my slippers to glide across the kitchen floor, pretending I was skating on ice.

My parents were pretty entertained by this and when my obsession didn’t go away after a few weeks, they enrolled me in skating classes at the local ice rink. I’m pretty sure they thought I’d get bored with it and move on after a few sessions. But instead I turned out to be an avid skater, rarely ever falling, and skipping right past the tots intro class that required you to wear a helmet and skate with an orange safety cone.

For the next few years I skated every winter (it was a seasonal rink) and did fairly well, that is until I hit the moves that required me to have a fair amount of (read: any) coordination.

I skated on and off until I was twelve, when a not-so-great injury made me realize that I was not built to throw myself into the air and never would be. I moved on to other interests but I still hold a love for the sport that captured my attention when I was little.

So to help those who are new to this wonderful sport (yes, it’s a sport, don’t you dare argue with me), here are a few keys elements you’ll be looking at when watching the skating unfold.

1) Jumps

Ah, yes, throwing yourself blindly into the air and then landing on a thin piece of metal on a slippery surface. No big deal, right? There are six types of jumps – the toe loop, the Lutz, the flip, the Salchow the loop, and the Axel – often in double and triple form (if not quads, which is INSANE) because that’s how many rotations they have to get through in the air before landing. To get an idea of what these look like and for more detail on what each of them are, check out this awesome article from The Wire with gifs of each of them. They then have to land on the appropriate edge of their skate (inside or outside, depending on which way they’re going) and they better not even dare to land on two feet or man are they screwed in points.

2) Spins

There are a six core spins you will see and hear about in the Olympics, all of which require so much speed that many of the skaters become blurs before your eyes –  the scratch, the flying, the sit, the Biellmann, the layback (my favorite), and the camel. Check out this handy guide, with GIFs, that compliments The Wire’s article. All of these require a solid center, much flexibility, and an enormous amount of power and core strength to keep the speed up. These spins often have variations as well – like switching feet, picking up speed mid-spin, and even occasionally combining spins – in order to get more points for difficulty. On top of it, they are seen as more artistic than jumps, and therefore must be graceful in order to also be seen as effective. It’s no easy task.

3) All those other random moves they do

A lot of other moves are seen more for artistic movement. Some don’t have official names, and most of that is dance-like stuff, but there are a few I can quickly introduce you to.

Spiral – nonsensically, this is the move where the skater puts her leg high into the air behind her (or sometimes in front of her if she’s a pretzel) and glides. It’s actually a lot easier than it looks (didn’t think I’d say that, eh?) but requires massive amounts of flexibility and balance.

Lunge – this is exactly as it sounds. The skater puts his leg down onto the ice and drags it behind him, usually for just a second or two because it will slow him down. This requires a strong center of gravity, let me tell you, or you’ll end up in the most uncomfortable half-split of your life. I may or may not be speaking from experience.

Crossovers – oh, these things suck. These things are what did me in early in my years of lessons because I was so clumsy. The concept is that you cross one foot over the other, either forwards or backwards, and it helps you gain speed—plus it looks nice. They do these constantly while skating. Look for them next time you watch and you won’t be able to un-see them again.

There you go – your basics to the language of figure skating. If you’re still hungry for more terminology, check out the United States Figure Skating Association’s glossary of terms – it’s comprehensive and very useful. Now go pop some popcorn and settle into your couch while you watch these skaters fling themselves into the air, spin at high speeds and generally do things that seem unsafe for the population at large. And then watch them cry as they get their scores. It’s the next great American pastime – only with ice, blades, and absolutely no padding, because padding is for amateurs.

Photo by Sara Slattery

Photo by Sara Slattery

Home (Theater) Improvement

“This is the end of life as we have come to know and love it.” I thought as I watched thirty five square feet and 1080 progressively scanned lines of glorious television walk out of my life forever. My roommate, along with his beloved projector, was headed for greener pastures, leaving the rest of us to languish away into sad, lonesome, standard-def obscurity.

The Projector

There’s a lot of good literature out there on the Googles that will help guide you to the perfect projector. Since we had become accustomed to a certain standard of television, we were looking for a 1080p projector, 60Hz would do, with a minimum contrast ratio of 1:2000. But In terms of what kinds of projectors are available on the market (from the $200 VewSanic knock-off to the $20,000 3DMax Sound-O-Vision Extreme), the price range we were expecting was between $500 and $1000. But for us our wallets, we were just looking for something to “scrape by.” So, when we found an $800 projector that hit our minimum requirements, but was available for $580 through a special refurbished program, we jumped at it. BOOM. And we had a projector again.

Everything was hooked up to the cable and DVR—we turned it on and… there’s no sound. Maybe we should have thought this out better. With a trip to RadioShack for a ⅛” stereo to ¼” mono adapter, we were able to jury rig my fiancée Meggyn’s bass amp in as a temporary sound system. Well, at least it was loud and thumpy!

The Mount

Bliss settled in, until we realized we were merely maintaining the status quo. Like cavemen watching the firelight flicker across the wall. With the projector haphazardly settled on an end-table with a book underneath to prop it up, the risk of inebriated guests leaving open-topped drinks on the same table and toppling them into the delicate internals—the horror, the horror!—was just too high. Of course, I’d just dropped an inordinate sum of money on a brand new projector, so I wasn’t keen on the idea of dropping even more moolah on a television mount that wouldn’t directly affect the viewing experience.

One of the nice things about living in a leased house is that you never know what surprises you might find! After hunting around for extra shelving, I came across an old television mount up in the back corner of the garage (the kind for those tube TVs that could smash toddlers to atoms). And so began the next obstacle: the mount was bolted into a high wooden rafter in the garage, but we only had drywall in the living room… To Google! It turns out that as long as there’s a stud behind wherever you’re screwing in the mount, it should hold weight. After a trip to the local Ace hardware to buy some screws that could be used to drill to China and a quick download of the Bubble Level app—to make sure we weren’t setting ourselves up for a neck kink—we got to work. (Contrary to Meggyn’s expectations, the level app did a good job!)

And then failure struck—we broke two of the screws because we thought we could get away without drilling pilot holes. It’s TOOL TIME! We borrowed a drill (thanks, mom!), and we raised the projector up like the Mennonites raising a barn. Then we cracked open a few beers to celebrate exactly like the Mennonites would not have.

The Connections

Now we were getting somewhere! We could no longer inadvertently destroy all of our wonderful video goodness without some extra effort of lobbing liquids towards the ceiling. The next failure, of course, being that we couldn’t actually connect the cable or the power to our ascended projector. Who wanted to get lost in the details of connecting this, right? What are we, rocket surgeons?

To solve our connection problems, I repurposed some unused bookshelves I had bought for my room. With a few more marks and holes in the wall next to the projector mount, I added a shelf in the living room that we loaded up with every bit of television-related electronics. To paint the picture for you, we now had the projector on the old TV mount (in the dead-center of the wall), an overburdened shelf stacked with enough boxes with blinking lights that it may have been flagged by the NSA, a bass amp on the floor, and so many power cables and audio/video cables strewn about that they might as well have been vines in a nightmarish Lovecraftian dystopian future of cybertronic Amazonian forest… Let’s leave it at “messier than a dorm room during finals” and be done. But now that everything worked, I was at: “Please, for the love of God and all that is holy (and not blinking lights at me), let me be done.”

The Organization

Now we had a beautiful 1080p picture taking up the front wall and plenty of loud thumpy sounds to accompany it. Except if you changed the input from the cable to the Wii. Or to the Chromecast. Or to the Xbox. Was I the only one around here who understood which colors get connected to which inputs on the back of this thing?! Rather than attempting to teach every person who came to the house which cables to disconnect/reconnect to switch the audio whenever you switched the video feed (I just wasn’t up for writing the Connectionist Manifesto), I decided that another trip to RadioShack was in order. There I found an A/V switch for under $20 along with a few new A/V cables and a shiny new sound bar with subwoofer for definitely not under $20 (Meggyn was complaining about wanting her bass amp back and, hey, it was payday!). I returned to our humble, if electrically dangerous, abode armed with my new equipment, a sharpie, some wire ties, some labels, and as much determination as I could muster. I tackled the monumental task of improving our sound system, organizing our A/V shelf, wire managing all of the dangly bits (can’t leave any extra 1s or 0s), and setting our theater system up in such a way that at the press of a (CLEARLY LABELLED) button, my roomies, or any of our guests, could switch between video and audio streams at will.

The Finishing Touches

Life almost seemed perfect. It was simple enough to use the newly organized system, the new sound system was much more balanced than a 15 Watt bass amp, and whatever we watched was beautiful (except the Wii… stupid standard-definition output). But if you can’t find a problem to fix, then you aren’t looking hard enough. Some of the darker colors were being washed together by the projector, and it was sometimes hard to tell what was going on during scenes that took place in the dark. Blackout curtains became the next addition to the room. We got these thanks to a generous donation of leftover fabric from Meggyn’s mom. They just barely cover the full width of our window, but it works. Now, we can watch the projector during the day as if it were the middle of the night (without that pesky bedtime thing). Our last improvement was to go to OSH and buy some cinder blocks, push the couch forward so that it was closer to the wall (or rather, the screen), drop the cinder blocks behind the old couch and ADD ANOTHER  COUCH. Because couch. Now, we’ve got theater-style seating to go with our home-theater!

I still don’t think we’re done making improvements, but for the moment we’re pretty happy with how everything turned out. And the only really spendy parts were the projector itself and the sound bar—things which will be following us to our next house! Thanks to some successful craigslist foraging, the new couch was free, and the cinder blocks we used to prop it up were a few dollars apiece. We used five blocks for the couch and another three to make a recycled-plywood footrest.

All-in-all, we could have done a much worse (much more expensive) job of converting our living room into one radical home theater.

Photo by Michael Cox

Photo by Michael Cox