Tag Archives: DIY projects

The Gospel of Removable Wallpaper

I don’t want to spend more energy than I really need to decorate my current apartment. I want a well-curated space, but at the moment I’m not entirely sure that I have the energy or cash to put that together. While the lease on my apartment does permit me to paint, I am loathe at this point to start a project that will require things like primers and sanding and taping and testing various colors at different times of the day. I want a maximal change with minimal effort. This brings me to removable wallpaper.
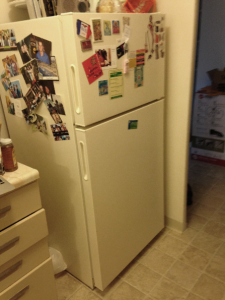
Before
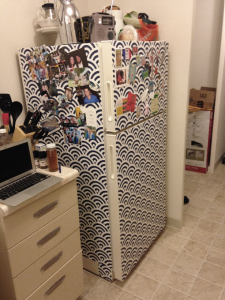
Before

After

After

Removable wallpaper is one of my favorite ways to change a space because it is so versatile and so low risk. You peel off a backing and then stick it to the wall. Press out all the air bubbles, maybe trim around the edges, and you’re all set. Change your mind? Peel it down. Done and done. Removable wallpaper can be used on walls, of course, but also all over your house. Cover a refrigerator or other appliances, line the backs of shelves, refinish a blah tabletop (such as IKEA’s LACK series), spice up the inside of a tray for serving guests, even create the appearance of a grand and stately headboard. All completely possible and so easy.

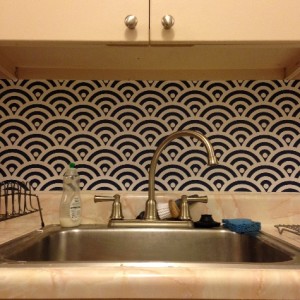
So far, I’ve redone the backsplash and refrigerator in my kitchen and one wall in my apartment, and were it not for my spouse saying he’s done with patterns, I’d be covering all the rest of the flat, smooth surfaces in our apartment with bright, cheerful colors and designs. The kitchen took all of forty five minutes to get done, and the trickiest part was matching the pattern repeat.

While, at first glance, removable wallpaper may look like the more expensive option, I’ve found that after you buy all the supplies to paint walls or hang art (tarps, brushes, pans, rollers, sandpaper, painters tape, primers, and multiple buckets of paint; or frames, mats, and custom fitting), the total cost is much lower. In total, I spent about $100—shipping included. Not to mention, you won’t ruin your favorite jeans when you think to yourself “Ah, but I’ll be so careful!” The only cost is the paper itself. It is also completely possible to make temporary wallpaper yourself with contact paper.
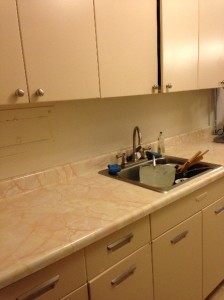
Before

Before

After

After

Don’t know where to start?

Check out the whole host of resources available online about where to buy and what to do with temporary wallpaper:

Removable wall paper can be bought at:

Feeling crazy? Try starching fabric to the wall. (I haven’t tried this, so don’t blame me if it pulls all the paint off your walls…)

And I’m not the only one who is totally into removable wallpaper! Read more on Oh Happy Day and Apartment Therapy.
Enjoy!
Enjoy!

Let’s Ask: How Do I Stain This?

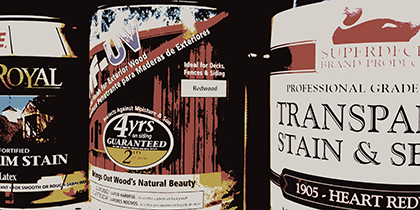
Working in a hardware store, I come into contact with a lot of do-it-yourself-ers. While I admire their efforts, often they need an expert, or at least someone with a little experience, to help point them in the right direction. One of the most common problems customers bring to my attention involves staining, both interior furniture and deck stains. It’s a lot harder to fix mistakes made while staining than it is if you mess up while you’re painting, and many people jump into a large project without doing their research. Here are some of the FAQs that are often brought to me by customers:

How do I prepare?

The most important part of any home improvement project is the preparation. You need to have the proper tools and know the proper techniques, or you’re going to have a bad time. When it comes to staining, this comes down to knowing what type of surface you’re working with, and whether it is new or old. I frequently have customers tell me they aren’t sure if their piece is even made of real wood, or whether it has been stained in the past. The answer I usually give is to try a little stain on a small, hidden area, and see what happens. If it soaks into the wood, you’re probably fine to stain the whole thing. If it doesn’t, stop trying, it’s not going to work. If the stain is just pooling up on top of the piece, it either is not able to be stained, or there is another coating or stain already on the wood that needs to be removed. In terms of equipment, you should have a brush, a rag to wipe off excess stain, and something to clean your brush (soap and water for water-based stain, and mineral spirits for oil-based). Unless your stain is designed to be wiped on, you should always use a brush. Exterior stains can be applied with a brush, roller, or sprayer, but check your product for recommendations before beginning.

What does a stain do?

Another misconception a lot of customers have is that a stain, like paint, is just an exterior coating. One of the most common problems my customers have is that they’ve tried to apply a stain as if it was a paint and, in many cases, directly over existing paint, or other coatings. Stain only works on bare wood, because it needs to soak into the wood fibers. Imagine your wood as a bundle of drinking straws. The straws can soak in water, and other liquids. However, there is a limit to how much the straws can absorb, and, of course, if they are blocked by something, they won’t soak in anything at all. Stain needs to soak into wood, and when it dries the fibers of the wood grain lock the color inside. A paint or clearcoat goes on top of the wood, and will prevent other liquids from soaking in, and make the piece more durable. You typically go over interior stains with polyurethane when you are done.

How can I stain something that has been painted or sealed?

The basic answer is: you can’t. You have to remove the paint in order to properly stain the wood. This is by far the most frustrating part of staining for customers unfamiliar with the process. Many decide to try anyway, only to return in a few hours even more frustrated. Defiant to the end, I’ve seen customers go through darker and darker stains, thinking a darker color would just cover up their mistakes, rather than taking my previous advice. In the end, their piece was ruined, and as far as I can tell they never attempted to remove anything they applied to it.

What about removing an old stain?

Unless you’re changing your stain color or switching to a water-based stain from an oil-based, you usually don’t have to remove your old stain at all. Just remember, a water-based stain can’t go over an oil-based stain. Removing stain is not particularly hard, but it will take patience. For interior stains, you have the option to sand the wood, or strip it. I usually recommend stripping, because it requires the least amount of grunt work. Sanding is cheaper, but harder, and you are more likely to damage your wood from over sanding. Most strippers just need to be brushed on, and let sit for a while, and then rinsed off. For interior stains this isn’t that hard at all, but for exterior deck stains, it’s a larger and more complicated task. Exterior stain remover usually comes in a concentrated form (so you can make a large quantity of it) and should be applied to the entire surface you want to remove the stain from. Unlike some strippers, these types of removers usually require their own neutralizer product. At this point is when most customers decide to just paint their deck instead–just saying.

With this information, your next staining project should be a breeze! The real key to staining, and any other household project for that matter, is to take the time to understand the process, and what types of stumbling blocks you might encounter. Staining is never a simple project to undertake, so consider whether it’s really worth your time. It can make your furniture and deck look fantastic, but only if done properly. If you’re looking for a quick-fix, try painting instead.

Photo by Rob Adams

Photo by Rob Adams

Curating Your Art Collection Without Busting Your Budget

Decorating on a budget is not easy.  Sure, you might do some great DIY projects, maybe find some decent furniture on Craigslist, but if you really want to make your place look great without spending a whole paycheck (or five), it takes a lot of work.  Fortunately, even if you have to live with a dingy 5-year old sofa that may have at one point belonged to the mother in What’s Eating Gilbert Grape (too soon?), here are four simple and affordable ways to invest in your own personal style.

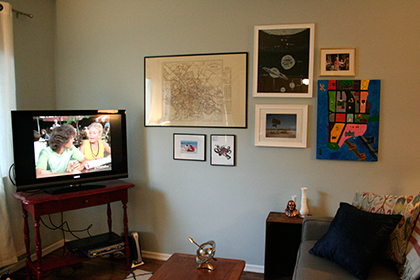
1. Use your own photos.  Why spend money on art when you have plenty of your own photographs just waiting to be framed on your wall?   I remind you that photographs were invented before the Facebook photo album, and a special photo will be a great conversation starter with your guests.  If you worry your pictures aren’t ‘artsy’ enough, get them printed in black and white!  Sugarfish is a great affordable service to get photos printed, and you can even order prints of your Instagram masterpieces on Shutterfly.

2. Maps, postcards, old records, anything flat you can put in a frame.  If you’re like me, you’re always finding a cool postcard you bought on vacation but never sent, or the ticket to that epic Dashboard Confessional show you went to in high school.  Rather than sticking it back in a drawer to be rediscovered in another five years, throw it up on the wall to break up all of your fabulous photographs.  Old maps are a particular favorite—both affordable and pretty!  Never been anywhere?  Fake it with the $3.95 map wrapping paper  from Paper-Source!

3. Affordable art prints and photos are easy to come by if you’re looking in the right places.  I like to shop around, but most of the sites below feature several different mediums (prints, photos, text graphics, even actual paintings) so if you don’t have the time or patience for scrolling through 40 pages of options, you would do well at just one of these.  The more affordable pieces from these sites do in fact still cost some money (many items in the $15-40 range, depending on the size), so I try to only purchase things I really love and would want to look at every day on my wall.  Minimalist and fan-made movie posters are a personal favorite that look nice and reflect my true passions.

  • 20×200 (www.youshouldbuyart.com):  Run by a gallery owner in New York, they have a great stockpile of photos and prints by up-and-coming artists.
  • Society 6:  Not only do they deal in art, but if you find a design you like, you can get it printed on t-shirts, mugs, pillowcases, phone cases, and more.
  • The Working Proof:  Art for a cause—15% of each sale goes to the charity of the artist’s choice.
  • Etsy:  A perennial favorite for all things, art included.  Perhaps pay tribute to the cinematic classic I mentioned earlier with this!


4. Don’t be afraid to create an original painting yourself!  I know the canvas–and-paint section at the art store can be intimidating, but delve in, and make your own masterpiece to hang on your wall. It’s easier to splurge on something when it’s half off, so double-check for coupons before you go in to your favorite craft store. Even if you don’t see yourself as “creative,” geometric patterns in a good color scheme look just as nice as a detailed landscape—and you still get kudos for having an actual painting on your wall!  Too shy to go it alone?  Try out Painting with a Twist (or any of the similar BYOB painting classes across the country) with a couple friends and a bottle of wine, and come home with a beautiful painting as well as some new memories (aww).

In all, I think the key to curating an art collection while not over-spending is to make every piece you own individual to you.  Whether it’s meaningful because you made it yourself or just because you love it, I guarantee that a piece of art with personal meaning that also looks great will justify any cost.  Now please, just promise me you won’t hang all of your beautiful acquisitions and discoveries with painter’s tape and thumbtacks. *

*Before you even try, I direct you to Michael’s (they almost always have a coupon for 50% off on their website) or Aaron Brothers (they have a buy one, get the second for 1 cent sale on frames and canvas in January and July every year).

Photo by Michelle White

Photo by Michelle White