Category Archives: Home

How I Made a Strange City Feel Like Home

Something magical has happened in the engineering of the UNDERenlightened’s publishing schedule, something insane and cosmic that I didn’t plan: today marks exactly three years since I pulled myself up by my New York bootstraps and hauled over to Los Angeles. Today, I’m three years older, still on the West (best?) coast, and treating myself to flashbacks from that bizarre, uncomfortable first month where I was waking up three hours too early every morning, basking in the awe of a trip to the beach on a Monday, and cursing myself for thinking that Southern California would not require a jacket or scarf in February. There was also the slow-leaking air mattress I slept on before my IKEA furniture got delivered (a whole week late!), the janky space heater in my 330 square foot studio apartment, and the psychotic notion of making left-hand turns on yellow-almost-red lights at major intersections (GO HOME, LA. YOU’RE DRUNK).

But I figured it out. I made it my home, slowly but surely. Moving by yourself to a brand new city is as petrifying as it is exhilarating, and every person who does it has a different way of dealing with all the changes.  Here are a few things I did to keep myself from hyperventilating and asking “Oh dear Lord, what have I done with my life?” every hour of every day those first few months.

Reassure yourself that this doesn’t have to be permanent if you don’t want it to be.

I was all about taking it one day at a time when I first arrived. I was very emotionally attached to New York and my BFFs from college who still lived there, as well as my entire family—parents, brother, grandma, cousins… everyone.. I treated the first six weeks in LA as an adventure, an extended vacation—one that I could end and return home from whenever I had had enough. But the interesting thing about this frame of mind is that it actually had the adverse effect. The longer I took it “one day at a time,” the longer I wanted to stay.

Have coffee/drinks/lunch/any excuse for food and beverages with new people, wherever you can find them.

I had a handful of great friends out in LA when I first moved here, for whom I will always be eternally grateful. I also had a network of acquaintances from college and work who lived out here, and I knew that unless I wanted to spend every day of my new West coast life eating soy nuggets on an overturned cardboard box sitting on my leaky air mattress watching Netflix, I would need to meet some damn people . So I emailed and Facebooked everyone I knew who was settled in LA and did some serious hanging out. I tend to suffer from self-inflicted Hermitation, so forcing myself to go out to bars with near-strangers to shoot the shit was a little bit terrifying for me at first. But considering that the alternative was complete and total isolation in my teensy studio apartment, it wasn’t a hard sell.

Sidebar: If I had it to do over again, I would have had roommates at first! Two good friends of mine lived right next door, thankfully; but having people around 24/7 (who know other people who you can someday know) can be really valuable!

Go on dates.

I was blissfully single and free as a bird when I moved, so I figured hey, what better way go out and see all the sights than go on some dates? After all, I had my “one day at a time” hat on, so how bad could it be, as long as nothing got too serious? There’s nothing a native (or long-time dweller) of a given city loves more than showing a bright-eyed new kid how cool their town is. I signed up for an OkCupid account for the first time ever—I think my photo caption said something like “Just passin’ through!” But as it turns out, my one-day-at-a-time approach also kind of failed me in this department, too. I met a guy through some mutual college friends, and pretty soon my “I’m on vacation here, I don’t really live here, all my relationships are transient!” mentality dissolved to “Maybe I’ll stick around for a little while.”

Plug shit into your GPS and GO—even if you have nobody to go with.

The first thing I said after buying my car in LA was something like: “Siri, take me to Malibu!” I followed the directions on my GPS and drove up the Pacific Coast Highway to Zuma Beach. I drove home with the backdrop of a classic dusty-pink LA sunset in my rearview, and even though the traffic was brutal, I was psyched to have taken myself on an adventure. I didn’t start my first job in LA until I’d been there for a month, so daytime was my playtime. While most of my new friends were at work, I took it upon myself to explore a new neighborhood every day. I hiked Runyon Canyon. I shopped at The Grove. I explored Santa Monica Pier. I went thrift shopping in Silverlake. I tried (and failed) to get my tiny dog to walk all the way up to the Griffith Park Observatory. And, of course, I hit all of the beaches and Farmers Markets (and don’t even get me started on the wonder that is locally sourced California produce. I SAID GOD DAMN). With the GPS on my side, I wasn’t afraid of getting lost or accidentally wandering into a seedy neighborhood. I got up every morning and I went somewhere. That was how I learned to love LA, I think. Every experience was mine and mine alone, because I was flying so utterly solo. I don’t associate places in this city with certain people or events, the way I often did in New York. The places were all mine, because I discovered them all by myself.

Today, I’m happy to report that I no longer eat Trader Joe’s chik’n nuggets on an overturned cardboard box and my apartment is no longer 330 square feet. I have friends, both new and old, I have managed to find fulfilling work, and even though I still pine for NYC every now and then (especially during the holidays!), the life I’ve created out here is so distinctly mine that even if I move away someday, it will not be for good. It’s so rewarding when you can create a new home on your own terms. As we age, we get fewer and fewer opportunities to do that.  So if you have a chance, I say go for it, enjoy it, and take it one day a time!

Friends in Readerland, tell us about the ways that you made a strange city feel like home in the comments!

Photo by Meaghan Morrison

Photo by Meaghan Morrison

Remodel Citizen, Homeowner

Buying your first home is supposed to be one of the greatest moments of any young adult’s life.  And at this time in history, with the economy and housing market just barely starting to emerge back from the deep abyss of The Great Recession, with so many post-grads still living with Mom and Dad, I—at the tender age of 28—recently became “Yusef Seidy, Homeowner” (yes I plan to print business cards).

It has been, to date, my most crowning achievement—especially considering the pattern of fuck-off-ery that marred my youth.  I was, to put it nicely, a burnout during my collegiate years.  The kind of shaggy-haired, quasi-rasta, new age hippie who listened to Dark Side of the Moon way too much (and often synced with The Wizard of Oz—seriously, try it if you haven’t).  But I digress…

I purchased a modest sized condominium, in a modest sized building in Redondo Beach, CA.  It is literally five blocks from my office, and one mile from the ocean.  The building is on the older side, built in 1967, but it’s been well maintained and has a certain street appeal.  The unit itself is on the first floor in the very front of the building.  It was clean, with great potential, but needed work, and therein laid the trouble.

First Disclaimer: Your Homeowners Association (HOA) is probably a group of older neighbors who have the time to sit around judging whether to approve or deny any improvements you propose to what is technically yours.  I say technically, because common areas belong to everyone in the complex; and, if you have a loan to pay for your unit, the debt is yours but the property belongs to the bank until said debt is paid. This isn’t a lesson in personal economics or the philosophies of ownership, however: it’s an account of my journey through the process of remodeling my condo and how I turned my diamond in the rough into a regal jewel fit for the King who inhabits it.

The first thing I noticed about the unit, and all units in this particular complex, is that the appliances are electric powered, with the exception of a fireplace, whose gas is covered by my Homeowners Association payments.  For all those wondering, natural gas power is cheaper than electricity, better to cook with, and more highly sought after in the housing market (which is to say, adds value to your property).  Luckily, my little slice of heaven sits in the perfect location for gas lines to be added because there is a crawl space underneath, allowing plumbing work to be done easily.

I’m getting ahead of myself.  The first task upon receiving my deed was to interview contractors.  A contractor is essentially a pimp, with a stable of subcontractors and laborers who do the actual work.  So, if I pay a contactor to add in gas lines, change my closet doors, retile a shower, redo some electrical work, add in an extra sink in the bathroom, install new windows and sliding glass doors, and repaint the condo—he goes out and pays a plumber, an electrician, a window guy, a tile guy, painters, a closet guy, and his ex-wife’s alimony.

Second Disclaimer:  When interviewing contractors, be wary of the low bidder, as there is a strong possibility he will charge you an arm and/or a leg for every little additional piece of work to make up for the fact that he low-balled you just to get the job.  Be upfront about the work you need done, don’t be afraid to let him know you’ll get someone else to do additions for cheaper if need be.  In my short, yet intense experience with remodeling, I have met plenty of homeowners who fired their contractor(s) for this very reason.

I chose the low bidder, and proceeded to begin work.  It was at this time I was informed that city permits would be required for installing new windows and sliding glass doors.

Third Disclaimer: City permits are a way for a town, such as Redondo Beach, CA, to fund and maintain the beautifully manicured landscape of its newly built and constantly improved municipal buildings.  They are, in a sense, extortion.  (Okay, okay, I guess they provide guidance for safe building practices and pragmatic construction) But in my case, they felt like tribute to a criminal overlord for permitting the improvement of what is, again, technically yours.

City permits, subsequently, require an HOA letter of approval for all proposed updates.  But, by the time my Association returned my messages regarding the windows, they had already been installed.  Then began arguments that the new windows did not match the old—not unfathomable considering the windows had not previously been updated since the Bicentennial, and city codes had changed a considerable amount since the Ford administration.  In the city of Redondo Beach, as in most cities, an egress window (one that can be used for escape in case of fire) must have a minimum opening of 24 inches—thus ensuring a plus sized buttocks may slide through easily, if snuggly, should a visiting relative decide to nap on your polyester couch while smoking a Kool Mild 100.  That is to say, in light of municipal requirements, the HOA graciously acquiesced.

This, however, was only the beginning of a long and arduous process of posturing and politicizing between the Homeowners Association, the city’s building department, and a contractor who clearly considers me his personal ATM machine.

Don’t let me sound negative or discouraging.  Sitting, finally, mercifully, on my very own couch, skimming through my Netflix queue and sipping scotch like the victory champagne of champions, the frustration and struggle of the past few months seems almost foreign to me.  Almost.  But, when I look down at my floors, the tile work done in my kitchen and around my fireplace, I see days of labor which had to be done by a separate team because I couldn’t trust my contractor to complete it.  I see hallway and bathroom walls that had to be gutted more than anticipated because a certain someone was unaware that Redondo Beach city codes require plumbing vents to be installed at least forty inches above the drain.  I see a washer and dryer that took me an additional two months to convince the HOA wouldn’t have a negative impact on the building’s drainage system—three separate plumbers were sought for advice to ensure an extra load of laundry wouldn’t back up the sink in the condo down the hall.

The misconception, or lie you may allow yourself to believe during a process such as this, is that this will be an easy process—that you will have the answers before the pitfalls arise.  Know that, especially your first time, you won’t forsee everything.  My only regret was letting myself believe what I heard during the initial walkthrough—that a three-week project couldn’t possibly turn into four to five months.  Looking around at my kingdom, however small it may be, the frustration and worry were worth every dollar and every ounce of sweat.  There is a path around every obstacle, if you keep a cool head.  And be certain from the beginning that the person you hire knows your city’s building regulations and requirements.

In the end, my greatest advice is that if you find yourself in the position I was in, stay positive and keep pushing forward.  I was lucky to have parents who had been through this before, and the love of a woman who kept me calm and collected.  So no matter how discouraged you may want to feel, remember that you earned your home, and that in end, it will be worth every moment of stress you feel.

Welcome home.

Photo by Meaghan Morrison

Photo by Meaghan Morrison


Home (Theater) Improvement

“This is the end of life as we have come to know and love it.” I thought as I watched thirty five square feet and 1080 progressively scanned lines of glorious television walk out of my life forever. My roommate, along with his beloved projector, was headed for greener pastures, leaving the rest of us to languish away into sad, lonesome, standard-def obscurity.

The Projector

There’s a lot of good literature out there on the Googles that will help guide you to the perfect projector. Since we had become accustomed to a certain standard of television, we were looking for a 1080p projector, 60Hz would do, with a minimum contrast ratio of 1:2000. But In terms of what kinds of projectors are available on the market (from the $200 VewSanic knock-off to the $20,000 3DMax Sound-O-Vision Extreme), the price range we were expecting was between $500 and $1000. But for us our wallets, we were just looking for something to “scrape by.” So, when we found an $800 projector that hit our minimum requirements, but was available for $580 through a special refurbished program, we jumped at it. BOOM. And we had a projector again.

Everything was hooked up to the cable and DVR—we turned it on and… there’s no sound. Maybe we should have thought this out better. With a trip to RadioShack for a ⅛” stereo to ¼” mono adapter, we were able to jury rig my fiancée Meggyn’s bass amp in as a temporary sound system. Well, at least it was loud and thumpy!

The Mount

Bliss settled in, until we realized we were merely maintaining the status quo. Like cavemen watching the firelight flicker across the wall. With the projector haphazardly settled on an end-table with a book underneath to prop it up, the risk of inebriated guests leaving open-topped drinks on the same table and toppling them into the delicate internals—the horror, the horror!—was just too high. Of course, I’d just dropped an inordinate sum of money on a brand new projector, so I wasn’t keen on the idea of dropping even more moolah on a television mount that wouldn’t directly affect the viewing experience.

One of the nice things about living in a leased house is that you never know what surprises you might find! After hunting around for extra shelving, I came across an old television mount up in the back corner of the garage (the kind for those tube TVs that could smash toddlers to atoms). And so began the next obstacle: the mount was bolted into a high wooden rafter in the garage, but we only had drywall in the living room… To Google! It turns out that as long as there’s a stud behind wherever you’re screwing in the mount, it should hold weight. After a trip to the local Ace hardware to buy some screws that could be used to drill to China and a quick download of the Bubble Level app—to make sure we weren’t setting ourselves up for a neck kink—we got to work. (Contrary to Meggyn’s expectations, the level app did a good job!)

And then failure struck—we broke two of the screws because we thought we could get away without drilling pilot holes. It’s TOOL TIME! We borrowed a drill (thanks, mom!), and we raised the projector up like the Mennonites raising a barn. Then we cracked open a few beers to celebrate exactly like the Mennonites would not have.

The Connections

Now we were getting somewhere! We could no longer inadvertently destroy all of our wonderful video goodness without some extra effort of lobbing liquids towards the ceiling. The next failure, of course, being that we couldn’t actually connect the cable or the power to our ascended projector. Who wanted to get lost in the details of connecting this, right? What are we, rocket surgeons?

To solve our connection problems, I repurposed some unused bookshelves I had bought for my room. With a few more marks and holes in the wall next to the projector mount, I added a shelf in the living room that we loaded up with every bit of television-related electronics. To paint the picture for you, we now had the projector on the old TV mount (in the dead-center of the wall), an overburdened shelf stacked with enough boxes with blinking lights that it may have been flagged by the NSA, a bass amp on the floor, and so many power cables and audio/video cables strewn about that they might as well have been vines in a nightmarish Lovecraftian dystopian future of cybertronic Amazonian forest… Let’s leave it at “messier than a dorm room during finals” and be done. But now that everything worked, I was at: “Please, for the love of God and all that is holy (and not blinking lights at me), let me be done.”

The Organization

Now we had a beautiful 1080p picture taking up the front wall and plenty of loud thumpy sounds to accompany it. Except if you changed the input from the cable to the Wii. Or to the Chromecast. Or to the Xbox. Was I the only one around here who understood which colors get connected to which inputs on the back of this thing?! Rather than attempting to teach every person who came to the house which cables to disconnect/reconnect to switch the audio whenever you switched the video feed (I just wasn’t up for writing the Connectionist Manifesto), I decided that another trip to RadioShack was in order. There I found an A/V switch for under $20 along with a few new A/V cables and a shiny new sound bar with subwoofer for definitely not under $20 (Meggyn was complaining about wanting her bass amp back and, hey, it was payday!). I returned to our humble, if electrically dangerous, abode armed with my new equipment, a sharpie, some wire ties, some labels, and as much determination as I could muster. I tackled the monumental task of improving our sound system, organizing our A/V shelf, wire managing all of the dangly bits (can’t leave any extra 1s or 0s), and setting our theater system up in such a way that at the press of a (CLEARLY LABELLED) button, my roomies, or any of our guests, could switch between video and audio streams at will.

The Finishing Touches

Life almost seemed perfect. It was simple enough to use the newly organized system, the new sound system was much more balanced than a 15 Watt bass amp, and whatever we watched was beautiful (except the Wii… stupid standard-definition output). But if you can’t find a problem to fix, then you aren’t looking hard enough. Some of the darker colors were being washed together by the projector, and it was sometimes hard to tell what was going on during scenes that took place in the dark. Blackout curtains became the next addition to the room. We got these thanks to a generous donation of leftover fabric from Meggyn’s mom. They just barely cover the full width of our window, but it works. Now, we can watch the projector during the day as if it were the middle of the night (without that pesky bedtime thing). Our last improvement was to go to OSH and buy some cinder blocks, push the couch forward so that it was closer to the wall (or rather, the screen), drop the cinder blocks behind the old couch and ADD ANOTHER  COUCH. Because couch. Now, we’ve got theater-style seating to go with our home-theater!

I still don’t think we’re done making improvements, but for the moment we’re pretty happy with how everything turned out. And the only really spendy parts were the projector itself and the sound bar—things which will be following us to our next house! Thanks to some successful craigslist foraging, the new couch was free, and the cinder blocks we used to prop it up were a few dollars apiece. We used five blocks for the couch and another three to make a recycled-plywood footrest.

All-in-all, we could have done a much worse (much more expensive) job of converting our living room into one radical home theater.

Photo by Michael Cox

Photo by Michael Cox

The Gospel of Removable Wallpaper

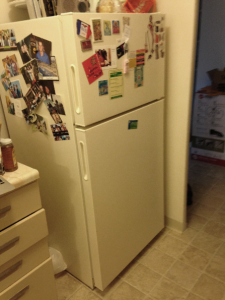
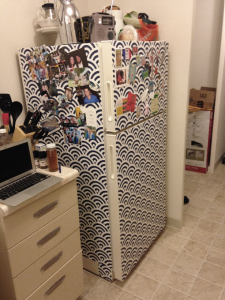
I don’t want to spend more energy than I really need to decorate my current apartment. I want a well-curated space, but at the moment I’m not entirely sure that I have the energy or cash to put that together. While the lease on my apartment does permit me to paint, I am loathe at this point to start a project that will require things like primers and sanding and taping and testing various colors at different times of the day. I want a maximal change with minimal effort. This brings me to removable wallpaper.

Before

Before

After

After

Removable wallpaper is one of my favorite ways to change a space because it is so versatile and so low risk. You peel off a backing and then stick it to the wall. Press out all the air bubbles, maybe trim around the edges, and you’re all set. Change your mind? Peel it down. Done and done. Removable wallpaper can be used on walls, of course, but also all over your house. Cover a refrigerator or other appliances, line the backs of shelves, refinish a blah tabletop (such as IKEA’s LACK series), spice up the inside of a tray for serving guests, even create the appearance of a grand and stately headboard. All completely possible and so easy.

So far, I’ve redone the backsplash and refrigerator in my kitchen and one wall in my apartment, and were it not for my spouse saying he’s done with patterns, I’d be covering all the rest of the flat, smooth surfaces in our apartment with bright, cheerful colors and designs. The kitchen took all of forty five minutes to get done, and the trickiest part was matching the pattern repeat.

While, at first glance, removable wallpaper may look like the more expensive option, I’ve found that after you buy all the supplies to paint walls or hang art (tarps, brushes, pans, rollers, sandpaper, painters tape, primers, and multiple buckets of paint; or frames, mats, and custom fitting), the total cost is much lower. In total, I spent about $100—shipping included. Not to mention, you won’t ruin your favorite jeans when you think to yourself “Ah, but I’ll be so careful!” The only cost is the paper itself. It is also completely possible to make temporary wallpaper yourself with contact paper.

Before

Before

After

After

Don’t know where to start?

Check out the whole host of resources available online about where to buy and what to do with temporary wallpaper:

Removable wall paper can be bought at:

Feeling crazy? Try starching fabric to the wall. (I haven’t tried this, so don’t blame me if it pulls all the paint off your walls…)

And I’m not the only one who is totally into removable wallpaper! Read more on Oh Happy Day and Apartment Therapy.

Enjoy!

Enjoy!

Curating Your Art Collection Without Busting Your Budget

Decorating on a budget is not easy.  Sure, you might do some great DIY projects, maybe find some decent furniture on Craigslist, but if you really want to make your place look great without spending a whole paycheck (or five), it takes a lot of work.  Fortunately, even if you have to live with a dingy 5-year old sofa that may have at one point belonged to the mother in What’s Eating Gilbert Grape (too soon?), here are four simple and affordable ways to invest in your own personal style.

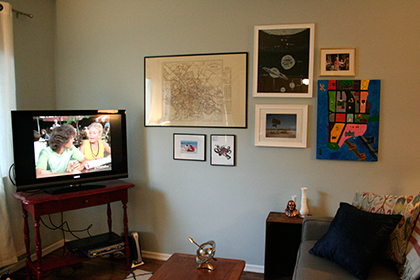
1. Use your own photos.  Why spend money on art when you have plenty of your own photographs just waiting to be framed on your wall?   I remind you that photographs were invented before the Facebook photo album, and a special photo will be a great conversation starter with your guests.  If you worry your pictures aren’t ‘artsy’ enough, get them printed in black and white!  Sugarfish is a great affordable service to get photos printed, and you can even order prints of your Instagram masterpieces on Shutterfly.

2. Maps, postcards, old records, anything flat you can put in a frame.  If you’re like me, you’re always finding a cool postcard you bought on vacation but never sent, or the ticket to that epic Dashboard Confessional show you went to in high school.  Rather than sticking it back in a drawer to be rediscovered in another five years, throw it up on the wall to break up all of your fabulous photographs.  Old maps are a particular favorite—both affordable and pretty!  Never been anywhere?  Fake it with the $3.95 map wrapping paper  from Paper-Source!

3. Affordable art prints and photos are easy to come by if you’re looking in the right places.  I like to shop around, but most of the sites below feature several different mediums (prints, photos, text graphics, even actual paintings) so if you don’t have the time or patience for scrolling through 40 pages of options, you would do well at just one of these.  The more affordable pieces from these sites do in fact still cost some money (many items in the $15-40 range, depending on the size), so I try to only purchase things I really love and would want to look at every day on my wall.  Minimalist and fan-made movie posters are a personal favorite that look nice and reflect my true passions.

  • 20×200 (www.youshouldbuyart.com):  Run by a gallery owner in New York, they have a great stockpile of photos and prints by up-and-coming artists.
  • Society 6:  Not only do they deal in art, but if you find a design you like, you can get it printed on t-shirts, mugs, pillowcases, phone cases, and more.
  • The Working Proof:  Art for a cause—15% of each sale goes to the charity of the artist’s choice.
  • Etsy:  A perennial favorite for all things, art included.  Perhaps pay tribute to the cinematic classic I mentioned earlier with this!


4. Don’t be afraid to create an original painting yourself!  I know the canvas–and-paint section at the art store can be intimidating, but delve in, and make your own masterpiece to hang on your wall. It’s easier to splurge on something when it’s half off, so double-check for coupons before you go in to your favorite craft store. Even if you don’t see yourself as “creative,” geometric patterns in a good color scheme look just as nice as a detailed landscape—and you still get kudos for having an actual painting on your wall!  Too shy to go it alone?  Try out Painting with a Twist (or any of the similar BYOB painting classes across the country) with a couple friends and a bottle of wine, and come home with a beautiful painting as well as some new memories (aww).

In all, I think the key to curating an art collection while not over-spending is to make every piece you own individual to you.  Whether it’s meaningful because you made it yourself or just because you love it, I guarantee that a piece of art with personal meaning that also looks great will justify any cost.  Now please, just promise me you won’t hang all of your beautiful acquisitions and discoveries with painter’s tape and thumbtacks. *

*Before you even try, I direct you to Michael’s (they almost always have a coupon for 50% off on their website) or Aaron Brothers (they have a buy one, get the second for 1 cent sale on frames and canvas in January and July every year).

Photo by Michelle White

Photo by Michelle White

Suing Your Landlord (aka Beating The Man: Part II)

We’ve all experienced a landlord, employer, contractor, etc., who has not held up their end of a bargain—withholding money from you simply because there’s no real incentive to pay. It’s frustrating, and once you’ve exhausted the VERY PASSIVE-AGGRESSIVE EMAILS, there’s not much to do besides take legal action, which can seem more daunting than it’s worth. But if you have the stamina and sufficient proof for it, and especially if you have an ongoing Beating the Man blog series, suing someone is a surprisingly navigable—and if I may say so, awfully satisfying— adventure.

photo

Let me begin by saying that I adored my wonderful little tenement apartment in the Lower East Side since early 2009 when I (and UE contributor Emmy Yu) moved in. It was a tiny place with a huge private patio, on what is arguably the best block in Manhattan, not that I’m biased. My long-term plan was for my boyfriend to move in with me, turning the two-bedroom into a one-bedroom with a living room. Then we would live there probably forever, eventually befriending the owner and quietly purchasing the entire 5-story building from him/her for a scandalously low rate.

In December of 2012, my building was sold and my dream along with it: the new management company told me they were going to raise my rent $850 (36%) per month, and no, they wouldn’t budge on that. This is legal, by the way, if you live in a non-rent-controlled or rent-stabilized apartment in New York, and the raise remains below the designated market rate.

I made preparations to move out and got my things in order, including taking care of some shady “late fees” amounting to $770 that had been thrown onto my account. This is something the former landlord used to do for kicks—a few hundred dollars would accumulate on my bill, then I would call them to protest and they would quickly say “Oops!,” tossing their hair impishly (I imagined), then drop the charges. But because the old management company was pretty much checked out in anticipation of the sell, I couldn’t reach anyone regarding the bogus charges—known as arrears in real estate-speak—and when the building was sold, my arrears were transferred to the new management company without any documentation (because there wasn’t any to begin with).

A months-long series of conversations and emails of bank statements (to prove rent payment) with a representative from the new management company ended with her CFO not budging on returning the $770, and it was withheld from the security deposit that they finally sent me. “Looks like I’ll be taking you guys to court,” I said, without any idea what that really entailed. “My boss says ‘go right ahead,’” responded the rep. Not wanting to back down, I was determined to follow through on whatever it was I had just threatened to do. So I did what any grown-up would do: I Googled “suing someone.”

My reliable friend the Internet led me to this helpful site, about filing small claims suits in New York State. I planned to go to the District Court on Canal Street one morning before work, but the night before I intended to file, I discovered some fine print on the District Court site that said I had to file in the county of the defendant. And since the company is based out of Great Neck, NY, that meant filing in the Nassau County court…. in Hempstead, NY. I realized then why the CFO had called my bluff. This was much farther than Canal Street.

Not to be intimidated by inconvenience, I woke up around 6:00 the next morning and headed to the train station, where I hopped on an hour-long Long Island Railroad train to Hempstead and walked to the District Court building from the station. I made sure to save all of my travel receipts so I could amend the final amount on my court date (which you can do, or at least request, on the day of). Inside, at the small claims office, they handed me a very basic form to file a small claims (under $5000) complaint. I handed it back, paid the $15 filing fee, and was assigned a court date for about a month later. Easy peasy. I walked back to the station, jumped on a train back to the city, and headed to work.

My court date was ultimately pushed back another month when I realized that I should have included the LLC associated with my particular building in addition to the management company. Typically, when you mail a rent check, it’s to the LLC for your particular building and not to the larger management company that handles the buildings it owns. That way, it’s easier for the larger company to avoid liability (“We didn’t know! We don’t deal with individual tenants!”). I was able to amend the complaint over the phone and the small claims office pushed the date back so they could send an updated summons to the now-two defendants.

I called my aunt and uncle (both lawyers) to ask their advice regarding court and to gauge my chances. They told me that New York courts tended to be tenant-friendly, but I should bring everything just in case. And fortunately, having inherited the hoarding gene, I had everything: the original lease from 2009 (detailing the late policy), the original inspection form, proof of every rent payment in the form of bank statements, and photos of the apartment, in addition to every email correspondence I’d had with the evil management company.

On the day of the court appearance, I brought my small mountain of documentation with me on the train, and I showed up at 9:00 for my 9:30 summons. From the crowd of people milling around a signup sheet outside my assigned courtroom, I gathered that there were about 30 cases all scheduled for that morning. I took note of the number listed next to my name and grabbed a seat in the courtroom, which looked pretty much like a conventional courtroom: 10 or so rows of benches, a long desk in the front, and a judge’s stand behind that. I realized then that the people filling the seats in all those Law & Order court scenes are just pending plaintiffs and defendants, listening patiently to Detective Benson’s gallant summations until their turn to see the judge. I looked around for my defendant.

A clerk took attendance by number. If the defendant and plaintiff were both present, he sent them down to a mediation room, where an arbitrator would help them come to a settlement. If both sides couldn’t come to a settlement, then the case would be sent back up to the judge to decide after each pled their case. When the clerk called my number, I raised my hand, but no one from the management company was there, so he pushed my case to “second call” and moved down the list. I had an in-case-of-boredom novel I brought open in front of me, but hardly glanced at it; there’s something bizarrely intriguing about hearing the various disputes people have with each other. The clerk was patient but clearly trying to move as briskly as possible through the cases, occasionally (to my suppressed glee) sniping at someone for talking out of turn or not answering his question properly.

He assured us that we would go through the second call before having to sit through trials of failed mediations. This meant that if a rep from the management company didn’t show up by the time my case was called again, the case would be called an “inquest” and the judgment would be defaulted to me provided that I could prove the amount owed. Sure enough, my name came around again and no one had showed up. I can’t say that I wasn’t a little disappointed not to open a can of dossier whoop-ass, but I would get a chance to present to the judge nonetheless. I handed the clerk a paystub listing the arrear amount, which he passed up to the judge. Because they were trying to get through all the inquests before the lunch break, neither inquired any further into my case or asked for any additional proof. So I wasn’t sure how understanding they would be, especially because I didn’t get a chance to really explain my case, but when the clerk handed me an envelope to self-address for the judgment, he commented, “You have a lot of enthusiasm, young lady.”

A week later, I received a judgment in my favor for the full amount, plus interest and travel fees, and I did a little jig. But it would be another month before I actually saw any money. The company tried to delay paying me in every way possible; first telling me they were trying to reschedule the hearing because their rep had to go to a funeral, and then just flat-out ignoring my calls. Too stingy to hire a marshal, I conjured up that ingrained skill of all youngest children—the great power to annoy. I began calling about once an hour every day, often repeatedly until I could hear the gratifying click of them manually hanging up on me. It took them a week to realize that they would rather pay $800 than deal with me any longer, and when they did, a check appeared in the mail.

… And you can, too! By now, you’ve realized that anyone with Internet access and the willingness to be a total thorn can file a suit if they feel financially wronged. I highly recommend it, as nothing feels better than sweet, sweet justice, except maybe depositing an $800 check. Here’s some advice if you do take action against a company: Save everything— receipts, forms, leases, take-out napkins. Be vigilant. Be very, very, very, very irritating. Bullshit your way to the finish line (everything is Googleable), and remember that confidence—even if preemptive—will help sway the powers that be onto your side. And always bring a book.

Stay tuned for the next installment of “Beating The Man,” in which I try to sneak into the bathroom at The Four Seasons.* Succeed… or die!!

*JK

Washing Your Car

It’s important to wash your car regularly, especially if you ever plan on selling it. Someone who is looking to buy a used car is more likely to buy a car that looks clean, and your paint job is the first thing people will see. A car that isn’t washed regularly will have its paint eaten through by sap, dirt, and other debris, which cause visible flaws in the paint and will make reselling the car much more difficult.

Photo by Sara Slattery

Washing your car by yourself can be a frugal and relaxing way to spend an afternoon. Getting all the necessary supplies to wash your car does have a small initial investment, but after you have all the supplies, you’ll be able to wash your car for about $1 each time (the cost of the soap and water). Much cheaper than a drive-thru car wash, and you have the peace of mind of knowing that everything was cleaned properly!

Washing by hand is the only way to wash a convertible car, and will save the paint job on any car! Drive-thru car washes that contact the paint with brushes strip your paint off each time and will cause your paint to fade prematurely. Washes that use high pressure nozzles have the same effect, albeit lesser.

1.       Supplies

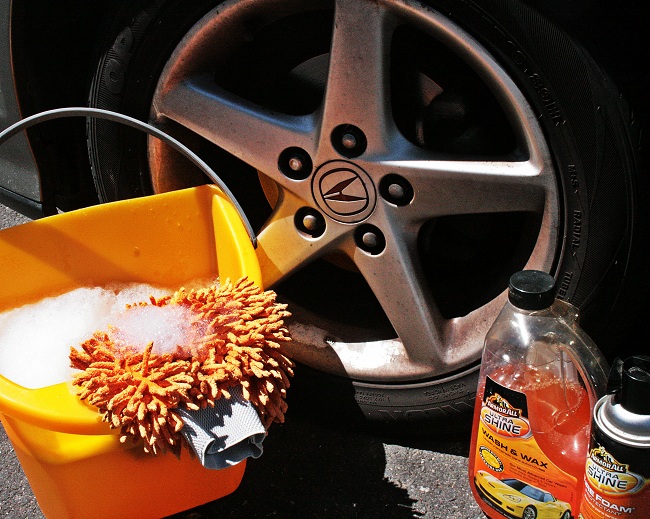
You only need a few supplies to wash your car. You’ll need two buckets, three or four microfiber cloths, a wash mitten or car sponge, and some car soap. Do not use anything except car soap! Dish soap and other soaps can strip away the wax and clear coat on your paint. Additionally, microfiber cloths are ideal for washing and drying because they trap the dirt particles in their fibers, whereas a rag or a paper towel will drag the dirt along, scratching the paint.

You should be able to pick up everything you need at your local auto parts store for around $20.

2.       Preparation

Before you start washing the car, it’s best to find some nice shade to park under. If you can’t find any shade, you can go to a do-it-yourself carwash or wait until the right time of the day so that the sun isn’t directly blasting your car. Another option is to rinse your car in the sun, and then quickly park somewhere nice and shady.  If shade just isn’t an option, you’ll have to wash and dry the car one section at a time in order to prevent water spots from occurring.

Fill up one of your buckets with soap and water, and fill the other bucket with only water. Next, lift your windshield wipers up until they ‘click’ and stay off the windshield.

You’re almost ready to wash your car, but first double-check that all the windows are rolled up and all the doors are closed.

3.       Rinsing

When rinsing the car, don’t use a hose or a nozzle with too much water pressure: too much pressure will end up scratching your paint! A garden hose with a trigger spray attachment is perfect.

Start by rinsing the car from the top down. Start with the roof and work your way down to the sides of the car. This should remove or break loose most of the dirt, preventing scratches when you scrub the car with the sponge.

If you live in an area with snow, you’ll want to pay special attention to the wheel wells, as the salt used on the roads builds up and can cause corrosion if ignored.

4.       Washing

After you’ve finished rinsing the car, you’re ready to soap it. Grab your sponge and soak it in the soapy water. You’ll need to go around the entire car with the sponge, starting from the top and working your way down to the bottom of the car. Go section by section, making sure that you’ve removed all dirt and debris from each area of the car before moving on to the next. A good order is to start with the roof, move on to the hood/front bumper of the car, then work your way back along the passenger side until you reach the trunk/rear bumper, and then work around the driver’s side to the front of the car, starting with the top of each section and working your way down.

As you finish each section, it’s best to rinse the sponge off in the clean water bucket and then re-soap it in the other bucket. This prevents dirt from building up on the sponge, making it clean better and preventing scratches to your paint. Some parts of your car will be much dirtier than others, and you may have to rinse the sponge off multiple times in order to get one panel clean.

Once you’ve finished all the body panels, move onto the wheels. Grab a clean microfiber towel, dip it in the soap water, and wipe down the wheels, making sure you get the brake dust off of all the visible surfaces. Make sure that the towel you use for the wheels is kept as a wheel-only towel for all future washes, as leftover brake dust will scratch your paint.

5.       Rinsing (again)

This is the same as step 3, but now to rinse all the excess soap off. It’s important to rinse off all the excess soap because soap residue can cause damage to your car’s clear coat.

Instead of using a hose, you can choose to use a second sponge with the clean water bucket. Make sure to rinse the sponge out in the clean water often. Make sure not to use too much pressure on the sponge; all you want to do is break the dirt loose.  This method saves a lot of water, but can be a bit more time consuming.

6.       Drying

This is the part that becomes a race against time, and it is the reason for that nice shade you found earlier. When drying the car, start with the top and work your way down. This prevents water from the top running down to an area that you’ve already dried. Use one of the microfiber towels to wipe down the car and remove most of the excess water, making sure to wring it out as necessary. Once you’ve wiped the car down once with the first microfiber, grab another dry microfiber and go over the entire car again. This gets the car completely dry and prevents the water from evaporating off and leaving dirty residue or hard water stains.

After you’re satisfied that you’ve gotten everything dry, do a pass around the car to look for any water residue or streaking on the windows. If you find any residue or streaking, rub the second drying towel on that area and it should wipe off and shine clean.

7.       Waxing (optional)

Now is the perfect time to wax your car, if you so desire. When waxing, you want to use a minimal amount of wax. If white streak marks are visible after you’ve passed over an area, you’re using too much! Use a wax applicator pad to apply the wax, and wait approximately 5 minutes until the area hazes over before buffing with a clean microfiber towel. It’s best to apply and buff one section at a time. Waxing your car is important because it acts as a shield between your clear coat and the dirt, and your car shine for longer so you don’t need to wash your car as often.

If you’ve waxed your car using a high-quality wax (and followed the instructions properly), it will only be necessary to wash your car once a month. If you opted out of waxing your car, it’s best to wash it every week to prevent debris from eating through your clear coat and ultimately your paint.

Wax essentially acts as an extra layer of paint, keeping your car cleaner for longer while simultaneously protecting your paint and clear coat.

Things to note

Should you happen to have a convertible car, do not wash the soft top with a hose unless you’re absolutely positive you have no leaks. If you only have minor leaks, it’s ok to scrub it off by hand with a clean sponge and dry it off with a microfiber towel. Keep in mind that a fabric-like convertible top is not waterproof, it is just water resistant, while a vinyl top is waterproof.  If you’re unsure what kind of material your convertible top is made out of, you can ask your car dealership or a local auto parts store. It’s best not to use car soap on a convertible top, since most car soaps contain some sort of shine-enhancing oil, which the top will absorb and become a dust magnet.

If you have a truck, the steps above are almost the same. The only difference is that you will need to open the bed and rinse it out. If you have a bed liner, there’s no need to dry off the bed; but if your truck bed has no liner, then you need to dry inside the bed to prevent rust, residue, and hard water stains.

DIY Household Cleaning Products and Haircare

If you had asked ten-year-old me what baking soda and vinegar were good for, I would have peered into my mother’s kitchen cabinets, scrunched my face in confusion, and hazarded these guesses: “Baking soda goes in waffles to make them fluffy. Vinegar just smells bad.” And thus, I lived most of my life in darkness, never realizing the true power of these two lackluster kitchen staples.

CleaningSquare

Photo by Heather Griffith

One look at the list of ingredients on any household cleaning product and your head will start to spin. (Unless you’re a chemistry nerd, in which case, you might actually understand what you’re reading.) Sometimes I wonder if it isn’t just a big hoax to get us to buy more petroleum-based products so oil companies can make money. Whether that’s true or not, you can bet your bottom dollar that you can save your bottom dollar by making your own cleaning products, and even shampoo, for a fraction of the cost of your usual products. The secret ingredients? Yup, baking soda and vinegar—they form the foundation for most of these recipes, with a few other household products playing supporting roles:

All-Purpose Cleaner

Use in place of Windex, 409, Mr. Clean, Lysol, or any other spray cleaner.

What you need:

- a spray bottle

- 2 cups water

- 2 cups white distilled vinegar

- 3 teaspoons liquid castile soap (like Dr. Bronner’s, sold at Trader Joe’s and some drug stores)

- 1 teaspoon of tea tree oil

Pour all ingredients into a spray bottle and shake well. If your spray bottle holds less than four cups of liquid, just cut the recipe in half. The castile soap and tea tree oil are optional, but they add cleaning and disinfecting properties.

Surface Scrub

Use in place of Comet, Scrubbing Bubbles, Soft Scrub, or any other abrasive cleaner.

What you need:

- a clean glass jar with a lid that seals tightly

- 2 cups baking soda

- ½ to 2/3 cup liquid castile soap

- 5 drops essential oil such as lavender, tea tree, rosemary or any scent you prefer

Mix ingredients together in the jar and store in a cool, dark place. (It should have the consistency of a goopy toothpaste.) Slap some of it on a sponge whenever you need to tackle some tough grime. The essential oil is optional, but will add antibacterial qualities.

Cheater version: add just enough water (start with ½ cup, and add ¼ cup at a time until the mixture is moist enough) to 2 cups of baking soda to form a wet paste and store in the jar. The baking soda will still work wonders, even without the soap and essential oil.

Toilet Bowl Cleaner

Use in place of Clorox, Lysol, Scrubbing Bubbles, or any other toilet cleaner.

What you need:

- 3 tablespoons to ¼ cup baking soda

- ¼ cup white distilled vinegar

Sprinkle the toilet bowl with baking soda and drizzle the vinegar on top. Let it soak for about a half an hour—go for a run, do some reading, get lost on Pinterest—and then scrub with a toilet brush.

Drain Opener

Use in place of Drano, Liquid-Plumber, or any other drain de-clogger.

What you need:

- ½ cup baking soda

- ½ cup white distilled vinegar

- 2 cups boiling water

Pour the dry baking soda down the drain, then vinegar. Cover with a small plate or jar lid and let sit for 10 minutes to a half an hour, and then pour boiling water down the drain. Don’t worry if your drain seems to “belch up” air bubbles: that’s totally normal.

Shampoo and Conditioner

Use the baking soda solution instead of shampoo and the vinegar solution instead of conditioner. It sounds weird, but trust me, it’s worth a try. Baking soda strips your hair of all of the grease and gunk, while vinegar detangles, seals your follicles, and makes your tresses shine.

What you need:

- 2 clean plastic squeeze bottles (reuse empty shampoo and conditioner bottles!)

- baking soda

- apple cider vinegar (not white distilled vinegar this time)

Into one bottle, mix 1 tablespoon baking soda for every 1 cup of water. Pour 1 tablespoon apple cider vinegar for every 1 cup of water into the second bottle. Make sure to shake each bottle before squeezing some of the solution onto your hair. Start with the baking soda solution: squirt some onto your hair, massage, and rinse. Use the same technique for the vinegar conditioner. (The intense vinegar smell goes away by the time your hair is dry, I promise. If you’re still nervous, add a drop of essential oil or vanilla essence to counteract the smell.)

Note: the ratio of baking soda to vinegar can vary between hair types. If your hair is too dry after using this ratio, try using less baking soda in your shampoo.

Recipes adapted mostly from Women’s Voices for the Earth and here and here on Grist.org. If this gets you on a DIY cleaning and personal care kick, the possibilities are endless! This primer on DIY household cleaners and this list of homemade self-care products are great places to start.

Compost vs. Recycle vs. Trash

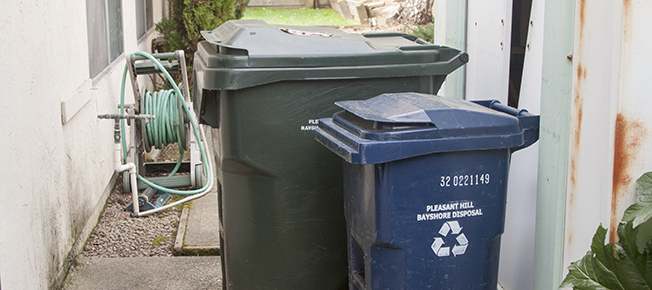
You’ve just finished sipping down warm peppermint tea at a farmers’ market, and you pause in front of the large plastic bins. They loom, inscrutable—challenging you to the Sphinx’s riddle of what to do with your now-empty paper cup, plastic lid, and teabag. Well, the paper cup can be recycled, right? But…it’s wet from holding tea, so does it have to go in the trash? The plastic might have to be thrown away, or maybe it can be recycled. And the teabag is a conundrum in itself: it’s made from plants, so it can be composted, except that it’s also made from paper, so it should be recycled…?

A few weeks later, you and your friends tidy up after watching the game and chowing down on take-out pizza and a few drinks. You again find yourself pausing, this time in front of the small trash can and recycling bin in your friend’s kitchen. You confidently rinse out the glass bottles, rinse and crush the soda cans, and put them all in the recycling bin. But then there’s the pizza box, its paper liner filled with grease and cheese scraps. It’s made of cardboard, so it could be recycled…but there’s grease on it, so maybe it has to go in the trash. None of your friends know the answer, either, so you shrug your shoulders and forget about it.

Okay, let’s drop the pretense. This “you” was me. Though I proudly wear my tree-hugging heart on my sleeve and I was an RA at a college that emphasized waste reduction, I suffered from waste disposal anxiety for years.

I’m here to share what I’ve gleaned from friends whose jobs are to educate the public about these things, from studying the lids of municipal recycling bins and looking up tips from the omniscient Internet.

COMPOST

Foreign though it may seem, figuring out what to compost is actually the most straightforward of all waste disposal skills.

If…

    • it is a plant or part of a plant (vegetable scraps, fruit peels, grains, tea leaves, coffee grounds)
    • it was made from plants (for example, bread or anything made from flour.
    • it is an egg shell

…you can compost it.

Don’t compost anything that came from an animal, or anything that’s greasy. (That means no meat and no dairy!)

Note: Those fancy compostable dishes and biodegradable bags that you might see at farmers markets are biodegradable, but usually only if they are taken to a special composting facility that is more high-tech than your average worm bin. If you get your home compost picked up by a municipal service, then you should be able to throw that potatoware right in, but if you’re doing it yourself, it might take awhile.

RECYCLING

Things get a little more complicated when it comes to recycling, and you should make sure to check the guidelines for what is recyclable in your county.

I’ve lived in California, Texas, and Montana, so to give you some perspective: in the Bay Area, most paper, glass, plastic, and aluminum products are recyclable for free; in the suburbs of Houston, you have to pay for a recycling service; in Missoula, Montana, you have to bring glass recyclables to a drop-off location so they can be shipped to a recycling plant in Washington.

You should be able to find guidelines for what and how to recycle on your city or county website. I’ll outline some general tips, but it’s always good to double-check what services are available where you live.

Important rule: when you recycle food containers, it’s important to make sure they are cleaned of any food residue.

  • Paper and Cardboard

You can usually recycle most items made of paper or cardboard: newspaper, phone books, cereal boxes, egg cartons, etc. Pizza boxes can sometimes be recycled—as long as you take out the liner and there isn’t any grease/cheese residue on the box itself. (Some counties can even recycle it if there’s a little grease on the cardboard, so check the details for where you live.)

Watch out for soymilk (and other alternative milk) containers. Because they’re actually a combination of paper, plastic, and metal, they’re pretty impossible to recycle.

  • Plastics

Ooh boy, plastic materials may be the most complicated. For starters, look on the plastic you’d like to recycle. If there’s no triple-arrow recycle symbol, then it’s gotta go in the trash. But even if there is a recycle symbol, you still have to be careful. You should see a number (1 through 7) inside the symbol, which indicates what type of plastic it is. Most places recycle plastics 1-5, but 6 and 7 aren’t always guaranteed. Again, it’s worth the little bit of time spent on the Internet to learn what types of plastics can be recycled in your county.

Pay attention to plastic bags. Many recycling centers can now recycle plastic bags, but the types that are recyclable vary. In any case, make sure the plastic is clean and dry.

  • Glass

Any kind of bottle or jar can usually be cleaned and recycled. If the bottle or jar has a metal lid, make sure to take it off so that it gets properly sorted.

  • Metal

Any metal can is recyclable—as long as it doesn’t have food residue and it’s empty (in the case of spray canisters). Aluminum foil, pie plates, and trays are also good to go (sans traces of food).

  • Other Possible Recyclables

Electronics can be recycled! But they must be taken to a specific electronic waste recycling center. Check online to see if there’s one near you.

TRASH

And, well, everything else is garbage. Remember that Styrofoam (including those little packing peanuts) is never recyclable or compostable. Things like CDs and batteries aren’t either. (In fact, batteries really shouldn’t even go in the trash. Several chain stores offer programs to accept your old batteries for disposal or recycling.)

This might all seem pretty overwhelming. That’s okay. I used to feel that way, too—it doesn’t mean that you’re an ignoramus or anti-environment. These things take time to learn, just like any worthwhile habit. I’ll leave you with a few simple, easy-to-remember nuggets:

  • If it came from a plant, compost it.
  • If it is clean paper or plastic or glass or metal, you can probably recycle it.
  • If it came from an animal or it’s Styrofoam or anything else that doesn’t fit in the first two categories, trash it.

Like Captain Planet says, “The power is yours!”

Compost1Hero

Photo by Meaghan Morrison

Finding Your Roommate Soulmate… on Craigslist

My roommate and I are what you might call: roommate soulmates. We compliment each other perfectly in the fine art of living with someone and not wanting to kill each other. And yes, we met through Craigslist.

To be honest, I love using Craigslist to find roommates. I think it’s usually easier to live with people that you don’t already have a connection with. At first, living with a friend seems like a great idea: you know the other person isn’t crazy, they’re generally neat, you guys have the same interests and hang out on weekends anyways. But, being goods friends does not necessarily make you good roommates.

Remember when Chandler kisses Joey’s girlfriend in Friends and Joey makes Chandler sit in a box to prove his friendship? Yeah—well you’re going to wish you could put someone in a box just because they haven’t done their dishes for a few days. But since you’re friends, and not just roommates, you probably won’t because you could damage the friendship. Yay passive aggression.

It’s also important to remember there is also that point at which friends spend TOO much time together. Everyone needs their space. I’m not saying living with someone you already know is an absolute no-no… but you have been warned.

So, if you’ve officially decided its time to involve Craigslist in your quest for your ideal roomies you’ve come to the right place. I’ve been on both sides of this battle. I’ve been the one looking for a room and I’ve been the one deciding which lucky soul gets a room. I live in San Francisco so finding housing is rough. Having done this 3 or 4 times in the past year, I have some tips for everyone involved to make the process a bit smoother.

If you’re looking for a room:

  • Prep for the perfect response.  

When you start responding to emails craft 4–5 sentences mentioning your age, job situation, smoker/non-smoker, if you have friends/family in the area, if you have pets. Are you home a lot or always out of the house? Mention some of your interests and favorite tv shows—keep it lighthearted—comedies and wine usually go over well.

If there is a definite start date that you need to be into an apartment—be sure you mention it. If that date just doesn’t work, you’re wasting everyone’s time.

Add all ways to contact you upfront (phone, email, skype, owl…)—seems obvious but sadly it’s not.

This is your base email. Use this as a starting point when you respond to posts. And when you do respond to a post, paste the URL of the original post at the bottom of the email for your own use. When the post owner responds, you will have the link so you can re-read which post was theirs. If you don’t do this you will only see the email that you sent them (which is likely to look very similar to the 15 others you sent out today…)

  • Be flexible.

It’s rough out there. At least where I live. And when we were looking for a roomie a few months ago I can tell you, the more flexible and available you were, the more likely you were to get the room. If you know you’re looking for an apartment this week—clear your schedule beforehand. You want to be able to respond immediately and say, “Yes, I can meet up tonight!” And then when they say, “Oh shoot—actually can you do tomorrow?” You say, “Yes! That’s no problem. When should I come by?” You are understanding and open to changes—as any good roomie should be.

Which also applies to move in dates. Even though we said the room is available on the 1st…. roomie A has to move stuff out while roomie B moves his/her stuff into roomie A’s room… while you move your stuff into roomie B’s room. The point is, if you have any flexibility on move in dates, mention it either in the initial email, a follow up email, or when you meet.

  • Treat the process like a job interview.

When you go to see the apartment, act enthusiastic unless you absolutely despise the place. You may find it is your best option later on and find yourself wishing you hadn’t cringed at the small closet.

Once you’ve seen the apartment and met the roomies, if your conclusion is that you want the apartment—tell them in person that if they offer it, you will take it. You don’t want to make them feel pressured—simply offer up the information that they may already be wondering. I am more likely to offer a room to someone if I already know they want it.

Follow up. Seriously guys. It says a lot to simply send an email after seeing the apartment thanking them for their time and saying or repeating that you would take the room if they offered it to you.

If you’re looking for a roomie:

  • Write a great post.

Include photos of the apartment. I’m just going to let this statement stand on it’s own for a while because it’s that important. People like photos. People want to respond to posts with photos. Take good ones where the rooms are tidy and the closet has more hanging in it than sad coathangers. Include photos of the room itself as well as some of the common areas. The more, the better.

Write about each individual roomie (1-2 sentences per person) and the general atmosphere of the apartment. Are you all already friends? Did you all meet on Craigslist? Do you have Wine Wednesdays?! Can I join!!?

Ask for a Facebook/LinkedIn/Twitter link. You first gut about a person is often right—in this case, online stalking is good. Also, you don’t need their explicit permission to do a little googling.

Make any absolutes/strong preferences clear. If you can’t have pets in the apartment—say it. If you would really prefer that someone move in the 5th even though the room is technically open the 1st—say it. If you don’t, you will get lots of emails from cat lovers who need to move in by the 1st.

Create a separate email account (or use an old account) which makes it much easier to navigate your responses. It’s also incredibly helpful if you have multiple people who are looking at and replying to the responses.

  • Clean. But not too much.

Once you’ve responded to some potential roomies and they’re on their way to meet you, clean the apartment—but not too much. Make the place presentable, but not drastically cleaner or more organized than usual. Maybe they’re a slob too, the fact that your place is now spotless will make them think they won’t fit in.

  • Nothing is final until a lease is signed.

I learned this the hard way last time. Girl was super interested, we told her she had the place, she was psyched, she ended up backing out because she had crazy overbearing parents who freaked out because we (two 24 year old adults) had lots of booze on top of our fridge. True story. Unless a lease or sublease is signed, try to keep your 2nd and 3rd choices as options. I think the best thing to do is to tell the runners up that you offered the place to someone BUT he/she hasn’t responded yet and they’re next on the list!!

If this is a sublease situation, be sure you actually have something down in writing. It’s easy to alter a basic sublease agreement for your needs. Just use simple writing and make sure you read everything through. Print out a copy for every person and have everyone sign all the copies.

Now, I’m not going to guarantee that taking these steps will lead you to your one and only roommate soulmate. It’s hard to tell whether someone is a great fit until you’ve actually lived with them. But, they will certainly make the process easier and get you more offers, if you need a room, or more quality people, if you need a roomie. Good luck out there on your own Craigslist quest.

CraigslistHero1

Photo by Sara Hamling