Category Archives: DIY

Decorating on a Budget

Usually good style comes at a price: though minimalist decor is in right now, even that style is not minimal on your wallet. But what I have learned from a little experimenting is that you actually can design on a budget, if you get a little creative, and do things yourself instead of buying them. I tend to stay away from the lengthy, more complex projects, so I found some easy DIY projects that will make your simple home more exciting.

Bookshelves
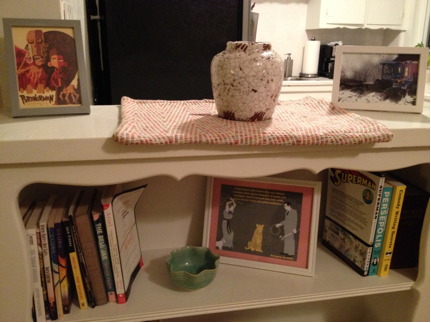
Bookshelves

Photos by Christina M. Tedesco

One way to spruce up your bookshelves is to de-clutter! Usually when things don’t look right, we instinctively add more to it; however, you can make your bookshelves look super cute by taking away all the busy stuff and only displaying a select group of things. Bookends come in handy here, whether you buy them or find something unique to hold the books in place. This way, you can spread your books throughout the bookshelf and add some things in between to please the eye (i.e. a small vase, a picture frame, a decorative bowl, etc.). This makes the whole shelf flow much better.

Instead of painting bookshelves, which takes time and money, I read an article about covering the insides with wallpaper. Now, wallpaper can also be a little expensive and difficult to work with, so an alternative is contact paper—it’s cheap, cute, and removable. Plus, if you get bored with it, you can keep switching it out with new designs!
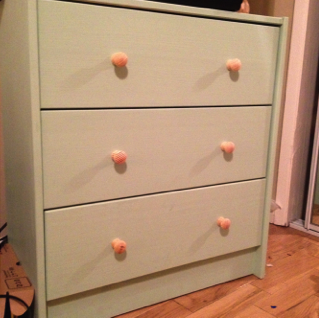
Dresser

Photos by Christina M. Tedesco

DIY Dresser

This one was exciting! I only needed a small dresser to hold some things I could not hang up. I found a solid wood dresser at IKEA for only $35. Choosing solid wood over other choices gives you the option of being a little more creative with it. I wanted to go for cute, but simple. I bought the smallest can of paint I could find for $5, assembled the dresser, and painted it. I also plan to order new knobs for it. Knobs can be pretty pricey, but it makes a difference! Urban Outfitters has super cute knobs for a good price. The total cost of my custom dresser came to $76.

Vase1

Photos by Christina M. Tedesco

Not Your Normal Vase

One thing I learned upon being a “grown up” is that flower vases can be surprisingly expensive! In this category, some thinking out of the box can go a long way. I had a cheap soap pump whose look I really loved, but the actual pump had stopped working. I threw away the pump and tied a ribbon around the top of the bottle. I arrange smaller flowers in there, and it makes a great piece to fill up an empty space.
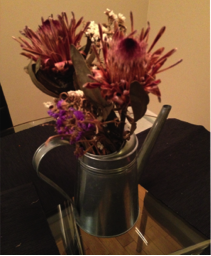
Vase2

Photos by Christina M. Tedesco

Changing out flowers in your vase based on the season is a great way to bring a theme and some color into your home. Right now is a perfect time for tulips, daffodils and any of the more vibrant flowers. I also use a tin watering can as a vase, this goes well with dried flowers or autumn flowers.

Plants

Another great way to brighten up a room is to grow or buy plants. Growing your own plants is fun and cheap, but definitely time-consuming. It takes a while for a seed to fully bloom, but it’s so exciting when you first see it start to poke through the dirt. A short cut for those lacking green thumbs, or patience, is buying your own plants: this way, you don’t have a bunch of pots with just dirt all around your house while you wait for a sprout. Though buying plants is a little more expensive than growing your own, you can look for cheaper ones at your local nursery. When buying plants or seeds, pay attention to how big they grow and the amount of sunlight needed. If you don’t have space outdoors for them, they can always liven up a windowsill.
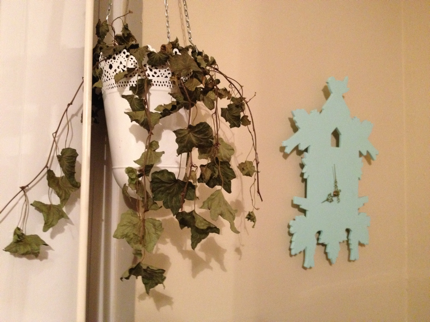
Plant

Photos by Christina M. Tedesco

A great way to add some decor to the kitchen, and save some money on spices, is to have a windowsill spice garden! Mine adds a great aesthetic to my kitchen, and it definitely makes me feel good when I can cook with something that I’ve grown! Spice plants are only a couple bucks from a nursery and are small enough to sit on your windowsill.

Dress Those Walls

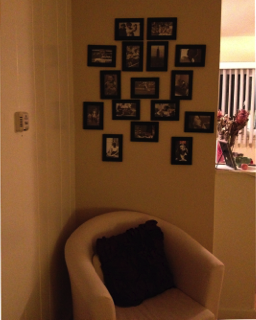
Dressing up your walls makes a big difference. But when buying pictures and frames, the money starts to add up. One thing to remember is that you can do something fun with a bunch of small pictures instead of hanging a big one.

One of my favorite things I did with my current apartment was going online (in my case, to life.time.com) and finding 16 photos I loved. I cropped them to 4×6, then found frames at IKEA for only $2.99 per two pack. This total project cost me $24 and took up a big part of my wall. I just printed the photos on a normal printer: since the photos are pretty small and framed, it’s hard to tell that they’re on computer paper rather than (more expensive) photo paper.
Walls

Photos by Christina M. Tedesco

Posters

I love different film posters, and especially minimalist posters. Now, I know my limits, and I for-sure cannot make an awesome minimalist poster. But, I did play around in Photoshop with some photos and quotes from favorite movies and books and created my own 11×14 posters. I asked a co-worker in our art department to print them out for me, so I didn’t have to pay for printing! (If you don’t know anyone with a photo printer, I would highly recommend using Costco. If you don’t have a Costco Card, ask around: I’ve had lots of friends let me use theirs. Their prices are great and the quality of the photo is really nice.) At IKEA, I bought some 11×14 frames for $8 each.

Counter Space

Counters can seem plain and empty, but it’s easy to fill them up just using normal kitchen supplies, especially when you don’t have a lot of cabinet space. I really liked the idea of canisters with chalkboard labels, but I couldn’t find any cheaper than $8 each. But, on Amazon.com, I was able to buy a whole roll of chalk-paper to then affix to a $10 canister set I found on sale. You can cut out chalk-paper labels into your own designs or buy a paper-shape cutter and make the labels yourself. I also put the metal tins of my favorite tea out on my counter. It adds some color and the tins are actually really cute!

Keep in mind that you need to arrange your appliances in a way that makes use of your space, but you can also show off all your appliances at the same time. If you’re short on cabinet space, another decor idea is stacking your coffee cups against the wall. Or you can buy ceiling hooks, screw them under your cabinets, and hang up your mugs.
Counterspace

Photos by Christina M. Tedesco

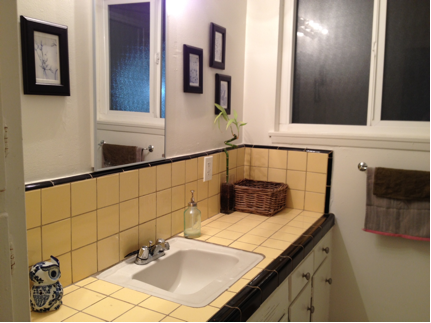
If you have counter space in your bathroom, there’s a lot you can do to keep it organized while adding flare. Plants and candle holders are one good way to add that extra something that your bathroom is lacking. Wooden baskets are useful for holding hand towels and will also make your counter look less empty. Pretty jars with lids hide away Q-tips, cotton balls, and other necessities. Finally, a nice soap pump always adds a good touch.

In my bathroom, I also have a lot of wall space, so I bought more frames and some postcards from IKEA to keep my walls from looking empty and boring.

There are plenty of simple DIY ideas out there to make a difference in your home but not in your wallet—all it takes is some experimenting and creativity! If you have some more suggestions for our readers, feel free to leave a comment: we’d love to hear your creative ideas!
DIY Household Cleaning Products and Haircare

If you had asked ten-year-old me what baking soda and vinegar were good for, I would have peered into my mother’s kitchen cabinets, scrunched my face in confusion, and hazarded these guesses: “Baking soda goes in waffles to make them fluffy. Vinegar just smells bad.” And thus, I lived most of my life in darkness, never realizing the true power of these two lackluster kitchen staples.

CleaningSquare

Photo by Heather Griffith

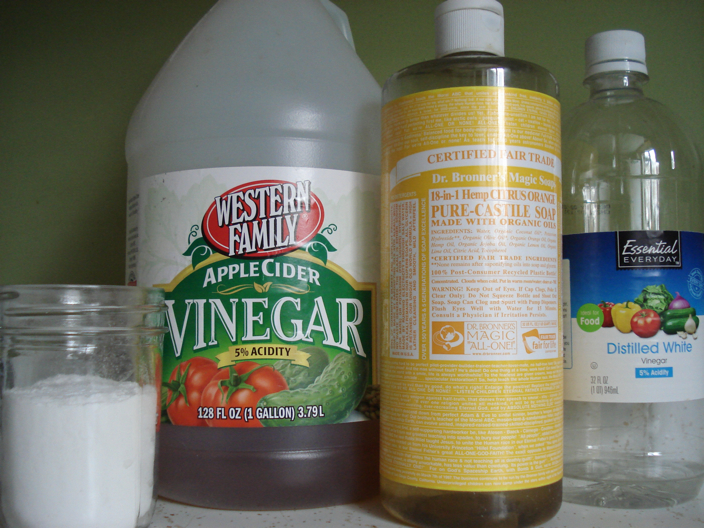
One look at the list of ingredients on any household cleaning product and your head will start to spin. (Unless you’re a chemistry nerd, in which case, you might actually understand what you’re reading.) Sometimes I wonder if it isn’t just a big hoax to get us to buy more petroleum-based products so oil companies can make money. Whether that’s true or not, you can bet your bottom dollar that you can save your bottom dollar by making your own cleaning products, and even shampoo, for a fraction of the cost of your usual products. The secret ingredients? Yup, baking soda and vinegar—they form the foundation for most of these recipes, with a few other household products playing supporting roles:

All-Purpose Cleaner

Use in place of Windex, 409, Mr. Clean, Lysol, or any other spray cleaner.

What you need:

- a spray bottle

- 2 cups water

- 2 cups white distilled vinegar

- 3 teaspoons liquid castile soap (like Dr. Bronner’s, sold at Trader Joe’s and some drug stores)

- 1 teaspoon of tea tree oil

Pour all ingredients into a spray bottle and shake well. If your spray bottle holds less than four cups of liquid, just cut the recipe in half. The castile soap and tea tree oil are optional, but they add cleaning and disinfecting properties.

Surface Scrub

Use in place of Comet, Scrubbing Bubbles, Soft Scrub, or any other abrasive cleaner.

What you need:

- a clean glass jar with a lid that seals tightly

- 2 cups baking soda

- ½ to 2/3 cup liquid castile soap

- 5 drops essential oil such as lavender, tea tree, rosemary or any scent you prefer

Mix ingredients together in the jar and store in a cool, dark place. (It should have the consistency of a goopy toothpaste.) Slap some of it on a sponge whenever you need to tackle some tough grime. The essential oil is optional, but will add antibacterial qualities.

Cheater version: add just enough water (start with ½ cup, and add ¼ cup at a time until the mixture is moist enough) to 2 cups of baking soda to form a wet paste and store in the jar. The baking soda will still work wonders, even without the soap and essential oil.

Toilet Bowl Cleaner

Use in place of Clorox, Lysol, Scrubbing Bubbles, or any other toilet cleaner.

What you need:

- 3 tablespoons to ¼ cup baking soda

- ¼ cup white distilled vinegar

Sprinkle the toilet bowl with baking soda and drizzle the vinegar on top. Let it soak for about a half an hour—go for a run, do some reading, get lost on Pinterest—and then scrub with a toilet brush.

Drain Opener

Use in place of Drano, Liquid-Plumber, or any other drain de-clogger.

What you need:

- ½ cup baking soda

- ½ cup white distilled vinegar

- 2 cups boiling water

Pour the dry baking soda down the drain, then vinegar. Cover with a small plate or jar lid and let sit for 10 minutes to a half an hour, and then pour boiling water down the drain. Don’t worry if your drain seems to “belch up” air bubbles: that’s totally normal.

Shampoo and Conditioner

Use the baking soda solution instead of shampoo and the vinegar solution instead of conditioner. It sounds weird, but trust me, it’s worth a try. Baking soda strips your hair of all of the grease and gunk, while vinegar detangles, seals your follicles, and makes your tresses shine.

What you need:

- 2 clean plastic squeeze bottles (reuse empty shampoo and conditioner bottles!)

- baking soda

- apple cider vinegar (not white distilled vinegar this time)

Into one bottle, mix 1 tablespoon baking soda for every 1 cup of water. Pour 1 tablespoon apple cider vinegar for every 1 cup of water into the second bottle. Make sure to shake each bottle before squeezing some of the solution onto your hair. Start with the baking soda solution: squirt some onto your hair, massage, and rinse. Use the same technique for the vinegar conditioner. (The intense vinegar smell goes away by the time your hair is dry, I promise. If you’re still nervous, add a drop of essential oil or vanilla essence to counteract the smell.)

Note: the ratio of baking soda to vinegar can vary between hair types. If your hair is too dry after using this ratio, try using less baking soda in your shampoo.

Recipes adapted mostly from Women’s Voices for the Earth and here and here on Grist.org. If this gets you on a DIY cleaning and personal care kick, the possibilities are endless! This primer on DIY household cleaners and this list of homemade self-care products are great places to start.

Halloween Carving Alternatives

Autumn and winter holiday traditions tend to rely heavily on very specific kinds of vegetation—we’re talking pumpkins, orange fall leaves, Christmas trees, etc. Now, this is a very joyful annual experience if you’re living in a chilly climate, but for someone like me (a New England transplant living in Southern California) it can be pretty dismal. This time of year, I make a valiant effort to rebel against the ecosystem I now call home, pulling my leather riding boots over my sweaty legs in 80 degree weather each day, living in sweet, sweet denial. I live for fall and winter holidays! But I’ll admit that trying to recreate my traditions here has become a difficult, kind of kind of tragic disaster.

Exhibit A: Last year I trekked two hours to a mountainside pumpkin farm to get the perfect giant pumpkin for a carving party. I realize I could’ve gone to Trader Joe’s, but the experience of going to a farm is what counts here. Sadly, what I found was a farm that had been completely pillaged and depleted of its healthy pumpkins. It was 90 degrees in October and there had been a drought. These things happen. It took me a solid hour to find the only decent one in the patch and it still cost me $30.

Exhibit B: Last year I spent $75 on a Christmas tree that was less than half my height. I am 5’0″. I think that speaks for itself.

So, if you live in LA, Miami, Dallas, Santa Fe—heck any tropical and/or desert biome—and don’t want to drop $30 on a pumpkin, or if  hacking them to pieces is somehow traumatizing, then this article is for you. Instead of carving a pumpkin for Halloween this year, why not try something different?

Below, for your holidaying pleasure, is a list of items that are easily accessible in grocery stores nationwide, are super fun to carve for Halloween, and even more fun to eat afterwards. (Because let’s be real: pumpkin seeds are actually pretty gross unless you toast them JUST right! But I digress.)

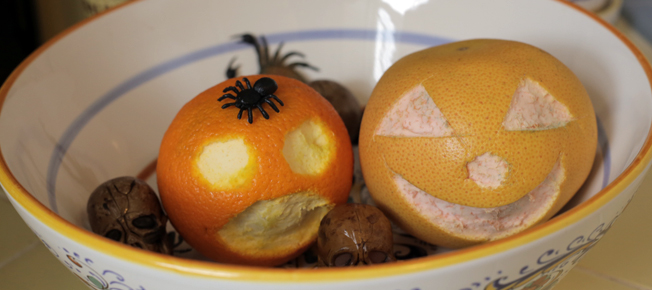
  • Apples: Hollow them out, use the innards to make an adorable tiny pie (because if you don’t love tiny pies, who are you?), and carve a face!
  • Butternut squash: Same deal. Hollow ‘em out, carve a face, and eat the insides (I recommend roasting them with some butter, agave nectar, and brown sugar).
  • Oranges and Grapefruits: Don’t carve out the insides of these because that would be a very sticky situation! Just perforate the design you want on the peel with a serrated knife, and then pull the peel off. I highly recommend chopping these bad boys up for autumnal sangria or a toasty mulled wine afterwards!

My mission this year is to adapt to my environment and create some fun new traditions. What are some warm-weather-climate Halloween/Thanksgiving/Christmas traditions that you have? Collecting advice and inspirations in the comments below!

Happy carving (of the pumpkin persuasion or otherwise)!

HalloweenHero

Photo by Elizabeth Kerin

8 Tools Everyone Should Own

In college, the only “tools” I owned were thumbtacks and painters tape. This worked for me until I bought my first piece of Ikea furniture and realized that I might need something more. They might say you can assemble everything using wood screws and elbow grease, but there’s no reason you can’t make it a little easier on yourself. Someday you might even upgrade your home projects to something more advanced, and the following items will become your best friends in all of your endeavors. Because that’s what a tool is—a friend to make every job easier and better, but without the power of speech to criticize your choice of curtain rod or doorknob.

1. Hammer

If you ever want to hang a picture frame or to fix a loose board in your house, you’ll need a hammer. There’s no question. If you’re truly desperate, you can use the sturdy heel of a shoe to bang in a nail. But do yourself a favor on bigger projects (especially ones where other people can see you, e.g. repairing your front porch) and get a hammer. Pro Tip: For removing nails with the opposite end of the hammer—go slow and wiggle the tool just a bit to avoid yanking out a chunk of your wall.

2. Phillips-head Screwdriver

Aka, the fancy one with the cross-shaped head. Since the flathead screwdriver is pretty clear which one it is by its name, I just think ‘the fancy one has the fancy name’ when I’m at the toolbox and can’t remember what I actually want. Apart from switch and outlet plates, most screws you’ll use in your home are meant for a Phillips-head. If you don’t have one and the tightness of the screw isn’t too firm, or doesn’t need to be, you may be able to put some gum or putty on the screw head to fill in the extra slots and use a flathead. Phillips screws are typically used when you might want to use a power drill, because the drill bit is less likely to slip out of the screw and damage your wall/furniture/etc. More on power drills later.

3. Flathead Screwdriver

Flathead screws can’t be ignored. They’re on your light switch plates and outlet covers all around your apartment, so you’ll definitely want to have one in your box if you ever want to paint your apartment. Or if you ever decide you want one of these. 

4. Flashlight

The last thing you want when you have a leak under your sink or when the power goes out is to be without a flashlight. Okay, when the power goes out, candles are more romantic. But laying on your back, under your sink, looking for a leak surrounded by candles inside your wooden kitchen cabinet? Not the best idea. I keep one in my bedroom and in my car.

5. Tape Measure

Yes, I know you still have a your ruler from high school math class. But guess what? Your apartment (hopefully) is more than 12 inches across. I spent years making hash marks along my wall when measuring where to hang things, and let me tell you, it’s about a million times faster to just open the tape measure. Also, they’re bendy, so you can take your body measurements–my (not) favorite use.

6. Level

Actually, maybe a level isn’t the best addition on this list, because once you don’t have to climb up and down your ladder over and over checking that your new poster is level (how to use a level), you might have to pay for a gym membership to supplement your Stairmaster workout. Apologies.

7. Ruler

I know I just said that you want a tape measure. And you do. But the main benefit of having a ruler in your arsenal is that they have flat, straight edges. When you have two frames you need to hang 10 inches apart, you can hold up your level (see above) in line with the ruler and get the hanging of your frames right the first time.

8. Power Drill

My personal favorite tool. After the first time I tried to screw a shelf into a stud in the wall and felt like my arm was going to fall off, I got a power drill. It did the same job in two seconds AND didn’t make a mess out of the wall like I did. Nothing will make your life easier than a power drill. Home Depot has a handy guide in what to look for in a drill. The standard homeowner/renter would do well with a 12 Volt drill (18 Volt if your projects are a bit more heavy duty). You don’t need to get the most expensive option, but don’t get the cheapest either. You can be a bit stingier with the drill bits you get to go with your new toy.

Runner-ups: 

Ladder/Step Stool – I include this as a runner up only because not everyone needs one for half of their home projects like I do, and it’s only sort of a tool. I’m short, so hanging curtains isn’t exactly an option without at least a small step ladder. Most people can just pull over a kitchen chair and use that, but I have to have more height. Same goes for replacing light bulbs. My roommate and I have a small ladder that fits into the corner of a closet, and it’s one of the best investments we’ve ever made in terms of maintaining sanity.

Duct tape – I’m a big believer in having the right tool for a job. But sometimes that right tool is the wherewithal to admit you don’t know what you’re doing and throw some duct tape on it. It usually works.

Photo by Meaghan Morrison