All posts by Richard Thayer

Learning to Cook: Beyond PB&J and Mac & Cheese

I have always loved to cook, but never really devoted myself to the art before. I could cook simple things that most know how to make: eggs, mac & cheese, and sandwiches. Anyone can slap a few pieces of ham between some bread and call it a day, but I decided to take it several steps forward. My recent foray into cooking culminated with a somewhat experimental dinner party.

Living on your own, you quickly find that you have to develop certain skills you used to take for granted. Cooking is an amazing skill to possess, but is easily overlooked if you have spent your life being fed by your parents. Many people only learn enough about cooking to get by day-to-day. However, the art of cooking can go much deeper, and have a much bigger impact in your daily life.  There are many reasons to learn to cook, including health and nutrition, enjoyment, and saving money. Eating out all the time can be expensive and unhealthy. In addition, learning to cook gives you a stronger connection to your meal. Preparing and eating a meal you have worked hard on gives a sense of accomplishment that would otherwise be replaced with boring empty calories from fast food. It is also a great way to impress guests with your gourmet recipes!

Probably the most daunting part of cooking is getting started. Depending on what you want to cook, you will need the right tools. Some basic necessities are a few good knives, a stove, and some pans. Ideally, you would want other accessories, such as cutting boards, spatulas, wooden spoons, and whisks, among others. If you are serious about cooking, your set of knives will be your best friend. If you buy good beginner knives, such as Wusthof brand, and properly maintain them, they can last throughout your culinary career—or just serve your personal cooking needs. However, there are cheaper models on the market for under $20 that will work for everyday cooking. You can probably find most utensils you’ll ever need at Bed, Bath & Beyond or a similar store. My dinner party only really required these basic tools and, except for the addition of a crème brulee torch, I already had everything I needed.

Here’s the fun part—selecting your menu and ingredients! The most important thing to remember is: the fresher, the better. Certain cuts of meat can be frozen; however, some, such as ground beef, should not. When at all possible, use fresh ingredients or plan accordingly when items need to be frozen. If you want to stick to simple and quick meals, try to find recipes that consist of five ingredients or less. This will make meals easier to prepare without breaking the bank and without sacrificing flavor. In fact, too many flavors can just as easily ruin a meal as not enough. My advice would be to try to plan out what you want to eat for that week and make a trip to the store once a week to get what you need. Some recipes can make enough to last several days, as well, so keep that in consideration so you don’t cook too much (especially if you’re only cooking for one).

To prevent culinary boredom, I try to vary my recipes by complexity throughout the week. On a day when I might have less time to prepare, I may limit myself to simple meals with little preparation time, but on a weekend, I may try something fancier. (These would be the days to invite others over to show off your culinary expertise.) If you are interested in hosting a dinner party like I did, portion sizes are very important. I didn’t take course selection as seriously, and in the end I had way too many dishes to serve, and not nearly enough people to serve them to. It meant I had a lot more work to do beforehand, which ended up as leftovers. Remember, simple is not necessarily a bad thing!

Another important issue to keep in mind is nutrition. While it’s almost always healthier to cook for yourself instead of eating out, that doesn’t mean every fancy recipe you discover is going to necessarily be good for you. It’s important to vary the types of food you prepare, including different colored vegetables and fruits. It’s easy to grab just the foods you feel familiar with, but learning to cook is the chance to explore and experiment with flavor. And since you’ll be prepping it all yourself, you are always free to perform taste tests as you go, just to make sure you’ll like it. I also try to challenge myself as often as possible by cooking something I have never eaten. Try exploring different cultural cuisines or perhaps a traditional meal from your own culture you have never tried. For my party, I combined British and French foods such as rainbow trout with capers, scotch eggs, leeks, a frisée salad, and a summer pudding and crème brulee for dessert.

Cooking is a skill everyone should learn. The level of complexity is entirely up to you, and you’ll be healthier and more satisfied with your meals. Definitely pick up a copy of The Joy of Cooking  by Irma S. Rombauer. This tome is a staple in the cooking world and gives you basic information about cooking, nutrition, and etiquette. In addition, it has thousands of recipes ranging from quick meals to huge dinner events. It even has a section with menus for different occasions such as holidays and birthdays. It’s debatable whether you need actual cookbooks for your recipes, especially with the internet, but I find it helps to have the book out in the kitchen instead of trying to print things out as you go. For my French and British dishes, I relied heavily on My Paris Kitchen by David Lebovitz and Gordon Ramsay’s Great British Pub Food. Always research what you’re cooking, though, cookbook or not. It’s always helpful to find other people’s results with a certain dish, and potentially learn any problems they might have run into. Know what your ingredients are, and what to expect from the cooking process. Lastly, always remember to taste, and try new things, and find what flavors and foods you enjoy.

Photo by Andy Sutterfield


Photo by Andy Sutterfield
Finding My Way into Game Design: Education After Graduation

Choosing a career path can be difficult for many students. You want to find something that will financially support you, while meeting your own personal goals, and doing something that fulfills and entertains you. My own search for a career has continued past my college education, and I found myself searching for other growth opportunities to really pinpoint what I want to do.

So where does game design fit into all of this? When I completed my Bachelor’s degree, it was in Pictorial Art with an emphasis on Studio Practice. It’s a pretty general degree for art students, where your specialty really comes down to what you choose to study. I had a fairly well-rounded education, jumping between animation, illustration, traditional art, digital art, and graphic design. My dilemma was, how do I put all of these skills to use in the real world?

My eventual decision was to further my education, so I began to research post-degree programs, such as certificates and two-year degrees. I also researched different career paths that would complement the skills I already had. I decided that any new education I pursued had to be something new that would build off of what I had already learned. The answer: game design!

I found a certificate program through Post University that would have a focus on the basics of game design, game programming, and some animation. Game design is still a relatively new subject with degree and certificate offerings, so it felt like a good opportunity to expand my skills in an emerging field of study. Probably the most important class I took was the Programming for Game Design course. It began with a basic intro to programming, focusing on C++, and led into the basics of game engines and how programming fits into graphics.

It was a fairly short program, but it gave me access to a lot of good resources that I wouldn’t have known about otherwise. The most useful were the game engines we worked with: simple engines, such as the App Game Kit and the Dark Game Development Kit. These are both fairly cheap engines provided by TheGameCreators.com. They are beneficial for someone who is new to programming or game design, and serve to ease new designers into the game development world. Beyond the scope of our actual class projects, I was advised to look into the Unreal Development Kit to learn more professional game development. The UDK 3 is free to download and use for anyone (however, licensing fees apply if you want to sell something). Recently, I acquired the Unreal 4 beta, which drastically improves many of the Unreal features; however, it requires a monthly fee, unlike the UDK.

A lot of the learning process was self-driven, such as working on my own projects beyond the scope of the class. I spent most of my time playing around with building maps in UDK. Working in the UDK, you have a choice between hand-coding minor details, or designing in a more what-you-see-is-what-you-get mode, which makes it probably the most robust engine available, and the fourth edition builds on these principles further. Here is a video exploring a partial level I have been working on:

https://www.youtube.com/watch?v=I1Iq4CAgYFs

Finding an industry that I enjoy as a consumer as well as a professional helped drive my projects as well. Good game designers make great games because they enjoy playing great games themselves. Going behind the scenes and seeing the raw elements of game design is like getting the best cheat codes available, and I think this is the type of fascination that one should strive for in any industry. If you love what you do or make, it will be that much more exciting and meaningful to make it your career.

Whether you’re interested in getting into a particular industry or just want to learn new skills, there are always opportunities for further education. If a set program is out of your budget, community colleges offer a lot of similar classes as well, or you can check out Coursera or Codecademy to learn from videos at your own pace. At the end of the day, it’s more about the knowledge and skills you gain than the degree or certificate you might receive.

Always make it a goal to never stop educating yourself!

Photo by Andy Sutterfield

Photo by Andy Sutterfield

Let’s Ask: How Do I Stain This?

Working in a hardware store, I come into contact with a lot of do-it-yourself-ers. While I admire their efforts, often they need an expert, or at least someone with a little experience, to help point them in the right direction. One of the most common problems customers bring to my attention involves staining, both interior furniture and deck stains. It’s a lot harder to fix mistakes made while staining than it is if you mess up while you’re painting, and many people jump into a large project without doing their research. Here are some of the FAQs that are often brought to me by customers:

How do I prepare?

The most important part of any home improvement project is the preparation. You need to have the proper tools and know the proper techniques, or you’re going to have a bad time. When it comes to staining, this comes down to knowing what type of surface you’re working with, and whether it is new or old. I frequently have customers tell me they aren’t sure if their piece is even made of real wood, or whether it has been stained in the past. The answer I usually give is to try a little stain on a small, hidden area, and see what happens. If it soaks into the wood, you’re probably fine to stain the whole thing. If it doesn’t, stop trying, it’s not going to work. If the stain is just pooling up on top of the piece, it either is not able to be stained, or there is another coating or stain already on the wood that needs to be removed. In terms of equipment, you should have a brush, a rag to wipe off excess stain, and something to clean your brush (soap and water for water-based stain, and mineral spirits for oil-based). Unless your stain is designed to be wiped on, you should always use a brush. Exterior stains can be applied with a brush, roller, or sprayer, but check your product for recommendations before beginning.

What does a stain do?

Another misconception a lot of customers have is that a stain, like paint, is just an exterior coating. One of the most common problems my customers have is that they’ve tried to apply a stain as if it was a paint and, in many cases, directly over existing paint, or other coatings. Stain only works on bare wood, because it needs to soak into the wood fibers. Imagine your wood as a bundle of drinking straws. The straws can soak in water, and other liquids. However, there is a limit to how much the straws can absorb, and, of course, if they are blocked by something, they won’t soak in anything at all. Stain needs to soak into wood, and when it dries the fibers of the wood grain lock the color inside. A paint or clearcoat goes on top of the wood, and will prevent other liquids from soaking in, and make the piece more durable. You typically go over interior stains with polyurethane when you are done.

How can I stain something that has been painted or sealed?

The basic answer is: you can’t. You have to remove the paint in order to properly stain the wood. This is by far the most frustrating part of staining for customers unfamiliar with the process. Many decide to try anyway, only to return in a few hours even more frustrated. Defiant to the end, I’ve seen customers go through darker and darker stains, thinking a darker color would just cover up their mistakes, rather than taking my previous advice. In the end, their piece was ruined, and as far as I can tell they never attempted to remove anything they applied to it.

What about removing an old stain?

Unless you’re changing your stain color or switching to a water-based stain from an oil-based, you usually don’t have to remove your old stain at all. Just remember, a water-based stain can’t go over an oil-based stain. Removing stain is not particularly hard, but it will take patience. For interior stains, you have the option to sand the wood, or strip it. I usually recommend stripping, because it requires the least amount of grunt work. Sanding is cheaper, but harder, and you are more likely to damage your wood from over sanding. Most strippers just need to be brushed on, and let sit for a while, and then rinsed off. For interior stains this isn’t that hard at all, but for exterior deck stains, it’s a larger and more complicated task. Exterior stain remover usually comes in a concentrated form (so you can make a large quantity of it) and should be applied to the entire surface you want to remove the stain from. Unlike some strippers, these types of removers usually require their own neutralizer product. At this point is when most customers decide to just paint their deck instead–just saying.

With this information, your next staining project should be a breeze! The real key to staining, and any other household project for that matter, is to take the time to understand the process, and what types of stumbling blocks you might encounter. Staining is never a simple project to undertake, so consider whether it’s really worth your time. It can make your furniture and deck look fantastic, but only if done properly. If you’re looking for a quick-fix, try painting instead.

Photo by Rob Adams

Photo by Rob Adams

How Humans Talk to Computers: Programming 101

Programming languages come in many different forms, but they all accomplish the same thing: they allow a programmer to communicate with their computer and make it do what they want it to do. At this point in our history, we rely on computers for just about everything we do, and yet many people have no idea how they actually operate! Learning a programming language not only lets you write your own programs, but it gives you a stronger understanding of the hardware that affects your everyday life. Programming builds your analytical abilities and, like learning a foreign language, it keeps your mind sharp. This article is a basic introduction to some of the concepts you will need to know in order to successfully learn a programming language.

Photo by Sara Slattery

Programming languages are divided into high- and low-level languages. High-level languages are written to be easily read and understood by programmers, while low-level languages consist of assembly languages and binary, which the CPU reads and understands. The most basic type of code a computer understands is binary. Binary is made up of strings of ones and zeroes which can be used in different combinations to make different characters. Binary is very easy for a computer to understand, because it only has to recognize two states (a one or a zero). Each 1 or 0 is called a bit, and a set of 8 bits makes a byte. One byte is enough data to represent a letter of the alphabet, or a number up to 255.

The position of a bit in a byte determines its value. From left to right, bits represent exponentially larger numbers. Programmers can string together multiple bytes to store larger amounts of data.

Below is an example of how the uppercase letter “A” would be represented in one byte of binary:

0 1 0 0 0 0 0 1

This expands out to represent the equation below:

00 + 11 + 02 + 03 + 04 + 05 + 06 + 17 = 65

When you type an uppercase letter “A” on your keyboard, your computer is actually saving a value of 65, which is interpreted graphically as the uppercase letter “A.”

However, it requires a lot of effort for a programmer to program directly in binary: it takes a lot of instruction to do even basic tasks! This is where assembly language and the high-level languages come in. In order to go from an assembly language to binary, the code is run through a program called an assembler, which translates the assembly language into the machine’s language (binary). The same process is true for high-level languages and assembly languages. In order to make your high-level language (one that programmers can read, like C++ or Java) program into assembly language, it goes through something called a compiler. Most programmers set up a development environment in a program such as Visual Studio which allows them to write and compile the code all in the same place. The benefit of this structure is that programmers don’t have to work in low-level languages like binary. C++ and other high-level languages are easy-to-read and use common words that a human could understand, even without an extensive background in programming.

One of the most basic programs is the “Hello World!” program, often used for absolute beginners. Below is an example of “Hello World!” in C++ and an assembly language. Notice how complex the assembly language is compared to C++. Even if you don’t know any C++, you could probably make a pretty good guess what the different lines of code do, while the assembly language is much more cryptic.

C++ Assembly – x86 Windows 32 bit

#include <iostream.h>
main(){
cout << “Hello World!”;
return 0;
}

.486p.model 
flat,STDCALLinclude  win32.inc
extrn            MessageBoxA:PROC
extrn            ExitProcess:PROC
.data
HelloWorld
db “Hello, world!”,0
msgTitle
db “Hello world program”,0

.code
Start
:
push    MB_ICONQUESTION + MB_APPLMODAL + MB_OK
push    offset msgTitle
push    offset HelloWorld
push    0

call    MessageBoxApush 0
call    ExitProcess

ends
end
Start

The main challenge in learning a new programming language is the syntax. Even though they are designed to be easy to read and understand, programming languages require the user to know the correct syntax, just like learning the grammatical rules of a foreign language. A computer will read all of the information it is given exactly as it is presented, so minor things (like forgetting to close a bracket) will show up as errors.

This will work:

#include <iostream.h>
main()
{
cout << “Hello World!”;
return 0;
}

This will get an error:

#include <iostream.h>
main()
{
cout << “Hello World!”;
return 0
}

The only difference is the lack of a semi-colon after the “return 0” line, but it is enough to stop your program from functioning.

My own experience with programming has been through game design and development. There is a much greater need for game designers to read and understand code than to necessarily be masters of programming, so I’ve taken a more everyday approach to my practice. Many of the complications I have run into are usually related to setting up a proper development environment. If you work with different libraries, it can sometimes be difficult to make sure your program files are all organized properly. In game design, it is typical to work from massive amounts of pre-written code, which you then have to make sure are all connected and communicating properly. This is known as a “game engine,” and allows game programmers to spend less time reinventing the wheel, and more time adding new features to their program.

If you keep these concepts in mind, learning to program becomes a lot easier. It takes time and effort to truly master any language, but you can start with a solid foundation by learning the basic concepts before worrying too much about complex grammar rules and syntax. Anyone who wants to learn a programming language should look at the books available in their respective field, in order to learn not just the basics but how different languages are used specifically in each field. For example, expect a software industry job to be more involved in low-level coding, while game design will typically focus on high-level coding. Probably the most popular code for beginners is C++, because it is particularly easy to read and has many attributes found in most popular programming languages. For game designers, I would recommend the second edition of Starting Out with Games and Graphics in C++ by Tony Gaddis. It begins with a well-rounded introduction to C++, followed by an introduction to a simple game engine, the App Game Development Kit.

How to Paint a Room

Whether you are painting your dream house or just touching up your bedroom walls, painting can be a very enjoyable, yet daunting, activity for those unfamiliar with the process. This is something that you’re going to have to look at every day, so it is important to do a good job! If you have never painted before, here are the basic steps to help you get started.

Materials You Might Need

This is a basic list of the materials you will need. Every job dictates slightly different tools, but this will get you in the right direction. Talk to the color specialist at your local hardware store for better information about what tools are best for your specific job.

  • Paint/Primer
  • Brushes/Rollers
  • Trays
  • Plastic/Drop Cloths
  • TSP/Cleaning Supplies
  • Spackle/Putty Knife/Sandpaper
  • Ladders
  • Mineral Spirits/Solvents
  • Sand Paper
  • Imagination! (Not Optional.)

Prepping

Before you start painting, you’re going to need to prep your work area.

First, you will want to cover or clear the room of any furniture or other things you don’t want to get paint on. You can use plastic sheeting or drop cloths in order to protect your floor from splattering paint. To make it easier to navigate and prevent trip hazards, you may want to secure the sheeting to the floor with blue masking tape, also known as painter’s tape (or any other tape that won’t leave residue).

If you have a different color trim or need to achieve a nice, crisp line at the edge of where you are painting, you will have to use tape. Often, people use regular blue masking tape because it is relatively cheap; however, if paint is left on the tape for too long, it is very likely to seep beneath the tape and leave hairy looking lines along your edge. What you should use is a tape with some type of foam chemical laced on the edge that will form a seal that prevents any paint from leaking. I recommend using FrogTape, which is the original paint block tape. Any contact with water will activate the chemical, so painting over it with water-based paint will automatically activate it. To use it with oil-based paints, you have to manually activate the product with a damp cloth before painting. Tapes like these can be left up much longer, and your paint will not bleed. If you insist on using regular masking tape, be sure to remove the tape as soon as possible.

The next step is to prepare the surface on which you will be painting. Depending on what type of paint project you are working on, there are several things you may have to do.

For older walls, perhaps already painted once before, you may need to fill in any cracks or nail holes with spackle or nail hole filler. These can be easily applied with a putty knife and are usually around five or six dollars for a small tub. A popular type of spackle for painters is lightweight spackle. If your brand new tub of spackle feels practically empty, it is probably a lightweight spackle. The benefits are that it will dry much faster than regular spackle and, in many cases, they contain primer, making small patch jobs a breeze. Lightweight spackle is not very durable though, so I would only recommend it for small holes and cracks. If you’re working in a bathroom or place with a lot of moisture, use vinyl spackle or one that will dry flexible. These types of putties are less likely to crack when exposed to moisture. Once the putty is applied and dried, just sand it down to the level of the wall with some sandpaper.

Cleaning

The next step is to thoroughly clean the surface you will be painting. At the very least, give the wall a good cleaning with warm soap water, and then rinse it off. However, many people prefer to use Trisodium Phosphate (TSP for short), an all-purpose cleaner that also helps prepare the surface to be painted.

Priming

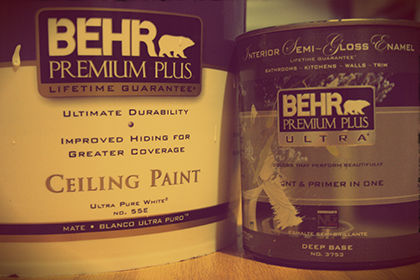
The last thing to do before painting is optional depending on several factors. Many people argue over whether you actually have to use a primer to paint your wall, but it all comes down to what is currently on your wall and what kind of paint you are using. A good rule to remember is that if it is a surface that has never been painted before, you need to prime it. Even with extra coats of paint, it just won’t stick as well without the high levels of titanium dioxide found in primer. (This is essentially what makes the primer adhere to the wall and your paint.) Today, most paints are labeled as “Paint and Primer in One,” which many people assume means they won’t have to prime. Typically, a Paint-and-Primer-in-One paint simply has added titanium dioxide, but it’s not nearly at the same levels as a true primer. What the Paint and Primer in One does is save you from re-priming the previously painted surfaces. However, if you are painting over a deep color and trying to achieve a light color, you will most likely need to prime anyway, otherwise your color will appear much darker because of the previous color underneath.

Painting

Once your work space is ready and your primer is completely dry (your can of primer will have instructions specifying how long to wait), you are ready to paint!

Now that you are all prepped, the actual painting process is actually pretty straightforward. Many people have different preferences regarding the order of things to paint, but traditionally you start with a brush on the edges of the wall and then use a roller to finish the main portion. Many paint manufacturers have different suggestions depending on what type of paint you use, as well. Be sure to read all of the information on your particular can of paint.

To begin, open your can of paint with a screwdriver or a paint can key (you can buy these at most hardware stores for a dollar, and they help preserve the integrity of your can’s lid). Use a stir stick or other stirring device to mix your paint up a bit to ensure none of the pigment has settled on the bottom. If your paint has been sitting for a while, it might even be necessary to have your can of paint shaken again. As long as the can is still in good condition and the can is more than half full, most hardware paint departments will be happy to shake your old can of paint, even if you didn’t buy it from them. Worst case scenario, you can shake the paint by hand in circular motions.

Next, pour some of your paint into a small cup or other paint carrying device. Use your angled brush and dip it about half way into the paint. Wipe off any excess paint, and then cover the edges of the wall. The benefit of the angled brush is you can get a closer, more even application of paint with less risk of getting the paint where you don’t want it. Reapply the paint on your brush occasionally, never letting it get too thin or too thick. If it is too thin, your wall will turn out splotchy. Too much, and it will not dry properly, potentially leading to many other problems later on. There are also smaller rollers designed to be used for this purpose; however, I personally find that a brush gives you a lot more control.

Now that you have finished your edges, you can move onto the main portion of the wall. Pour some paint into your tray (the deeper end). Place your roller into the tray and pull back, bringing some paint with you. You then roll the roller back and forth on the textured portion, ensuring you get a nice, even coverage of paint. If you get too much paint on your roller, it will not roll properly, and is liable to splatter paint back at you when you roll. Too little and you will have to reapply the paint to your roller more frequently. If you are right handed, start from the right end of the wall and work your way left. If you are left handed, do the opposite.

Many people assume the best application with a roller is vertical lines, but in order to get the best coverage and smoothest final product, you should actually apply the paint in a slight angled fashion resembling a narrow W or N shape, and finish with a straight line all the way to the top when your roller starts to run dry. This is so you don’t leave huge gobs of paint at the edge of the ceiling. Every time you finish one strip, your next should overlap by about half the size of the paint roller. To finish up you do a rollover, which is just rolling over the area you just painted with your roller, without applying more paint. This is only to help even out your paint and make sure you didn’t leave any areas particularly thick.

Drying

The last step is to sit back and watch paint dry. I’ll wait for you…

Okay, I guess you should clean up while you wait. It is actually very important for the integrity of your brushes that you clean them immediately after you finish using them. If you are using a water-based paint, this is as simple as using warm soapy water. If you are using an oil-based paint, you will need to use mineral spirits instead.

Last, make sure your brush is left to dry with the bristles hanging down so the water or mineral spirits drains out properly. (This is why paint brushes have holes on the end: so you can hang them up to dry!) The roller can also be cleaned with soap and water. If you have to use it again right after cleaning it, you can buy a roller spinner that will help dry it much faster. It’s important not to use a damp brush or roller, because that will potentially water down your paint.

Assess whether or not your paint job requires a second (or third) coat. If so, repeat. Happy painting and share your stories with us in the comments!

Photo by Sara Slattery

Photo by Sara Slattery

Console Wars: Here We Go Again

It’s that time again. A wave of next-generation video game consoles are lined up for gamers, with the three console giants (Microsoft, Sony, and Nintendo) offering up their latest and greatest products. With consoles becoming a dying breed, and their sales dwindling compared to social and PC gaming, what should you know about the next generation, and which console is right for you to buy when they are released this holiday season?

Nintendo Wii-U – $299

In an attempt to get a headstart on the competition, Nintendo released their next-gen console a year in advance. As such, it is already glaringly obvious from the Wii-U sales that Nintendo’s new high-definition console has fallen quite far from the innovation of its predecessor.

The Wii-U’s two main selling points are the inclusion of HD graphics (finally) and the new gamepad. While an interesting piece of hardware, the gamepad has yet to be utilized by game developers in a way that enhances gameplay beyond that of the Wii. The inclusion of HD is something that should have been a part of the Wii from the start, and now feels like Nintendo is just playing catch-up at this point.

The problem with the Wii-U is that it ultimately doesn’t amount to much more than a glorified Wii system with new hardware that is hardly used by developers. The Wii’s innovative design was quite groundbreaking at the time, and it created a gaming market for an age group that was otherwise uninterested in gaming. Now, the Wii-U is a poor attempt at marketing towards the hardcore gamer market. Nintendo used to be the top in hardcore gaming and game consoles; however, since the release of the Wii, Nintendo fans have criticized the company for neglecting the hardcore market. The Wii-U was ambitious by trying to please both casual and hardcore markets, but the result is a console that fails to please either side of the spectrum.

Who Should Buy It: Anyone interested in a lower-priced gaming console and casual gaming who doesn’t already own a Wii, or a gamer who is really committed to Mario and Zelda games.

Microsoft Xbox One – $499

The Xbox One is Microsoft’s answer to an all-in-one media hub. The Xbox 360 was best known for its Xbox Live service, as well as its Kinect motion sensor. In the Xbox One, Kinect will be integrated right out of the box and, in addition to the regular Live service, Xbox One users will have access to movies, television, music, and internet browsing, as well as the library of games.

One of the biggest criticisms of the Xbox One was their integration of the user’s console with their network, as well as their harsh DRM (Digital Rights Management) rules. Originally, the console was required to connect to the Internet at least once every 24 hours, potentially alienating gamers who prefer to play offline. Games bought in a store were also meant to be linked to a particular player’s account in order to work, making reselling or lending a game to a friend a difficult process.

Thankfully, Microsoft recently backtracked on these due to negative feedback. To me, this says two things. First, they are actually listening to their potential buyers. Second, if they back-pedaled this easily on something they were so adamant about when the console was announced, it doesn’t send a strong sense of confidence about the Xbox One in general. While it is important for companies to listen to consumers, it is the company’s job to ultimately decide what is delivered in the final product. Innovation is the responsibility of the company itself.

Maybe they should just call it the Xbox 180.

Who Should Buy It: Anyone looking for a device that integrates various media, is particularly fond of previous Xbox products, and can afford the heftier price tag.

Sony PlayStation 4 – $399

The PlayStation 4 has been the thing of rumors for years. When the PlayStation 3 was initially revealed, its presentation and subsequent lack of promised features led to parody and ridicule. The PlayStation 4 reveal, however, was simple and to the point: the PlayStation 4 is designed for hardcore gamers, who have lacked a proper dedicated console for a long time.

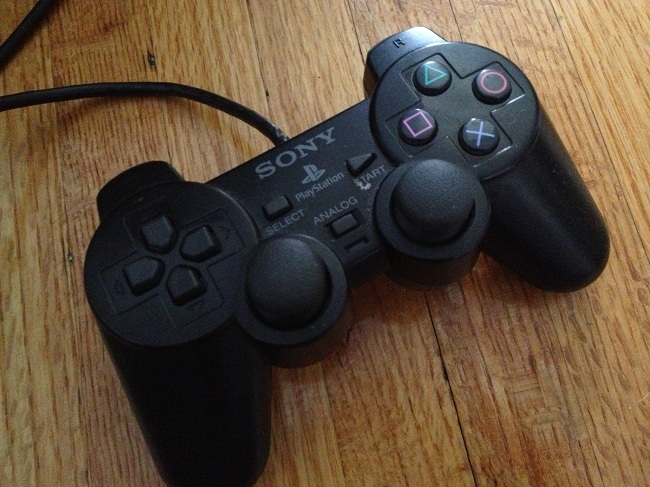
 The PlayStation 4 is pretty much a powerful gaming PC wrapped in a console. In addition to the powerful hardware, the PlayStation 4 does not stray far from the controller PlayStation fans have become accustomed to for nearly two decades. (Speaking of PlayStation history, there are plans to include previous PlayStation titles in a streaming cloud service to solve future problems of backwards compatibility.)

In comparison with the Xbox One, the PlayStation 4’s selling points are its price, the way they have handled used-game resale, and its Digital Rights Management. The PlayStation 4 will sell for one hundred dollars cheaper than the Xbox One. In addition, Sony’s policy towards used games (from the start) is that, if you buy a copy of the game, you have the right to trade it in, let a friend borrow it, or keep it forever.

Who Should Buy It: Serious gamers, and that’s pretty much it. As exciting as the PS4 sounds, it seems to be doing the opposite of what the Wii did years ago, and seems likely to alienate casual gamers.

Fifteen years ago, there wasn’t a lot of variation in the game market to guide the creation of new systems. However, today we have huge divides between many factions of gamers. Some systems will be best for casual gamers, while others will be better for the more serious gamers. Personally, I believe if you are a casual gamer, the perfect system already exists for you: the Wii. If you haven’t bought a Wii yet, that might be a good reason to buy the Wii-U. For the serious gamer, the PlayStation 4 seems more likely to challenge and entertain. The Xbox One seems to be somewhere in the middle, for your semi-casual, semi-serious gamers who sometimes just want to binge-watch Arrested Development instead of pwning noobs.

next gen consoles square

Gaming Survival Tips for Noobs

So, you’ve just bought your first online game and are eager to jump in and start grinding levels and slaying monsters! You quickly build a character and enter the game world. You look around and see hundreds of other players running around on quests and fighting monsters. But, as you grip that cheap wooden battle-axe, you suddenly realize—you have no idea what you’re doing.

As soon as you figure out some basic controls, you start spamming out HELP messages over the game interface. This is met with a wave of hate and obscenities the likes of which you have never seen before.

Before you can even respond, you are struck down by a level 88 Death Knight.

Game Over.

Gaming Square

Photo by Meggyn Watkins

“Well, that wasn’t very fun at all!” you might be thinking. What you didn’t realize was you joined a PVP (player versus player) server with Roleplaying chat on (where players only speak in-character). You were lost before you even began.

Unfortunately, for many gamers, this is how most begin their online journeys. I remember my first online games (Warcraft III and Final Fantasy XI). They’re fun up until you hit the steep learning curve, at which point you typically become a nuisance for experienced players if you can’t keep up.

The Internet, and games played over the Internet, offer everyone immediate access to just about anything and everyone they can think of. This type of accessibility can have its drawbacks, however. More connections along with almost complete anonymity mean you have the potential to run into some interesting situations.

It all started in the arcades—the original haven for gamers. Arcades were social venues which housed various video game machines that you could spend your quarters to play for short periods of time. Games required a lot of skill, and if you were good enough you were rewarded with your name on the high score list. This level of competition (combined with the fact that arcades required you to physically leave your home) made video gaming a social activity.

The first wave of consoles started a new trend: rather than go out to play in an arcade, home consoles allowed a player to play within the privacy of his or her own home, occasionally with friends. But it wasn’t until the 1990s when video games truly began to take an anti-social form.

Many of the games developed in the 90s were single-player adventure games. There were some pushes to bring back social elements to console gaming, such as party games and other multiplayer games, but this period cemented the stereotype of the anti-social gamer lurking alone in a dark room.

During this time, however, PC gaming was also becoming more popular, adding the advantage of playing games over the Internet. While consoles eventually caught up and added Internet connectivity, PC gamers have been re-connecting through cyberspace and re-inventing what social interaction means.

Many people still see this as anti-social behavior, but I like to think of it as a new frontier of interaction. Whether the Internet is the new standard means for communication or just an intermediate to whatever form of communication waits for us down the road, the impact it has had on gamers is substantial. That being said, it is important to remember a few things if you are unfamiliar with online gamers:

1. The Internet is anonymous, and the majority of people act accordingly.

If someone wants to be a jerk, there is no sense of restraint that you might find when talking face-to-face with someone. Let’s face it, there are mean people out there, but don’t get discouraged if you run into one of them. You can always walk away (or Ctrl-Alt-Del away). Most just have too much free time on their hands and are best ignored.

2. Be polite.

This pretty much speaks for itself. Avoid being the person listed above when possible. The huge benefit of the Internet—being able to connect to anyone anywhere—comes at a huge price: there is little to no moderation. This is why most online games come with their own little warning from the company waiving their responsibility for online interactions.

3. Don’t take things too personally, especially in a game.

For the above reasons, don’t take it personally if you encounter someone who is just out to ruin your day. Getting into arguments online or having negative encounters with fellow gamers has a chain reaction effect, similar to when someone is having a lousy day in real life. One negative event can make someone more likely to be negative to someone else later on. It’s much better (and relieving) to simply block them, switch servers, or exit the game.

4. Don’t be stupid.

Sorry if this sounds a little harsh, but many gamers take what they do very seriously. Like the Death Knight example from earlier, if you wander into an advanced area without bothering to learn the proper etiquette, you are likely going to get flamed for it. It would be akin to walking into a fancy dress party in your underwear. Most games offer servers for beginners—an area designed for you to test things out few times without pissing anyone off. Failing this, the almighty Google should have answers for you if you are worried about impatient pro-gamers.

5. Take Your Time

Online gaming can be a great pastime, but don’t feel rushed to absorb twenty years of game development overnight. Find a game similar to what you are familiar with, and try to find a group or forum online that caters to beginners. You will normally be met with a lot more positivity than if you take the headstrong approach. Even better, if you already have a group of gamer friends, they might be able to help you get on your feet.

With these tips, you should be able to get into online gaming easily! But before you commit to paying a monthly fee for some games, perhaps try out similar games that you can play for free. For example, World of Warcraft allows you to play for free until level 20. So you can get in right away, find a beginner’s server, and get the hang of things before you commit. Star Wars: The Old Republic is now free-to-play as well, if you prefer sci-fi to fantasy.

If shooters are more your thing, Team Fortress 2 is also free-to-play, but once you get hooked in, you can buy upgrades and fancy hats.

If you are more the creative type, I would check out Minecraft. Though not free, it is fairly cheap to purchase. The game has many player-run servers; however, dedicated Minecraft servers through Mojang are currently in the works for a future update!

Have a game recommendation or some stories or tips from your own experience? Share them in the comments.

How to Make a GIF

In 1987, a new type of image format, known as 87A, was released by CompuServe. This type of format allowed for a broad range of colors and the ability to loop. It would eventually become what we know today as an animated GIF, or Graphic Interchange Format. Today the GIF is still used in a variety of online settings, such as moving graphics for a site or part of a meme or a piece of art in itself. But what do you have to do to make a GIF?

To make a GIF, you’re going to need a few things:

1. A collection of images you wish to animate or a video

2. A copy of Adobe Photoshop

Once you have these, it’s time to get to work!

carrey

conantypes

The first thing to do is prepare your source material. Depending on the kind of GIF, your images will come from different places.

Slideshow/Looping GIFs

Some GIFs are just loops of still images without a lot of real animation. This is probably the most basic type of GIF to make. The first thing you want to do is gather all of your images in one folder, preferably in the order you want them to appear in your GIF. It is important that they are all sized as big as you want your GIF to be, otherwise you will have to do this manually in Photoshop.

Next, open Photoshop and create a new file (set the image size to whatever the size of your GIF will be).

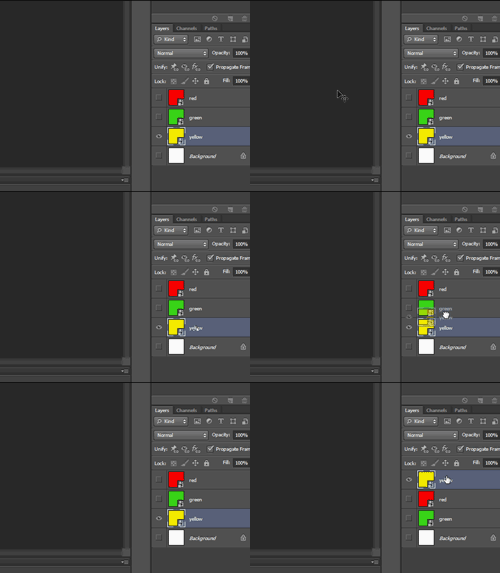
Place your images into new Layers by using File > Place. You will see your images appear as individual layers on the right. Make sure they are in the correct order if they aren’t already. The bottom layer will be first in the animation, but you can adjust it however you wish.

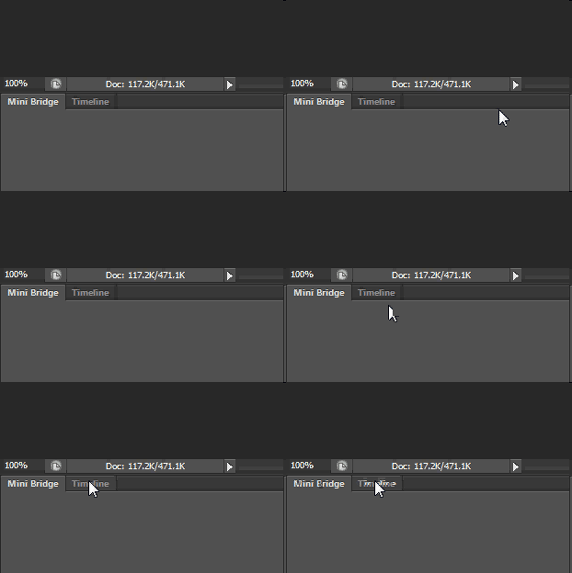
A

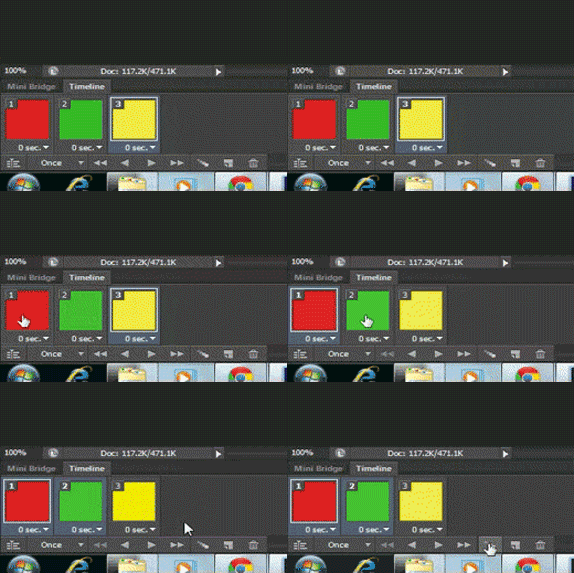
If you are using CS6, click on a tab at the bottom called Timeline. If you are on an older version of Photoshop, you must go to Window > Animation to see this.

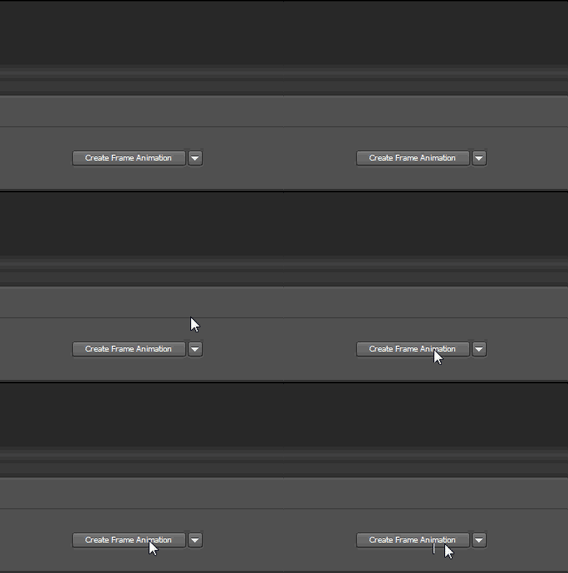
B

Select Make Frame Animation in order to get to the right mode. It should create a frame of your topmost image.

C

Next, pull the Animation drop-down menu and select Make Frames from Layers. This will make a new frame from each layer. This includes the background layer, so delete this if you don’t want in your animation.

“But my animation looks all choppy!” You might be saying.

carreychews

Refining Your GIF

At this point, you have several options. You can save it at this point, but you may need to refine the timing. The main tools you will use at this point are the delay and tweening. For this example, you should only need to set the delay. It is normally defaulted to a 0 second delay, and set to repeat only once. Change this to repeat forever if you want it to loop. Beneath each frame, you will see a triangle. By clicking this, you can set how long each frame should last. If you select all of your frames, you can adjust them all at once as well.

Tweening is used in GIFs to smooth the transition between two or more frames. It creates a more fluid transition between your images if they are not already optimized for animation.

D

To tween an image, select two frames that are side by side and click the Tween button by holding Shift. The menu that pops up will ask how many frames to create between your frames.

Using too many can make your images appear ghostly, but not enough might not do anything at all.

NoTweening

No Tweening

Tweening

Some Tweening

TweeningBad

Too Little Tweening

TweeningTooMuchToo Much Tweening

You will notice subtle differences between the above images, and depending on what effect you are trying to achieve, there are different solutions possible. Remember, if you tween your frames, you will probably have to adjust your delays as well.

Video Clip GIFs

But the real reason you’re here is to learn how to make all those funny meme GIFs from various films and TV shows!

wonka

Another method of making a GIF is to convert a video file to frames. This is probably one of the most common types of GIFs, and is very popular in meme culture. It is also very easy to make once you have access to the video you want.

cumberbatch

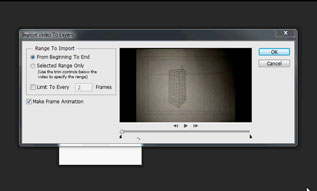
The only difference in the process is how you obtain the images. Instead of placing images, you must import a video clip into Photoshop. (It is important not to use a very long video, or it will take a long time to load: under 10 seconds is usually a safe bet).

[File > Import > Video Frames to Layers... GIF]

A pop-up menu will allow you to trim the specific portion of your clip you want to use. This will automatically convert your clip to frames, and then you can edit the delay and tweening if you wish.

IMAGE_E

Saving Your GIF

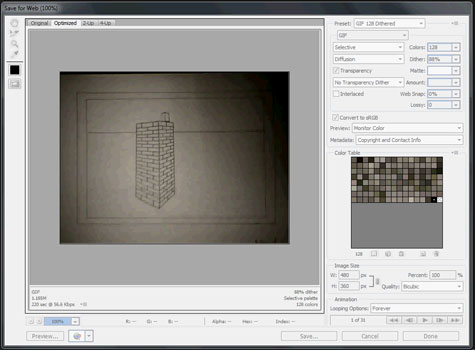
Lastly, you will have to save your file to the proper format. Instead of using the normal Save feature, use Save for Web or Save for Web and Devices.

[File > Save for Web... GIF]

This menu gives you options to select the proper format, plus different sizing and optimization functions. This tool is designed to allow you to keep your full Photoshop project saved at the highest quality so you can then save multiple versions of your work in various formats. To make sure your GIF remains animated, select GIF from the formats and click Save below. The file size will be much larger than a normal JPEG.

IMAGE_F

That is all you have to do to create your GIF! Note that the speed of your GIF may be different than what you viewed in Photoshop, so you may have to play around with different settings to get precisely what you want.

videogif

Another interesting feature (new to CS6) is the ability to make transparent GIFs. These function in the same manner and are created the same way, however, they utilize the transparent background that can be used in other Photoshop projects. By using these in your GIF, you can make an animation that can be layered onto a website and you can still see the background through it.

transparent

Animated GIFs are seen by some as an emerging art form in itself. With this knowledge, you can easily play around with them and see for yourself, or just give a cat some laser beams!

laserhipstercat

And that is all there is to it!

rickman