All posts by Michelle White

Curating Your Art Collection Without Busting Your Budget

Decorating on a budget is not easy.  Sure, you might do some great DIY projects, maybe find some decent furniture on Craigslist, but if you really want to make your place look great without spending a whole paycheck (or five), it takes a lot of work.  Fortunately, even if you have to live with a dingy 5-year old sofa that may have at one point belonged to the mother in What’s Eating Gilbert Grape (too soon?), here are four simple and affordable ways to invest in your own personal style.

1. Use your own photos.  Why spend money on art when you have plenty of your own photographs just waiting to be framed on your wall?   I remind you that photographs were invented before the Facebook photo album, and a special photo will be a great conversation starter with your guests.  If you worry your pictures aren’t ‘artsy’ enough, get them printed in black and white!  Sugarfish is a great affordable service to get photos printed, and you can even order prints of your Instagram masterpieces on Shutterfly.

2. Maps, postcards, old records, anything flat you can put in a frame.  If you’re like me, you’re always finding a cool postcard you bought on vacation but never sent, or the ticket to that epic Dashboard Confessional show you went to in high school.  Rather than sticking it back in a drawer to be rediscovered in another five years, throw it up on the wall to break up all of your fabulous photographs.  Old maps are a particular favorite—both affordable and pretty!  Never been anywhere?  Fake it with the $3.95 map wrapping paper  from Paper-Source!

3. Affordable art prints and photos are easy to come by if you’re looking in the right places.  I like to shop around, but most of the sites below feature several different mediums (prints, photos, text graphics, even actual paintings) so if you don’t have the time or patience for scrolling through 40 pages of options, you would do well at just one of these.  The more affordable pieces from these sites do in fact still cost some money (many items in the $15-40 range, depending on the size), so I try to only purchase things I really love and would want to look at every day on my wall.  Minimalist and fan-made movie posters are a personal favorite that look nice and reflect my true passions.

  • 20×200 (www.youshouldbuyart.com):  Run by a gallery owner in New York, they have a great stockpile of photos and prints by up-and-coming artists.
  • Society 6:  Not only do they deal in art, but if you find a design you like, you can get it printed on t-shirts, mugs, pillowcases, phone cases, and more.
  • The Working Proof:  Art for a cause—15% of each sale goes to the charity of the artist’s choice.
  • Etsy:  A perennial favorite for all things, art included.  Perhaps pay tribute to the cinematic classic I mentioned earlier with this!


4. Don’t be afraid to create an original painting yourself!  I know the canvas–and-paint section at the art store can be intimidating, but delve in, and make your own masterpiece to hang on your wall. It’s easier to splurge on something when it’s half off, so double-check for coupons before you go in to your favorite craft store. Even if you don’t see yourself as “creative,” geometric patterns in a good color scheme look just as nice as a detailed landscape—and you still get kudos for having an actual painting on your wall!  Too shy to go it alone?  Try out Painting with a Twist (or any of the similar BYOB painting classes across the country) with a couple friends and a bottle of wine, and come home with a beautiful painting as well as some new memories (aww).

In all, I think the key to curating an art collection while not over-spending is to make every piece you own individual to you.  Whether it’s meaningful because you made it yourself or just because you love it, I guarantee that a piece of art with personal meaning that also looks great will justify any cost.  Now please, just promise me you won’t hang all of your beautiful acquisitions and discoveries with painter’s tape and thumbtacks. *

*Before you even try, I direct you to Michael’s (they almost always have a coupon for 50% off on their website) or Aaron Brothers (they have a buy one, get the second for 1 cent sale on frames and canvas in January and July every year).
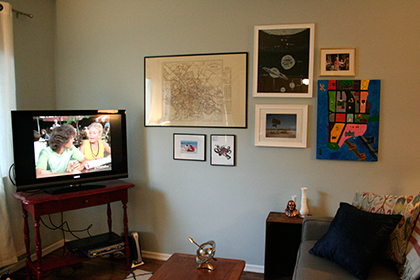
Photo by Michelle White

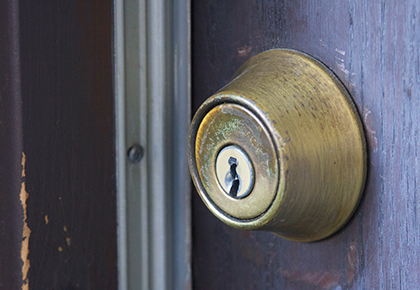
Photo by Michelle White

8 Tools Everyone Should Own

In college, the only “tools” I owned were thumbtacks and painters tape. This worked for me until I bought my first piece of Ikea furniture and realized that I might need something more. They might say you can assemble everything using wood screws and elbow grease, but there’s no reason you can’t make it a little easier on yourself. Someday you might even upgrade your home projects to something more advanced, and the following items will become your best friends in all of your endeavors. Because that’s what a tool is—a friend to make every job easier and better, but without the power of speech to criticize your choice of curtain rod or doorknob.

1. Hammer

If you ever want to hang a picture frame or to fix a loose board in your house, you’ll need a hammer. There’s no question. If you’re truly desperate, you can use the sturdy heel of a shoe to bang in a nail. But do yourself a favor on bigger projects (especially ones where other people can see you, e.g. repairing your front porch) and get a hammer. Pro Tip: For removing nails with the opposite end of the hammer—go slow and wiggle the tool just a bit to avoid yanking out a chunk of your wall.

2. Phillips-head Screwdriver

Aka, the fancy one with the cross-shaped head. Since the flathead screwdriver is pretty clear which one it is by its name, I just think ‘the fancy one has the fancy name’ when I’m at the toolbox and can’t remember what I actually want. Apart from switch and outlet plates, most screws you’ll use in your home are meant for a Phillips-head. If you don’t have one and the tightness of the screw isn’t too firm, or doesn’t need to be, you may be able to put some gum or putty on the screw head to fill in the extra slots and use a flathead. Phillips screws are typically used when you might want to use a power drill, because the drill bit is less likely to slip out of the screw and damage your wall/furniture/etc. More on power drills later.

3. Flathead Screwdriver

Flathead screws can’t be ignored. They’re on your light switch plates and outlet covers all around your apartment, so you’ll definitely want to have one in your box if you ever want to paint your apartment. Or if you ever decide you want one of these. 

4. Flashlight

The last thing you want when you have a leak under your sink or when the power goes out is to be without a flashlight. Okay, when the power goes out, candles are more romantic. But laying on your back, under your sink, looking for a leak surrounded by candles inside your wooden kitchen cabinet? Not the best idea. I keep one in my bedroom and in my car.

5. Tape Measure

Yes, I know you still have a your ruler from high school math class. But guess what? Your apartment (hopefully) is more than 12 inches across. I spent years making hash marks along my wall when measuring where to hang things, and let me tell you, it’s about a million times faster to just open the tape measure. Also, they’re bendy, so you can take your body measurements–my (not) favorite use.

6. Level

Actually, maybe a level isn’t the best addition on this list, because once you don’t have to climb up and down your ladder over and over checking that your new poster is level (how to use a level), you might have to pay for a gym membership to supplement your Stairmaster workout. Apologies.

7. Ruler

I know I just said that you want a tape measure. And you do. But the main benefit of having a ruler in your arsenal is that they have flat, straight edges. When you have two frames you need to hang 10 inches apart, you can hold up your level (see above) in line with the ruler and get the hanging of your frames right the first time.

8. Power Drill

My personal favorite tool. After the first time I tried to screw a shelf into a stud in the wall and felt like my arm was going to fall off, I got a power drill. It did the same job in two seconds AND didn’t make a mess out of the wall like I did. Nothing will make your life easier than a power drill. Home Depot has a handy guide in what to look for in a drill. The standard homeowner/renter would do well with a 12 Volt drill (18 Volt if your projects are a bit more heavy duty). You don’t need to get the most expensive option, but don’t get the cheapest either. You can be a bit stingier with the drill bits you get to go with your new toy.

Runner-ups: 

Ladder/Step Stool – I include this as a runner up only because not everyone needs one for half of their home projects like I do, and it’s only sort of a tool. I’m short, so hanging curtains isn’t exactly an option without at least a small step ladder. Most people can just pull over a kitchen chair and use that, but I have to have more height. Same goes for replacing light bulbs. My roommate and I have a small ladder that fits into the corner of a closet, and it’s one of the best investments we’ve ever made in terms of maintaining sanity.

Duct tape – I’m a big believer in having the right tool for a job. But sometimes that right tool is the wherewithal to admit you don’t know what you’re doing and throw some duct tape on it. It usually works.

Photo by Meaghan Morrison

FML: I’m Locked Out

Locking yourself out of your home can be stressful: a fact I know very well now after locking myself out of my apartment three times. There is no worse feeling than your stomach dropping when you realize you’re standing outside your own door with no way in.

The very first thing you need to do is make a copy of your key. Stop what you’re doing right now, go to Home Depot (or your local hardware store—heck even Wal-Mart copies keys), and get it over with. Go now! They’re open late, and it costs less than five dollars. It took me three lock-outs before I bucked up and got a spare key—don’t let that happen to you.

You have a couple options for what to do with your spare. You can hide the key somewhere nearby, but be smart about it. Don’t just put it under the mat—we all know about that one for a reason! Try to find a reliable friend to hold onto it (preferably a friend in relative walking distance in the event you get locked out without your phone).

Planning for a lockout is easy, but there’s nothing you can do if you’re without a spare key and already locked out. If you have a roommate, you could just wait it out if time isn’t an issue. But if you live by yourself, your roommate is out of town, or you’ve locked the baby you’re babysitting inside, you’ll need to reach out for help. If your building manager lives on site or is easy to reach, there is a very good chance they have a spare set of keys and can let you back in. If you haven’t already, program your manager’s phone number into your phone—this is also just a good thing to have. Unfortunately, my building manager was very helpful but didn’t actually have keys to any of the apartments in my building.

Before you call the dreaded locksmith, you’ll probably consider breaking into the apartment yourself—but wait! Unless you live in the middle of nowhere (where you can’t even walk to a gas station and/or borrow a phone) or it is a life-or-death emergency, DO NOT break in to your house or apartment. Trust me: no matter how much you want to just smash your way in, you’ll regret it. Plus, windows are expensive to replace (especially compared to the expense of the locksmith), one of your neighbors might call the police thinking you are up to something nefarious, and, if you live in a rental, you could be in serious trouble with your landlord.

Okay, so you actually need to call the locksmith. Finding a locksmith is one Google search away: that’s the easy part. If you don’t have a smart phone, call 411 to get the number for a locksmith. If you lock yourself out without your phone, you can either knock on neighbors’ doors (if you feel comfortable with that) or walk to the closest gas station or deli and borrow a phone.

When you call, ALWAYS get a quote over the phone first. The quote depends on location, time of day/week, and what they ultimately have to do to get the lock open. And, as expected with anyone with skills in demand, the locksmith will try to overcharge you if you don’t know what you should pay in advance. There’s a minimum price (a “service fee”) for having the locksmith drive out to you, even if you end up not using their services—usually this is about $50. It will be more if you’re locked out at night or on the weekend, so be prepared for that as well.

ALWAYS ask specifically what the price is for a Schlage doorknob lock (one of the most popular brands of quality doorknobs) or something similar. If you just ask for a nonspecific price, they’ll tell you what it will cost for a ‘minimum’ lock—think a crappy bathroom doorknob. The front door of your apartment is going to be a higher quality lock, not a ‘minimum’ lock, and will, therefore, cost more. The difference could be as much as $50-$100 dollars more! Don’t let yourself get caught off-guard. A typical lockout will cost about $90-$120, depending on where you are.

Don’t be afraid to ask if there is a possible discount if you pay in cash. The answer will almost certainly be yes, and the locksmith might even wait for you to get cash out from a nearby ATM if you ask nicely. If the phone operator tells you there won’t be a discount, ask the locksmith when he or she gets there. Locksmiths may be a bit more willing to work with you than the operator. If you have to pay with a card, unfortunately, this isn’t too helpful.

When the locksmith arrives, he or she will assess the lock before starting work and give you a quote for the work required. Again, this quote may differ from the quote you got over the phone, which is why it’s so important to be armed with the best information possible. DO NOT pay more than $200 to get your door opened, unless there’s a baby or a starving pet inside. Catching the new episode of Grey’s because you forgot to set it to record does not justify paying that much money. (Even for the season finale.) If you’re paying cash, in my experience, you shouldn’t pay more than $120 (and even that is pushing it). The key is to not be afraid of negotiation. The worst thing that can happen is that you get the price as low as they’ll go, even if it’s still out of your comfort zone. Being a bit of a bitch is your friend: embrace it! There’s no set price for what locksmiths do, so there is ALWAYS wiggle room. At the very minimum, tell them you’ll tip in cash even if you have to pay the rest with a card. Remember, they’re looking out for themselves too.

So, you’ve settled on price, and the locksmith goes to work. Every time I’ve called someone out to my apartment, they’ve tried to pick the lock unsuccessfully before telling me they have to drill the lock. While this is absolutely a trick of the locksmith trade, there’s a step in between the two that involves a hammer and a normal key, one of which the locksmith will definitely have with him. He puts the key in the lock and hits it with the hammer until the door opens. Yes this is technically breaking the lock, but once you’re inside, he can reset it with your newly repossessed key. Again, there is no harm in asking (even if you think you’re being more overbearing than necessary). If it works, there’s no lock replacement necessary (which is what would have happened if they had drilled).

Congratulations! You’re finally back inside! And it was only slightly painful, I hope. The fact of the matter is getting locked out can be embarrassing and expensive, but it doesn’t have to be stressful if you’re prepared. There’s always a way to get back in, even if it means paying the “idiot fee” to a locksmith because you don’t have a spare key stashed away yet. Which brings us back to where I started: GO TO HOME DEPOT AND GET A SPARE KEY. Even if you never use it, $5 is a lot cheaper than $150! And tell all your friends to do the same, before you have to deal with their lockouts too.

Photo by Meaghan Morrison

Photo by Meaghan Morrison