All posts by Emily Knight

Learning How to Actively Take Care of my Body Without Hating It

As a lady who lives on Earth, I have some body issues. Luckily, these didn’t really start for me until I was 17 (which is apparently, and distressingly, a pretty late age to begin worrying about this stuff, considering that some start as young as 9 years old.)

The Old

So, what happened at age 17? The birth control pill. Over the course of the first two to three months I was on it, I gained 20 pounds. I was definitely never skinny to begin with, but this was the first time I thought of myself as actually “fat.” Before the year was out, I was on Weight Watchers and I stuck to it pretty diligently. I lost that 20 pounds after following the program for a few months but even though the scale said 145, I still looked in the mirror and felt 165. And, yet, despite insisting that the fat-free ice cream (which, as someone who has since made her own ice cream—how is that created??) tastes just as good as the regular,  religiously checking the calorie count on all the breads at the supermarket and weighing that against the size and density of the slices, going to bed hungry and looking forward exclusively to eating in the morning, I was done.

Policing one’s weight is hard work. I didn’t want to do it anymore. But I had been raised to be a hard worker, to not quit just because I haven’t succeeded, and to excel at all the things I do. So a few months later, I tried again, with some other plan. And then another. And another. They really all blurred together over the next six years or so. But in trying and failing to lose weight, I gained it. And kept gaining. Sometimes, just deciding to count calories again would be enough and I wouldn’t even lose anything, just start to slowly gain. I would constantly berate myself with the pinpoint-accurate, harsh criticism that only I can inflict on myself. Too bad fat shaming doesn’t actually motivate weight loss and actually predicts weight gain instead, ‘cause that’s what happened.

It took a long time to realize that my sizeism was hurting me. (How interesting—there is a red squiggly line under this word. “Did you mean ‘sexism’?” Microsoft Word asks. No. Then again…) It took even longer to realize that the reason I had trouble (strike that, have trouble) letting go of my sizeism is because that would mean that I would have to reject that idea that if I were just less lazy and weak-willed, I could be better. To accept the idea that I’d been going about it all wrong for five freaking years. But I had been.

Dieting does not work. Not even if you don’t call it a diet. Not even if you are just “trying to eat healthier” or “just eating whole foods” or “counting calories.” It is actually, as that last link explains and my body can tell you firsthand, a predictor of future weight gain. Because, of course, those things do work! For a while. And then they don’t anymore and you end up with more health problems than you would have if you had just stayed kinda fat, which is, in fact, not a health problem.

As you can probably tell, this is something I have spent a lot of time and feelings on. About a year ago, I was seriously freaking out. I weighed more than I ever had, I was feeling like crap about myself, and whenever I even thought about dieting, my body started freaking out from deprivation anxiety and I couldn’t last a week. The definition of insanity is when a person tries the same thing again and again and blahblahblah… I’m still fat. That’s when I went crazy with the online research. That’s when I finally admitted I had a huge body image problem and a terrible relationship with food. That’s when I went to see a body image counselor.

The New

Here is what I do now: I practice intuitive eating. I do not restrict what I can eat—I’ll eat whatever I damn well please, since restricting it is what screwed me up in the first place. But I do pay attention to my fullness. I do consider how my body will feel—not look, feel—after eating whatever I’m considering. And I do work to take care of my stress, unhappiness, loneliness, and whatever-other-feelings with methods that are not soothing them with tasty food. My love of cooking has been both a help and a hindrance to this. I cook what I want, just like I eat what I want, but I still try to consult with my digestive tract to figure out what is going to make me the happiest. I try—and this is always a battle—to truly and honestly consider my health, vitamins, nutrients, and essential food groups, etc. over my weight when making dinner. This is the hardest thing I still struggle with.

As for exercise, I similarly exercise where and when and how I want. I try to refuse exercise that I feel like I “should” do and only do what I want to do. Instead of daily runs and elliptical work, I get to do an activity that I actually really enjoy doing, instead of just appreciating it as a way to burn calories. I regularly practice yoga, bike to work, dance in tap classes, and play Quidditch. Doing exercise because I like it while I’m doing it instead of just feeling self-congratulatory afterwards gives me the opportunity to do it without the guilt and self-pressure to exercise as a means of eating more. I can’t tell you how many times I’ve gone for a run (a thing I despise) instead of riding my bike because it was a faster calorie burn and I was having people over for dinner later. This is a recipe for a terrible relationship with both exercise and food.

Finally, a part of what I do that you won’t find in any size policing plan: managing my psyche. Real talk: I’d love to lose some of the weight I’ve gained from my past dieting experiences. It would be awesome. But to avoid dieting again—a constant temptation despite my past experiences—I work hard to make sure I feel happy and beautiful how I am. As a big Pinterest fan, I noticed I felt lousy every time I went on—because all the fashion boards I follow have only skinny white women. I immediately found five “fat fashion” boards to follow. Seeing these beautiful women of all shapes and sizes and colors makes me feel like I can be beautiful too. We see obese people in the world a lot, nearly always portrayed as lazy, stupid, face-stuffers. It is no wonder that nearly everyone is sizeist, even fat and obese people! Seeing them as beautiful and sexy everyday does wonders.

Clothes shopping is another battle against feeling good, but I do it because I like fashion and want to get dressed every morning feeling like I look stylish and fun. For a long time, I kept thinspiration clothes in my closet, hoping, knowing that I would fit into them someday. What a great way to feel like shit every morning! I have since gotten rid of them and replaced them with things that look good on me now.

Keeping up with fat acceptance and fat positivity bloggers has been awesome. This is more deprogramming of my sizeism and it makes me a better human to both others and myself. Isabel Foxen Duke is sassy and funny and sends weekly e-mails reminding me to continue the awesomeness. Others: Dances with Fat, Nude Muse, and Fat Nutritionist.

The Future

To even suggest, let alone say outright, that I am all fantastic and super happy all the time in my fat body and always make the best choices would be ridiculous. I’m still learning. But I do:

  • Refuse to bully myself or let others bully me around food and exercise choices
  • Actively work to love myself and how I look
  • Allow myself to thoughtfully eat whatever the hell I want to and exercise however and whenever the hell I want to
  • Seek out others who will support my positivity

Let me tell you: these things make a huge difference. It’s a lot of work to love yourself, especially if that self is not deemed “loveable” by society. But it is most definitely worth the effort.

Photo by Michelle White
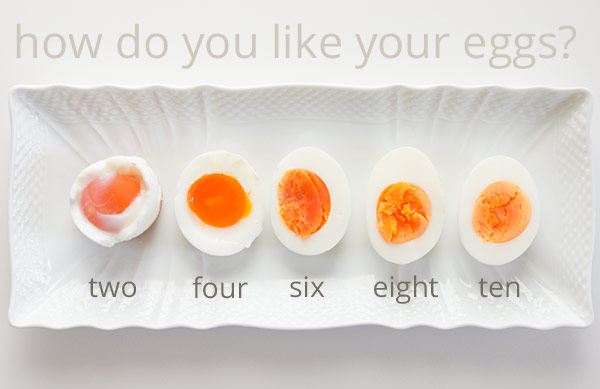
Photo by Michelle White

Saucepan Recipes That Are Easier Than You Think

Cooking, for whatever reason, can be intimidating. Maybe it is the fire and knives? Maybe it is the possibility of poisoning yourself or your loved ones? Or maybe it’s just because being a chef seems like a glamorous career for geniuses. The thing is, though, it’s not as hard as it seems. Like any other skill, it just takes some learned skills, practice, and the willingness to make a few mistakes.

I consider myself a chef, though I am not “in the industry,” which was my response when a waiter at an upscale brunch place asked me where I worked after seeing my culinary-inspired tattoo. And, you know what? That’s okay! People are quick with an apologetic, “Oh, I’m a terrible cook!” when it’s time for the staff meeting potluck. Instead, I challenge you to appreciate the effort you put in to feeding yourself! Let me start you off with three intimidating foods that are easier than they sound, and all of which can be cooked in a saucepan. Which is a pot, by the way. A small pot, that in restaurants might be used for sauces, but in many 20somethings’ kitchens is mostly used for 1-2 servings of Annie’s mac and cheese.

1. Boiled Egg

Why Make It?

Have you ever sliced a hard-boiled egg with fresh ground pepper for a mid-morning snack? Piped some tasty egg yolk and mayo mixture into delicious deviled eggs? Slurped a warm soft-boiled beauty with your miso-filled ramen bowl? They are well worth the effort.  Though this first dish might be like skating through easy-town for some readers, I do give some tips and tricks (one I just learned last week!) to make things easier, so check it out.

The Technique

You will need a saucepan, a medium sized bowl, and eggs for this.

Place the eggs in your saucepan and fill it with enough water to cover the eggs about an inch. Don’t go running for a ruler; I usually just approximate with the first joint of my index finger.

Cover the saucepan and bring it to a boil. It is important to boil the water with the eggs already inside because 1) the cook time accounts for the cooking they’ll do as the water boils and 2) if you drop them into already boiling water, they will crack and not be beautiful and perfect.

When the water is boiling, turn off the heat and move the saucepan to a cool burner, leaving the lid on to keep the heat in. Set the timer for your desired egg done-ness using the following useful chart from No Recipes (this site has an extensive egg boiling article—definitely worth a read!):

Saucepan Recipes That Are Easier Than You Think

Photo via No Recipes

2 minutes – The white isn’t fully set, and the yolk is totally raw

4 minutes – The white is fully set, but the yolk is thick and runny

6 minutes – The white is fully set, and the yolk is mostly set but still a little runny in the middle

8 minutes – The white is fully set, and the yolk is set but tender

10 minutes – The white is fully set, and the yolk is fully set

As you wait, prepare your ice bath: fill the medium-sized bowl with cold water and ice cubes. I usually leave it in the sink so I can do a quick dump. I hold the lid partially on to keep the eggs in the saucepan while I dump out the water, then I move the lid out of the way to dump the eggs right into their ice bath. This is because I am lazy about dish-washing; a colander would suit just fine.

After a minute or two in the ice bath, they will be cool enough to touch. I pick them up, bang them on all sides with the back of a spoon to make cracks all over the shell, and put them back in the water. If I want one right away, I might pull it out and peel it then and there, but ideally they should sit for a bit so the water can get under the shell and loosen it to make peeling easier. And you’re done!

Tips and Tricks

By far the biggest issue for egg boiling is the peeling. If you’ve ever found yourself attempting to peel and egg and instead removing chunks of tasty white (that’s food in there!), you know what I mean. This is especially annoying if you want to serve these to people and want them to look smooth and flawless.

My mom always told me to just use older eggs (as in, near their expiration date). This does work for science reasons that I don’t understand just yet. But if you can’t wait that long (and who can?), there is another trick. Before cooking your egg, take something with a small but rounded edge (I used the butt of my rolling pin handle). Take your raw egg in one hand and hold the rolling pin steady with the other. Whisper a short prayer to your deity of choice, and then tap the wide butt end of the raw egg gently against the tip of the rolling pin handle. You want to hear a tiny crack that breaks a bit of the shell but not the membrane of the egg. I was sure this would end in a mess and tears, but it totally worked and made peeling at the end a lot easier.

2. Jam

Why Make It?

When most people picture jam-making, they picture a kitchen full of Laura Ingalls Wilders, out in the middle of nowhere, all wearing kerchiefs over their hair and wiping sweat from their brows with their forearms as they use both hands to stir an enormous, thick vat of goo that will last the winter. But that is not at all an accurate depiction of the time and effort involved! Jam is actually fairly quick and easy to make, especially if you are only making a couple jars and do not plan on proofing (sealing the lids so they can sit out at room temperature for ages). And with the delightful ability to mix flavors to your own personal preference and look like a gourmet BAMF, there is no reason not to.

The Technique

First, supplies: To make jam, you’ll need some sterile* mason or Ball jars (with the flat lids and twist rings), fruit, sugar, lemon juice, and pectin (available at most larger grocery stores, in the baking aisle, by the Jello). Choose the No Sugar Needed Pectin—it works the best even if you do use sugar (which you will, I imagine).

You’ll also want a pot and probably a funnel, to ease more jam into the jar.

* To sterilize them, boil the jars, lids, and rings in a big pot before you put the finished jam inside. This kills all bacteria. Washing the in dishwasher will do the trick too.

Now, recipes: Different jam recipes have different ratios, so I’ll start with a specific favorite of mine: strawberry lavender. For lots of recipes, proofing times, and just generally great advice, check out PickYourOwn.org, a website with terrible design but a lot of knowledge. It walked me through my first canning experience.

Strawberry Lavender Jam

Buy/pick some strawberries! You’ll need about twice as many cups of whole strawberries as you want cups of complete jam. So if you want 6 cups of jam, you’ll need 12 cups of whole berries.

Wash them, hull them (cut the leaves and white part out with a small knife), and cut them into pieces. The smaller you cut them, the faster they will break down in the jam.

Prepare your sugar by blending 4 cups of sugar in a food processor with 4 tablespoons of edible lavender buds (available at specialty spice stores). I do this one cup at a time ‘cause my food processor is small. You could also probably get away with chopping up the lavender very finely as well.

In your saucepan, mix ¼ cup of your lavender sugar with 1 ½ packages of pectin (SureJell or another brand, doesn’t matter). Feel free to play with this amount as you cook. As you make more jam, you’ll find the perfect ratio for you.

Cook this mixture over medium high heat for about 5-10 minutes, until the mixture is at a full boil (remains boiling even when you stir).

Add the rest of the sugar and allow it to come to a boil again. Don’t raise the heat too high, though, as that creates more foam. Keep at a full boil for 1 minute. Speaking of foam, feel free to scoop that off and toss it in the sink. It’s just bits of jam with too much air.

Remove from heat and test for thickness. Do this by keeping a teaspoon in a glass of cold water. When you take the saucepan off the heat, dip the spoon to get a bit of jam and let it cool to room temperature. If it looks thick enough, hooray! If not, add a little more pectin and cook a bit longer.

When the jam is cooked to perfection, use a funnel to move it into the jars. If you plan to use and eat or give away the jars to people who will use or eat them right away, you don’t need to proof them. If you want to save them, then…

Proofing!

If you want to make more than a jar or two, you’ll likely want to proof (or seal) your jars to get rid of all bacteria and allow them to sit safely on the shelf without going bad.

To proof them, fill with jam, screw on the lid and ring, and place them into a big pot of boiling water. There should be a few inches of water over the top of the lid. Depending on the jam, they will need to proof for different amounts of time—check online. When the time’s up, remove them from the pot and let them sit out and cool overnight at least. Within 30 minutes, you should hear a “pop” to tell you the can has properly sealed—if not, keep it in the fridge and eat it soon. Aside from a big pot, you’ll probably want something to lift them out of the boiling water (I used big tongs once, but then I went to Target and got an actual jar lifter and it was fantastic).

Tricks and Tips

Jam-making includes a lot of equipment and, for that reason, it’s super helpful to have everything lined up and ready to go. Make sure you have your sugar and pectin measured out and lots of oven mitts and hot-thing-holders on hand. Your jars, lids, and twist rings should be clean and ready, too.

You also want to be aware of temperature. Pouring hot jam into a cold jar could cause the glass to break, so you will want to sterilize your jars while prepping your jam. I usually do this by allowing the jars to boil away for about 10 minutes in a big pot on the stove while I’m cutting up the fruit. If I’m just making a few jars worth and not planning on proofing, I wash the jars in hot water to warm up the glass while the jam thickens.

Depending on the fruit you are using, your jam will be different consistencies at different temperatures. I found, for example, that blackberries thicken up nicely in the saucepan and stay at a similar consistency in the fridge. Strawberries and prickly pears (the fruit of cacti), however, don’t seem to thicken much in the saucepan, causing you to bite your nails and continue adding pectin, which all comes together strongly when the jar is cooled, making your jam a bit stiffer than desirable. So don’t worry if it doesn’t thicken like you think it should—it could just be the type of fruit. Do more research online.

Finally, note that pectin will lose its magical thickening abilities if you up the recipe too much, so work in small batches. The recipe I provide above is about as much as you want to do at one time in one pot. But there is no reason not to have two pots going at once!

3. Pastry Cream

Why Make It?

Pastry cream, though super delicious, probably seems like something that Julia Child or Martha Stewart would make, not you. What do you do with it anyway? Well, if you’re like me, you use it to impress your friends and neighbors! Obviously pastry cream is integral for tasty pastry creation, if you’re working on fruit tarts or Danishes or donuts. But it is also an integral ingredient in a very simple, very fun, very beautiful dish know as a trifle. This dish is meant to be made ahead and then refrigerated, making it easy to bring to potlucks and get-togethers, impressive and convenient to serve at a dinner party, and fun to assemble and eat with groups for a bridal or baby shower or a birthday party.

Pastry Cream Recipe

You’ll need:

  • 2 cups of milk/cream (I usually combine 1 cup of whipping cream and 1 cup of milk; half and half works too)
  • ½ cup sugar
  • Pinch of salt
  • 5 large egg yolks (save the whites – you can make an omelet later!)
  • 3 tablespoons cornstarch (flour is fine too)
  • 4 tablespoons of butter (1/2 a stick)
  • 1½ teaspoons vanilla extract


Before you start cooking, prepare an ice bath to quickly cool your pastry cream. Get two large bowls, one slightly (but not much) bigger than the other. Fill the bigger one with cold water and ice and float the small inside the larger. Finally top it off with a mesh strainer balanced on the top. Put this ice bath to the side for the end of your recipe.

Heat the cream/milk in a saucepan until simmering. Watch out! Milk comes to an overflowing boil within seconds of starting to simmer. Keep an eye on it.

Whisk the sugar, pinch of salt, and 5 egg yolks together in a large bowl. You want to whisk for a good long time, until the mixture turns more of a paler yellow than the brighter yellow it started out as. Add in the cornstarch/flour.

If the milk has started to simmer by now, please, feel free to remove if from the burner and turn off the stove.

Now it’s time to combine the two mixtures. Be careful—doing this too fast will cook the eggs. You are going to do a process called tempering, in which you add a little bit of the hot milk/cream to the egg, sugar, flour mix to slowly warm it up. Drizzle about a tablespoon of hot liquid into your bowl and immediately whisk it to spread the heat evenly and avoid cooking one small spot. Repeat this a few times—you should be whisking for as much of this time as possible. I usually add about 1/3 of my cream this way.

When the mixture seems to be fairly warm, use a spatula to scrape the mixture back into the saucepan with the rest of the hot milk/cream. Return it to medium heat. Using a whisk or silicon spatula or wooden spoon, stir constantly while the mixture cooks. You are heating up the cornstarch/flour so it thickens the mixture, plus kills any bacteria in your eggs.

Continue whisking, even though you are super bored, for about 5 minutes. It could take longer or shorter, depending on the temperature of your ingredients. If you let it sit, you will scorch the bottom of the pastry cream. You’ll know it’s time when you see these cool-looking, thick bubbles of pastry cream in the saucepan. When you see that, continue for 30 seconds to a minute longer, then remove saucepan from the burner.

Off the stove, add in your butter and vanilla, and stir to combine.

Now, turn to your ice bath. Use a spatula to scrape the custard into mesh strainer, to get rid of any lumpy bits. It won’t fall through on its own, so you’ll need to hold the strainer and use the spatula to push it through.

Allow it to sit 10-15 minutes and cool a bit, then take plastic wrap and cover the bowl. Make sure the plastic wrap comes down inside the bowl, pressing against the top layer of pastry cream and coming up the inside sides of the bowl. Sounds weird, but this keeps the pastry cream from developing a skin. Allow it to set for at least 3 hours in the refrigerator.

Tips and Tricks

Believe it or not, this is one of the easiest fancy things to make. As long as you don’t add your hot milk to your cold eggs too fast or cook the final product without stirring, your pastry cream will be delicious.

To play with other flavors, consider soaking herbs in the milk/cream while it heats. Mint is delicious, but basil and even rosemary create a really unique and tasty final product. Make sure you remove the leaves before combine the milk with the eggs and sugar.

You can also add chocolate chips at the end with the butter and vanilla for a tasty chocolate-y flavor!

And that’s it! Hopefully you will be breaking out your saucepan for more exciting things this weekend!

Holiday Baking Bliss

For many people, cooking and baking can be anxiety-inducing enough, without the added worry of subjecting your dish to your friends and loved ones for scrutiny. If you don’t find holiday baking bliss in here, let’s at least shoot for something below a panic attack when the next potluck invite comes your way.

When I was 11 years old, I made brownies in my best friend’s kitchen using my mom’s battered old copy of The Joy of Cooking. Let me tell you, Irma S. Rombauer doesn’t coddle you along. If you are reading her recipes, she assumes you know some basics. Except, well, I was 11, and my friend was 12, so we knew nothing. Which is why, after melting our Hershey’s bars in the microwave to get that rich, chocolaty goodness, we just dumped the mess into our batter, which (little did we know) instantly curdled our eggs—ultimately creating brownies that tasted like a chocolate omelet. This perhaps sounds better than they tasted, which was God-awful.

Now, most cookbooks and recipes that you will read nowadays know better than to assume that little girls and boys grew up learning how to “Do Things Properly,” but just in case, let me take a moment to impact some basic kitchen wisdom.

Measuring

  • Liquids should be measured in a liquid measuring cup, preferably Pyrex brand because they will live longer than you will.
  • Solids can be measured in measuring cups, but make sure you adhere to additional rules
    • Flour (and really, powdered sugar as well) should never be scooped up from the bag with the measuring cup. Instead, spoon it into the cup one scoop at a time with a regular tablespoon. When you have a little hill over the top of the measuring cup, tap the back of a butter knife on top and smooth it out. This is to make sure you do not compact the flour.
    • Brown sugar, on the other hand, must always be compacted. Press it into your measuring cup with your fingers or a spoon so that when you dump it out, it somewhat holds the shape of the measuring cup.
    • Granulated sugar (which is the baking name for plain ol’ white sugar), chocolate chips, baking soda/powder, peanut butter, whatever else can all be simply scooped with your measuring cup.
  • Though spices can be estimated, please do not estimate baking powder or soda. Adding too much or too little can keep your baked good from rising properly. These powders react with the liquids of your recipe to create air bubbles, which elevate your batter. Not enough powder and you have too few air bubbles. Too much powder and you get too many bubbles, which pop each other, collapsing the dish. And what’s the difference between baking powder and baking soda, you ask? Baking soda is a basic (as in pH) sodium bicarbonate, which needs some sort of acid in the recipe (often lemon) to react while baking powder is baking soda with a dry acid mixed in, which activates when wet.


Mixing

I have been watching Gordon Ramsey’s Ultimate Cookery Course, which has been utterly delightful and extremely informative. He knows his stuff. But I was appalled when he was making blondies (cookie dough in a single casserole dish) and just threw all the ingredients willy-nilly. Dumb idiot, that’s not going to rise! And it totally didn’t! And still, it was on TV! Let’s not make the same mistake:

  • Mix “wet” ingredients (butter, sugar, eggs, milk, melted chocolate, vanilla, etc.) separately from “dry” ingredients (flour, baking soda/powder, cocoa powder, spices, etc). This is critical for the dry ingredients, so that the baking soda/powder gets fully distributed throughout the flour (remember, those air bubbles are everything for presentation). It’s also beneficial for the wet ingredients as well, which sometimes need a pretty thorough beating, which you don’t want to give them when dry ingredients are in there, too.
  • “Why can’t I mix dry and wet ingredients for too long?” you whine. Well, when you mix dry and wet ingredients together, you are forming the glutinous bonds that will hold your treat together. If, however, you form too many glutinous bonds, your treat will be super tough and unpleasant and all your friends will hate you. Typically, recipes counsel you to mix “until just combined,” which I will repeat. It’s mixed when it looks homogenous.
  • Tempering. This is a scary word to some and it is part of Intermediate Baking. But not to fret. I taught 4th graders how to do it and I can teach you too. This is the skill that was missing from my repertoire during the infamous Omelet Brownie Debacle.
  • Here’s the situation: you have a hot thing (usually chocolate or hot cream) to which you need to add to a room temp or colder thing (usually containing eggs). What you want to do is slowly raise the temperature of the eggs by adding just a bit of that hot liquid (like 1-2 tablespoons) to your cooler thing, while whisking constantly. This will warm the little eggies up gently. Scoop up more of that hot liquid (go ahead and use ¼ cup this time) into the now-less-cold liquid and keep whisking. Keep doing this until both are completely combined and you are ready to continue the recipe!


Mise En Place

This is a French phrase that means “everything in its place” and it is the crux of kitchen bliss. Not only does it mean that your kitchen is somewhat organized when you set out to cook, it also means that you are ready mentally and physically.

That means that you have read the entire recipe already. That way, when you get to the phrase “chill overnight or for 8 hours,” you won’t start swearing because your party starts in 30 minutes. Seriously, read the whole thing as soon as you decide it’s what you wanna make.

Make sure you have your ingredients ready to go. Have your butter and eggs out on the counter (they ideally should get to room temp, anyway), have your measuring cups clean and ready, have your pan greased and your oven pre-heating. If you want to be super smooth, put pre-measured ingredients in little prep dishes. This will make everything so, so much smoother. Little things like this can make the difference between sipping your wine while tapping your foot to jazz and getting flour in your hair just as you start screaming!

Let’s Bake!

For the holidays, people love certain seasonal staples. Cooking/baking “in season,” meaning the produce is freshest at this time of year, will absolutely boost the taste of your food, especially if you buy from your local farmer’s market.

Try baking with the following produce, in season during autumn and winter:

  • Citrus fruits (clementines, oranges, lemons, limes, tangerines)
  • Kiwis
  • Pears
  • Apples
  • Persimmons
  • Dates
  • Chestnuts
  • Squashes (acorn, spaghetti, butternut)
  • Cranberries
  • Jujube
  • Pumpkins
  • Pomegranate


Recipes to Try

I have not tried all of these recipes but don’t let that stop you! Find something that looks doable and delicious and you’ll be achieving baking bliss in no time!

  • A delicious, unique collection of recipes can be found at mom.me
  • Two recipes with pomegranate seeds: Chocolate Pomegranate Clusters and Orange Pomegranate Bread
  • 15 fantastic pear recipes from one of my go-to recipe sites, Real Simple
  • Chestnuts can be intimidating, but also delicious and unique! Plus, Trader Joes sells them all ready to go! Try Chocolate Chestnut Torte or Chestnut Cupcakes (for piping frosting on all pretty, spoon it into a Ziplock baggie and cut off one of the corners for an instant piping bag!)
  • Persimmons make fantastic bread and cookies, but be careful! Fuju persimmons are squat and flat at the bottom and can be eaten like a stone fruit, when orange and slightly softened. Hachiya persimmons, however, will leave a dry, cotton-y taste in your mouth and taste super tart if not ripened to mushy softness. The latter are the most commonly used for baking and taste fantastic when allowed to fully develop. Try them in cookies and bread.
  • Check out this tasty compilation of sweet squash based desserts!
  • Cranberries pair beautifully with sweet flavors. Try Pear Cranberry Crisp or Cornmeal Biscotti with Cranberries and White Chocolate
  • If you are feeling exotic and adventurous, try a dessert with the Chinese winter fruit jujubes, like the Jujube Tart with Walnut Cream. The jujube has the consistency and taste of an apple and looks wrinkled like a date. A larger farmers market should have them.


Contingency Plans

Help! Help! My dish failed and I have 30 minutes until my event! Okay, okay! Try this!


You are now ready to prepare and consume a delicious holiday treat that will impress and satisfy your friends and neighbors and banish your enemies into a vortex of shame at their inferiority. Go forth and bake!

Photo by Andy Sutterfield

Photo by Andy Sutterfield

Baby’s First Building Project: from Folding Chair to Bar Cart

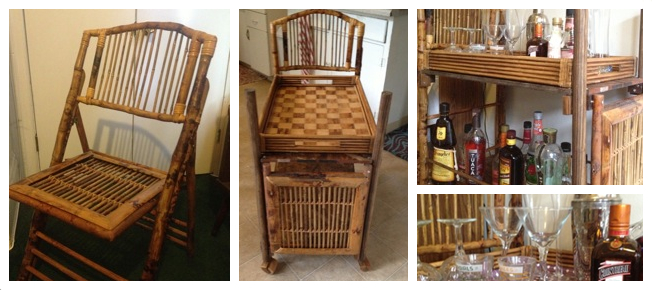
Dinner party with a dozen or so close friends, all gathered in the dining room of my house. Various friends and roommates bustle around, getting food on the table and pulling up chairs. Someone inevitably reaches for the bamboo folding chair and I tense up, clutching the plate of Brussels sprouts I’m holding. Our guest flips the chair open with a caviler flick of the wrist, drops it in front of the table and plops down heavily. My face contorts in an anguished wince as I hear the mournful creak of the old, vintage bamboo as it bends under the weight of our unsuspecting guest.

Bar Cart

After this scene had replayed itself several times, I began to wonder. Sure, I didn’t like seeing the pretty, antique bamboo chair that I had thrown down 20 bucks for at Urban Ore subjected to the torment of being sat on. However, it had occurred to me that this was, in fact, the primary function of said chair, and perhaps I should either come to terms with that fact or get rid of the thing.

Needless to say, I sat on this knowledge for a good year or so before springing in to action. And when that day came, I did not take either of the equally undesirable actions I had presented to myself. Instead, I thought, I should repurpose it into something. Something awesome. And finally, one day, after spending a good 2¼ hours pining over bar carts on Pinterest, I leapt to my feet, shouting—“I could use my bamboo folding chair for this! I could use it to make my bar cart!” Eureka.

Now, as the title suggests, I did not go into this endeavor with a whole lot of knowledge or experience. I had used a drill, which was great, and I had been to Home Depot before. That was fine, though: I used my networks, consulting with friends, family, and the Internet.

Starting from the brainstorm stage, I took the chair apart and maneuvered it to try to figure out how, exactly, my finished product would look. This also allowed me to take stock of what else I would need to buy to complete my project. Speaking from the wealth of experience I have gained by building exactly one item, I think that having something tangible to manipulate while you brainstorm can really help you visualize what you want and how you can get there.

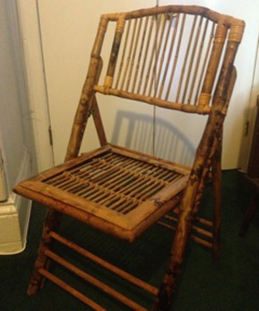
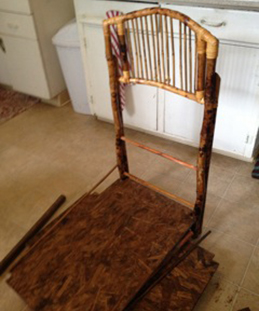
Original chair! Chair in pieces on my floor as I brainstorm how to put it together. My wood shelves are there too.
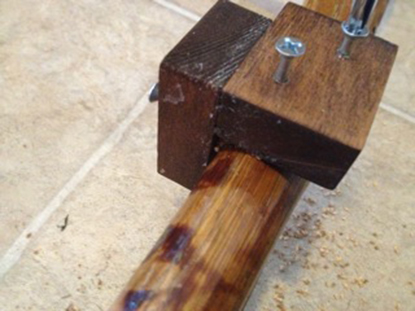
Here are my “L”-shaped supports for the wooden shelves. I just bought a long pice of rectangular wood and cut it into 2 inch pieces.


Per my dad’s suggestion, I also measured the materials I had and drew out a sketch, complete with piece measurements and where screws would go. This piece was invaluable—I referred to my sketch often throughout the process and you will too, should you take the prudent route and make a sketch for your own building project. Furthermore, my father’s experience and advice were extremely helpful: no doubt, I would have made a shoddier product were it not for a few of his suggestions. I definitely recommend going over your plan with an acquaintance who has even a tiny bit of experience building something.

In that same vein, when you go to the hardware store to purchase your materials, I also recommend conscripting an employee to help you. This person knows what they are talking about (most of the time, and if they don’t, find someone new). They can help you find the cheapest and best way to get what you need, which can save you money and time. In my experience, hardware stores are way too big and have far too many options for beginners.

Beginning the work back at home, I found the old adage “Measure twice, cut once” to be the best possible advice one could give—­particularly after I had to return to the hardware store after failing to abide by it. Once I finally had my pieces cut and ready, I laid them out to stain them.

A few words about wood staining: It took awhile to stain my pieces and let them dry before I could put the piece together, so if you will be using wood stain or paint, be sure to allow for the necessary time and plan a nice, outdoor place for them to dry without asphyxiating yourself. Also, if you use stain, know that you cannot just throw away the cloth you use, as wood stain is crazy flammable. You have to soak it in water and then do some hazardous waste disposal. (When someone writes an article on how to do that, I’ll let you know. And then, I’ll also finally be able to throw out the small can of water and used stain rag that is currently sitting on the floor of my pantry.)

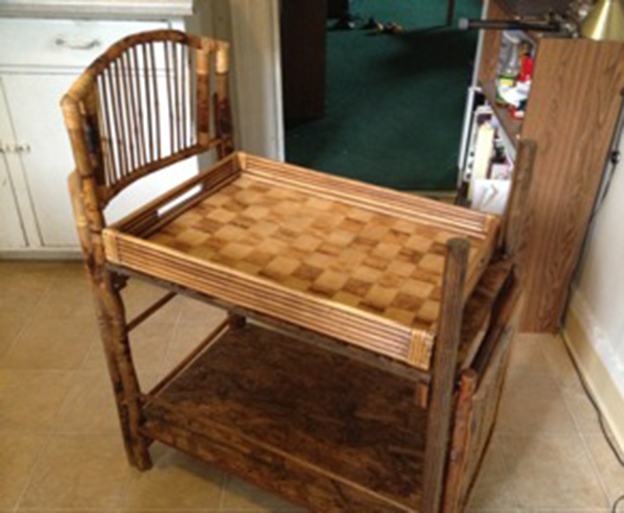
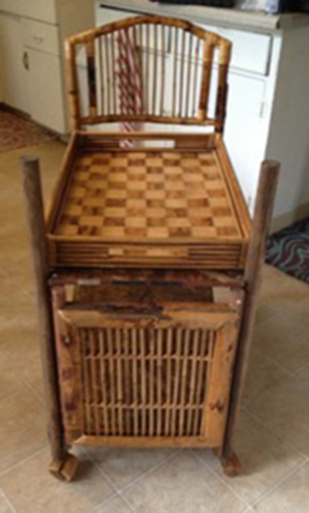
Finished product, with awesome tray!

Finished product from a new angle – The back of the chair is farther back in the photo, and the seat of the chair is attached right there in the foreground.

While the stained wood was drying, I began to drill my holes. First, I drilled small holes to make and connect little “L”-shaped supports to set the shelf on. Getting those to be even took several rounds of measuring, recruiting people to hold things to getting, using the level, swearing when it wasn’t level, and measuring again. When I finally had those lined up and screwed on, I had a bigger drill situation to attack. I had, by beautiful, divine providence, come across the perfect bamboo hostess tray to sit at the top tier of my cart at an antique store. Perfect – things would now stay put stylishly. However, I still needed a way to keep the big bottles of rum at the bottom to feel and look somewhat secure. I decided to get two dowel rods, stain them, and make a little railing for the bottom tier.

At this time, I learned quite a bit about the drill that I didn’t know. After attempting to drill a hole big enough to fit my ¾ inch dowel rods only to have the drill whine and sputter at me, I learned that it is necessary start with a small hole and enlarge it gradually by using an increasingly larger bit to grow the hole. Though this may seem super obvious, it took me quite some time to figure it out, so I thought I’d save you the trouble. You will not be able to drill a ½ inch hole directly into solid wood. Start with 1/16 and work your way up. Since I was drilling on my beautiful antique chair, I did some practice drills on spare wood to gear myself up for it. Definitely would do again – I learned the hole enlarging tip that way and saved a bunch of heartache.

After all this crazy work of staining, drilling, and leveling, I could finally assembly my cart! I took the beautiful back of the chair propped it up and the “pushing” end of the cart. I used two mega thick dowel rods, stained to match my chair, and fixed them at the other end. To balance the motif of excessive bamboo rods, I took the seat of the chair and nailed it to the barren, dowel rod end of the cart, giving it more life and visual action. Then, I placed my wooden shelves on their little “L”-shaped supports and fit my dowel rods into their now enormous drill-holes and pushed the whole thing together. I dashed in circles around it, drilling anything that made me nervous, until, with a drop of the tired drill hand and a heavy sigh, I collapsed into a kitchen chair. My bar cart was done!

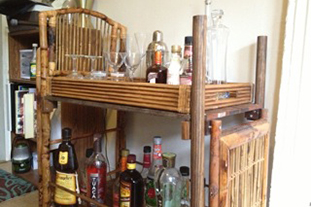
With drinks! And accouterments!

I know there are a million tips and tricks to have a successful building project, and I am still learning so many of them. Still, don’t forget to sand your edges to avoid splinters. Don’t screw screws in too close or the wood will crack. Don’t screw them into slivers of wood too small, either, or the same thing will happen. Use a level so your finished product doesn’t tilt. If the vintage wheels don’t go on, just keep hammering until they do. If you wander antique stores long enough, you’ll find exactly what you need. Make sure, at the end of your project, that you have someone with you whom you can excitedly scream at to “come look” every 5 minutes or so.

And good luck! May your building project bring you as much joy and inebriation as mine has brought me.

Budgeting Your Overwhelming Trip Overseas

As I demonstrated in part one of this topic (Planning Your Overwhelming Trip Overseas), when it comes to trip planning, Effie Trinket has nothing on me. I charted a course for my best friend and myself through Paris, Rome, Florence, and Venice, scheduling in every sight we wanted to see and restaurant we wanted to eat at. In two weeks. On a student budget.

traveling square

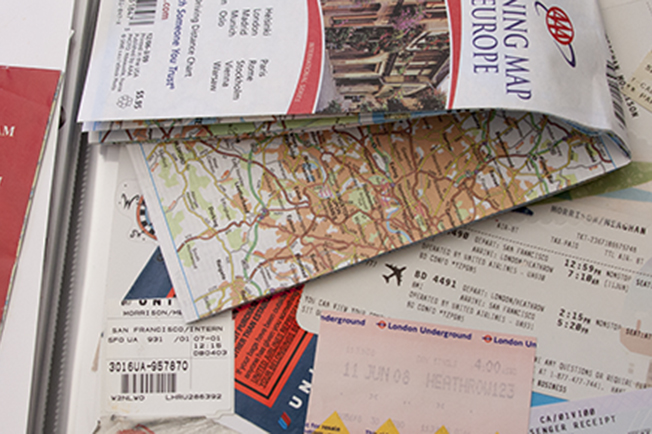
Photos by Remi Coin

Since my first installment was an overview on how to approach planning a trip abroad, I wanted to follow up with a deep dive on how I budgeted the trip. It can be tricky knowing where to splurge and where to pinch! Again, this article comes from my personal knowledge traveling France and Italy, but these tips can definitely be of use when planning any trip.

When you start budgeting your whirlwind trip overseas, break down your choices and approach them step-by-step as you estimate and add up prices. Naturally, every traveler will have personal preferences on where they want to save money and where they want to go a bit crazy. My friend might have rolled her eyes at me when I laid down 40 euros to make a necklace of hand-blown Murano glass beads in Venice, but I maintain that maybe she didn’t need a ¼ liter of wine at every meal, either! It was no big deal, though, as neither of us expected the other to pay for something huge unless we both wanted to. Make sure to plan what you want to spend the most on, and consult with your travel partner(s) so no one is taken by surprise.

1. Airfare – This will likely be the biggest price tag, with round trip plane tickets overseas easily going into the thousands of dollars. You can save a lot here by planning ahead! Studies have suggested that the optimal time to buy plane tickets is either weeks in advance and that tickets are pricier in the morning (when business people are typically booking on the company dime) than in the afternoon (when future vacationers come home from work and plan their own trips). Websites like Kayak, Expedia, and TripAdvisor can also help you find cheap airfare by allowing you to plug in numbers and play around with different airports in nearby cities and compare prices from many different airlines. These sites even let you set up notifications for certain flights, so the site emails you if one of your saved flights lowers in price.

2. Accommodations – Depending on your comfort and safety preferences, the cost of your accommodations can vary greatly. If, like many young backpackers, you are planning on hitting up the local hostels, you still have a wide range of options. Websites like HostelWorld and HostleBookers can be hugely helpful in finding accommodations that fit your preferences and budget. These sites have listings for tons of places and come with reviews, photos, lists of amenities, rates, availability, and maps to show where you’ll be in the city and where public transit is located—everything you need to plan your trip.

When I was sorting through this wealth of information and options, I considered price and location first and foremost. Often, the cheapest accommodations are distant from the main attractions and events the city has to offer. Do some research into the city’s public transit: is there an easy way for you to get where you want to go, and does the transit run as early/late as you’ll need? Also, keep in mind that staying out all day without a stop at “home base” can be draining. My friend and I went abroad during July and were often hot and exhausted after lunch. Finding a park to nap in became a frequent routine that was critical to our enjoyment of the rest of the day. If that doesn’t jive with you, make sure you’ll be able to head back to the hostel fairly easily when and if you need to.

Aside from price and location, it is also important to consider the atmosphere of your accommodation. In Italy, we stayed in a vastly different hostel in each city. A Venice Fish was a communal, hippy-ish house full of excitable, partying Australians. After Venice, we stayed in PLUS Florence, one of a chain of hostels under the PLUS name. Though we were worried that it would feel distant and corporate, it turned out to be an awesome experience and it was very geared towards ease of the traveler, with everything from a money exchange at the front desk to preplanned daytrip offers for the guests. In Rome, we stayed in these cabins outside the city. About half of them seemed to be populated with other travelers, while Roman citizens rented the other half to temporarily escape the hustle and bustle of the city. This seemed like it would be a really relaxing stop at the end of our trip, but since the cabins were sorted by type of occupants, we ended up in one end of a duplex shared by five or six enormous bros who drank and listened to dubstep until approximately 4 o’clock each morning. In short, even though you will never know exactly what a place will be like until you get there, you are going to be spending a significant amount of time at your accommodations, and it is worthwhile to scour reviews and photos to find a good match for your personality and preferences.

3. Travel within City/Country/Continent – This item varies a lot depending on where you are going. In some places I’ve been to, like West Africa, one could take daytrips from a central location very cheaply and easily, but traveling from country to country took either a good deal of time (a few days) or much more money (flights around Africa are nearly as much as flights from North America to Africa!). However, traveling around Europe was (relatively) cheap and, because it is such a frequent destination for people in their 20s taking a modern-day Grand Tour, there are many discounts available to young travelers. RailEurope is an excellent tool to plan and book tickets, as you can layout your trip and get price quotes for each leg or find special offers that help guide your planning. Another benefit is that you can buy passes that will work on any one of a number of given days. That means if you decide to stay an extra day or leave early from a city, all you have to do is look up when the next train comes and hop on!

Once you’re inside your chosen city for a few days, you’ll want to get around to all the sights. You can certainly take taxis everywhere, but most of us just don’t have that kind of money, or we would rather spend it on awesome stuff instead of a yellow car that smells like cigarettes. Getting familiar with the city’s subway or bus system is a must. The bonus to this is that you can spot the deals ahead of time and get the most ride time for your money. Our lack of foresight in this aspect of our trip was what ultimately led to our ferry ticket in Venice, as we were trying to make it back to a station large enough to have 5-day passes for sale without having to purchase another one-way pass. C’est la vie! But it is a fate you can now avoid.

4. Food Budget – I am a huge foodie, make no mistake. A big part of traveling for me is trying the weird things they like to eat there and the classic foods for which they’re famous. That being said, I revolved my Italy/France trip around art, not around food. Still, I was able to find a plethora of tasty food options all over every city. For me, the Rick Steve’s guide to Europe was invaluable. It (and other travel guides like it) collects the tastiest and most interesting food options and sorts them by neighborhood and price. With short descriptions of the restaurant’s atmosphere and fare and a little pricing scale, we had no trouble choosing a restaurant just a short walk from wherever we were.

When planning ahead for a budget, it’s extremely helpful to use these guides and the benefit of your home Internet to plan ahead a bit and check out the online menus and price lists of the type of restaurants where you plan on dining. Though there is, of course, no need to commit to a specific restaurant tour just yet, this will help you estimate costs and allow you and your travel partner(s) to consider where to save and where to splurge.

5. Attractions and Shopping Budget – This part is very broad and very dependent on your interests, budgets, and need to bring home cheesy souvenirs for your loved ones. Keep in mind that you will possibly be paying for things like entry fees for museums, covers for bars, tasty bottles of wine, key chains that say “I ♥ NY,” and other things that spark your interest. Consider your buying habits and maybe even make a list of what kinds of things you plan to purchase while on vacation, so you can more easily budget your money for those items and not buy the first 20 euro Eiffel Tower paperweight you come across.

As for attractions, the Internet is the perfect resource for discovering that admission to the British Museum is free but a ride on the London Eye costs 26 pounds. You can also often find similar tourist deals as you did for transit—for example, the Paris Museum Pass gives you free entry, with skip-the-line privileges, to over sixty Paris museums and monuments. That is something I wish I had researched before spending two hours outside the Musee d’Orsay.

In closing, plan your budget, stick to it when you can, and most importantly, have fun!

Photo by Remi Coin

Photo by Remi Coin

Planning Your Overwhelming Trip Overseas

When the Venice ferry stopped at the Rialto station and several Italian men in serious-looking uniforms boarded and started checking people’s tickets, I thought, “Man, I coulda planned this better.” My best friend and I did not have a ticket for that particular ferry, and we were promptly and sternly written a 70 euro ticket (each!) and deposited—red-faced and stammering excuses—at the next stop, a 45 minute walk from our hostel.

When traveling abroad, it can sound fun to go with little to no plan. It sounds very romantic and exciting to frolic about Europe (or wherever you’re headed) with every intention of going wherever the winds of adventure take you and departing whenever these winds happen to blow. That might work out really well for some people. For most of us, though, that might lead to being stranded in Milan with no money, no place to sleep, no plane ticket home, and numerous bags of expensive Italian dresses.

I consider myself a fairly thorough trip planner and, aside from the misstep with the ferry police, my 3-week trip to Paris, Venice, Florence, and Rome was amazing and filled with safe, clean hostels, cleverly-purchased transit tickets, top-notch food, and a plethora of art and activities for the student budget. How did I plan it, you ask? That’s what I’m here to tell you! Though this article comes from my personal knowledge traveling France and Italy, these tips can definitely be of use when planning any trip!

Step 1:

Make a “Places to go, Things to see” list. If you are going with a friend or group of friends, it is important to consult with them early about this. Maybe the biggest problem you’ll face is that your friend digs architecture while you want more paintings. Maybe, though, your friend wants to hit up every DVNO nightclub he can find, while you expect him to get up for your 6 am snorkel appointment. Even if you are good friends, it’s important that you discuss styles of vacationing (I’m a big “main attractions” and “foodie spots” girl; others are into nightlife, outdoor adventure, leisurely relaxation, etc.), as well as pace of vacationing (squeeze in 3 museums, 1 monument, 2 long meals, and a play every day or slow it down some?).

Step 2:

Narrow down that list to fit in to your budget (both time and money). Again, pace of the vacation plays a big role here. If you want to fill each of your days to the brim, go for it! Just be wary of wearing out. Also keep in mind the locations of all these “must sees.” If your budget allows you to hit up every European capital and then go to Greece before heading home, that’s awesome! But most of us can’t make that happen. Remember that it costs both time and money to move around a country or continent, and it might ultimately be worth it to you to skip out on Madrid in order to spend two more days in Barcelona.

As you research, you will probably have to do steps 1 and 2 several times, but that’s okay. Better to go to wherever you’re going with a practical sense of what you’ll be able to do, rather than be there and either spend your time running around like crazy or leave fuming about missing the second, smaller Jewish History Museum in NYC.

Step 3:

In order to do step 2 more effectively (and you’ve probably already done this), it’s now time to start making choices and estimating and adding up prices.

  1. Airfare – Use sites like Kayak and TripAdvisor to find the cheapest airfare. You can even set up alerts for your chosen trips!
  2. Accommodations – Hostels are the way to go for the discerning, frugal traveler. Websites like HostelWorld and HostleBookers can help you out with reviews and amenities of tons of places.
  3. Travel within City/Country/Continent – Look for youth and student discounts for trains. Also, most city subways and bus systems have a week long traveler pass for a discount.
  4. Food Budget – If you want to splurge on food, plan on it and save! Also, use Yelp or travel books to figure out how much your average meals will cost to budget.
  5. Attractions and Shopping Budget – This will be very different for different types of travelers, but planning it out will help you stick to a budget.

I’ll share more on these next week in my article about Budgeting for your Overwhelming Trip Overseas.

Step 4:

Chart out your course. Now that you have brochures, maps, bookmarked webpages, some sort of budget, and hopefully a travel guide (believe me, I used mine everyday!), you are ready to set out an itinerary. “But,” you protest, “I don’t want to plan out every millisecond of my trip! I want to play some things by ear, check out the local scene, have some freedom!” Of course you do—this is your vacation after all. However, planning ahead, even with a vague sketch of a plan, can save you a lot of money and can help ensure that you make the most of your time abroad, so you never have to say, “Man, I wish I knew that electro K-pop festival was coming to Berlin before I left for Moscow.” Which is a thing I am sure countless disappointed electro K-pop fans have said.

When charting your course, your finalized list of necessary stops and cities is invaluable. You want to amp up the research at this stage, looking into the goings-on of these cities. Are there festivals or events or holidays you really want to be there for? Are there any of these that you want to avoid? I was in San Francisco for Pride a few weeks ago and, let me tell you, I did not envy the clueless tourists trying to navigate BART to get to the airport with 80 pounds of luggage. You definitely want to avoid experiences like that—though enjoying Pride in the city on foot with nowhere to get to except for your hostel that night would be awesome.

Of course, you also want to use logical proximity to chart your course. Keep in mind the general order of your destinations. Also, decide if you want to do a circular route so you can fly in and out for the same city (cheaper) or a straight route from, say, London to Budapest (no backtracking, but pricier airfare). Like I said above, you can often tweak your plans for hopping from city to city and country to country, especially with an open rain pass. That way, all you need is the general timeline of your trip and you can change the rest to suit your whims.

Some people (me, for instance), are a bit more diehard in the planning department. I know that my traveling style is squeezing every last drop out of cities, and with that trait comes a bit of a micromanaging vacation planning style. In a three-day trip to London, I managed to get in more than my travel partner would have done in a week on his own. If this sounds like you, then you will be doing even more research. Which night is 80s night at that club? Pencil it in. That antique store closes on Mondays? We’ll do the zoo that day instead. The tactic I found most useful for my short London trip was to jot down the times each of my necessary attractions was open and pin those times to a tourist map. Then, I used iCal (no Google Calendar yet, but that would have been perfect) to set aside times to do each item on my long list. I moved everything around based on open times and location until I had a strict 9:00 am – 8:00 pm schedule for each day, squeezing in Harrods, Buckingham Palace, Parliament and Big Ben, the London Eye, the Tower, Westminster Abbey (my favorite!), the British Museum, Saint Paul’s, the Globe (play included), Covent Garden, and Hampton Court Palace. Probably you fall somewhere between that (my highest level of dedication to trip planning) and complete laissez-faire (homelessness in Europe, basically). Do the level of charting that seems appropriate to you to make sure you feel comfortable and confident but not overwhelmed.

Step 5:

Get out of here! You’ve set a plan for your adventure, you’ve got your tickets, your passport is burning a hole in your pocket—it’s time to go! But, before you do, remember: not everything will go according to plan. The Eiffel Tower might be closed for maintenance, the Great Wall might have crumbled a little bit, Venice might sink! Your superb planning cannot account for every little thing, so it’s important that you roll with the punches and stay flexible.

That can get tough sometimes, but remembering that you’re on vacation and it is your job to have fun (or at least be relaxed) can often help. Even if things don’t “go wrong,” don’t be afraid to change your plans. You can have an amazing, unexpected adventure that way! One of my favorite days in Rome was one when we were too tired to navigate the city on our own and signed up for a bus tour of a vineyard with our hostel. Totally unplanned, totally amazing.

Stay sensible, stay safe, and most importantly, have fun!

EuropeSquare

Give Brussels Sprouts a Chance

Brussels sprouts (aptly named for their prevalence in Belgium in the 16th century) are often considered the epitome of gross food. Every time a cartoon character has to eat something icky, every time someone wants to complain about a childhood dinner requirement, every time a parent wants to issue a threat to inspire fear into a child’s heart, it always falls on poor, misunderstood Brussels sprouts to be the bad guy.

This is especially unfortunate because it has implanted a dislike of Brussels sprouts in tons of people who have never even eaten them—or at least have never eaten them prepared well! My father was a victim of this stereotype. Unfortunately, my grandma did not know any better than the boiling method. As a result, my brother and I were spared the vegetable growing up and we assumed that if Dad (a foodie and not the least bit picky) didn’t like them, then they must be pretty bad. It wasn’t until I went to college and really started seeking out new recipes and tastes to take advantage of my kitchen when I discovered how tasty these little guys can be! Now I want to eradicate this damaging prejudice from everyone’s hearts, so all can embrace these delicious and healthy little cabbages.

Luckily, we can be the change we want to see in the world here. First, I will tell you the best ways to prepare the sprouts for maximum deliciousness (including some tasty recipes at the bottom). Then, having (hopefully) seen the light, you can prepare and enjoy some delicious Brussels sprouts to share with disbelieving friends.

The trick to enjoying Brussels sprouts is simple: Do not boil or steam them.

Think of the little guys like tofu—would you enjoy tofu, just boiled or steamed in water? No. (Unless, of course, you like bland things, in which case you probably already like Brussels sprouts: rock on!) The deliciousness of tofu comes from sponging up tasty sauces and spices, and the same holds true for Brussels sprouts. You can add whatever you want to them: brown sugar, balsamic vinegar, salt and pepper, cinnamon and cloves, Worcestershire sauce, whatever, and they’ll taste delicious.

So here is how to prepare them:

1.  Buy a bag at whatever grocery store/farmer’s market you frequent and give them a good wash in the sink.

2.  Place them on a cutting board and use a nice, sharp kitchen knife to cut off the ends—that’s the whitish, dirty-looking end, not the round leafy one—and chuck that in the trash or compost. If your Brussels sprouts look bigger than you would comfortably eat in one bite, you might want to cut them in half lengthwise as well. This also gives them a nice flat side to sit on the pan and get that lovely, brown, roasted color.

3.  Once they are clean and cut, put them in a bowl and pour in a dollop or two of oil (vegetable, olive, or other). You want just enough to coat the sprouts and keep them from sticking to your pan. Then, add in your flavoring of choice: classic salt and pepper, brown sugar and cinnamon, honey and balsamic vinegar—the possibilities are endless. Mix it all up with a spoon (or your fingers). You want the whole surface of the sprouts covered so they can soak up all of the flavors.Many people favor sautéed Brussels sprouts with garlic and onion, shallots, or a tasty meat like pancetta and bacon (see recipes below).

4.  At this point, I like to sauté the Brussels sprouts for about 5 minutes. Sauté is just a fancy French word for cooking in a pan with a tablespoon or two of vegetable oil on a medium heat, and moving them around a bit with a wooden spoon to keep them from sticking.

5.  After sautéing the Brussels sprouts, I like to put them into a 400º oven for approximately 30 minutes to roast them. When you try this method, keep an eye on them after minute 20 and assess how brown they are: you must take them out when they are chewable, but not burnt. Some folks turn them after 15 or 20 minutes to get an even browning, but I like mine with just the cut side browned.

Alternate Option: Some recipes call for you to sauté the Brussels sprouts until they’re browned to your liking. Then add a few tablespoons of water and continue cooking them for another 8 minutes or so. If you choose this method, be aware of how adding water may affect your flavoring.

6.  Pull them out when they’re to your liking and serve!

Some favorite Brussels Sprout recipes:

Remember there are lots of ways to make Brussels sprouts delicious; so don’t be afraid to try different things until you find something you like!