Tag Archives: The Macgyver Solution

A Tale of Two Kitchens: Living With and Without a Microwave

The Microwave Oven. Invented in 1947. Described on Wikipedia as a device that “heats food by bombarding it with electromagnetic radiation.” Though it sounds like something out of a comic book, the microwave is in fact a staple for the young professional, the college student, and the lazy cook.

But there is life beyond the microwave oven for these simple folk.

I would know. I lived without a microwave for a year after moving to Los Angeles. And no, I’m not a big cook. If you open my cabinets right now, there is a lot of instant oatmeal. But I had my reasons for refusing to cave for a microwave.

First, they are kind of expensive for an optional appliance. A quick Target.com search puts them at $55+.  After buying furniture, putting down a security deposit, and starting up my electric bill, I didn’t really want to spend that money. When it came down to the Dirt Devil or the microwave, I chose the Devil.

Also, even quick or instant dinners can be made in a conventional oven—even your Lean Cuisine! It does take a bit longer. You actually have to wait for the oven to heat, and it takes 20-40 minutes to cook instead of three. And there were a few times I may have burned my instant dinner because I forgot it was in the oven. (I was too lazy to invest in a good egg timer—okay, I’m still too lazy to invest in a good egg timer.)

In the end, I still found this cooking technique to be better for me. If I came home from an eleven-hour work day hungry, I would throw something in the microwave and wolf it down. But if I actually have to take my time to heat it up, I eat slower for some reason. Maybe my appetite settles during the cooking process. Without the microwave, I would make big casseroles or veggie stir-fries. I could still reheat them in the oven—even egg dishes like Stratta reheat easily.

And don’t fret: you can pop popcorn and make Ramen on the stove. You don’t even need special popcorn! All you have to do is cut open the bag, pour the kernels into a pot, cover it and turn on the heat. If you have a clear glass lid, it’s even more fun! You can watch the kernels ricochet off the sides of the lid. Kernels in the bag should already be salted and oily but for tips on how to pop and season plain old kernels (not from a bag), Recipe Girl has some great tips.

This does not mean microwaves are evil. You might have noticed I said I “used to” live without a microwave. Yes—I have one now. I acquired it when a friend moved cross-country and couldn’t fit it in her car, so it was free. It is nice to have for defrosting things and reheating leftovers. It is also great for steaming vegetables (certain things just don’t taste good when they are grilled in a skillet on the stove).

But I’m happy I had that year to curb my craving to eat instant pizza every day for dinner, just because it was easy and available. And this microwave takes up so much counter space, I frequently consider giving it to someone else, knowing I could live without it!
MicrowaveHero square

Photo by Meaghan Morrison

No Dryer? No Problem.

I don’t know about you, but I am constantly plagued with wet or damp clothing that I never have enough time to deal with. I always seem to be out of time with a dryer that is nonexistent, broken, taken, or—like in my last apartment—seemingly incapable of drying clothing.

So, in the absence of self-drying clothing, I present you with the following five dryer alternatives for your dryer emergencies:

1. Direct Sunlight

The old school method: lay/drape/hang your clothes out in the sun and watch the magic happen! And by watch I mean go do anything else for six hours because—depending on the amount of sunshine, humidity levels, and temperature—this approach can be painfully slow. Keep an eye on the sun (remember it moves) and make sure to rotate (and/or flip over) your clothes at least once.

If you want to get fancy, use a clothesline. You might be able to find one in your backyard if you live in an older house/apartment building, but if not you can always jerry-rig one out of chairs/trees/fences/poles and some string/shoelaces/ribbons/computer cords. Then drape or clip your wet apparel on the line and let Mother Nature do her work. No super cheap clothespins lying around?  Binder clips, chip clips, and hair claws make for great alternatives.

2. Fan

While the outdoors is always best for maximum wind/sun exposure, if you’re without a yard, balcony, or trustworthy neighbors, you can also take advantage of the sunshine within your home and speed up the process with your favorite fan(s). Personally, I like to use hangers and a metal clothesline (aka my shower rod) or an awesome drying rack. But if that doesn’t cut it just hang your clothes on, or tucked into, other ledges around your home (i.e. dresser drawers, door handles, moldings). NEVER drape wet clothing over lamps. (Let’s just say, I’ve tried it… Two words: burn marks.)

The advantage of this method is that it does not require the sun (making it your best overnight option) and it is entirely environment controlled. Unfortunately, if you’re drying a lot of clothes, this method can take quite a bit of time. If I need dry clothes within an hour or two, I take a more direct approach: draping the clothes straight on to my fan. (This is probably definitely a fire hazard so I’m not recommending it.) Instead, try hanging what you need on the back of a chair, and pointing your fan directly at it to produce the same results.

3. Blow Dryer

You’ll need to own a blow dryer to embrace this option—so guys, you may be out of luck. This is my go to option under pressure—fast, efficient, and effective. It is, however, more labor intensive than any of the other methods. But it can also be a great approach for dealing with any unfortunate liquid mishaps. This will work with your clothes on or off, but for very damp clothing, off is better. I usually stick my blower right into an arm or leg, hold the other end closed, and let it fill up with air, rotating between sections every 10-15 seconds to make sure nothing burns. But again: fire hazard. So instead, let’s both try hanging our clothes in the shower and following the tips recommended by Wardrobe Advice.

4. Heater

This works better in the winter months because let’s be honest, no matter how badly you need that shirt, who wants to turn on the heat in July? (Plus, if it’s summer, umm sun?) I find the heater has a significant set it and forget it advantage over the blow dryer because, as long as you position your clothes just right (or weigh them down) to keep them from blowing off, you can enjoy your cereal from across the room. (Keeping an eye on them for rotation and safety of course.) This method is also especially effective for larger, or heavier articles of clothing (i.e. jeans).

5. Car Heater

Does it really get better than your own personal, traveling dryer? If you own a car, and are absolutely desperate, this may be your best option under extreme time pressure.

First, check and see if your car has a heater vent in the center console (the vent for the back seat). If so, drape your article of clothing in front of the vent (rotating every few minutes for maximum coverage) and voila! Your very own on-the-go dryer.

But, if you’re like me, and don’t have a handy back seat vent, you’re stuck with the dashboard vents. MAKE SURE you take the appropriate precautions for your personal safety and the safety of others before trying this—i.e. don’t be stupid and hold the shirt on your heater while you are driving.

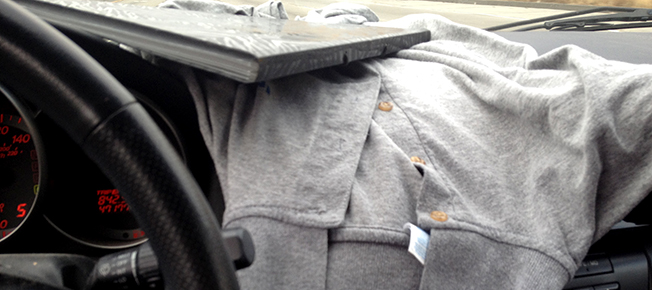
In the above photo, I used a handy expanding file folder (while driving in a straight line) to keep my desperately needed shirt in place. This is clearly not the safest option. Think about using clothespins (or any of the above clothespins alternatives) to keep your clothing attached instead. There is a rotation factor here, so please PULL OVER (or make sure you are stopped) when you rotate your clothing. No dryer emergency is worth a car accident.

Bonus Tip: Need to get wrinkles out?  Hang up your shirt up as close to the shower as you can without getting it wet. Turn the water on to the hottest setting, close the bathroom door, and let the steam give you a wrinkle free shirt in about ten minutes.

dryerhero

Photo by Anastasia Heuer

Disclaimer: This article is meant for your entertainment. You can read the UNDERenlightened’s full disclaimer in our User Agreement.